There are other functions for adjusting the balance between Parts within the Performance or for quickly switching to different groups of settings that have been registered to the buttons in advance.
The Mixing function allows you to adjust the balance between Parts.
The Pan, Volume, and other settings for all Parts are shown on one screen for ease in adjusting the Mixing parameters for the Performance.
The Mixing screen appears.
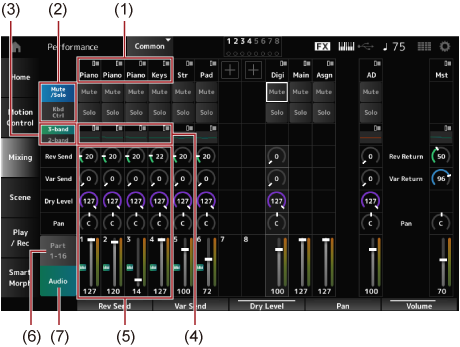
With the Audio part, you can set the parameters for the audio input from the A/D INPUT jacks and the [USB TO HOST] terminal (Digital* Part).
* Refers to the audio set to Digital L/R in audio channels.
If you need to fine-adjust the value, press the [EDIT/![]() ] button while the Mixing screen is shown on the display to open the Edit screen.
] button while the Mixing screen is shown on the display to open the Edit screen.
The Scene is a “snapshot” of various settings, such as Arpeggio type, Motion sequence type, and Part parameters. By registering different Scenes to each of the eight SCENE buttons, you can use the SCENE buttons to recall different settings instantly.
This would be convenient, for example, when you wish to change only the Arpeggio and Motion Sequence types, without changing the Performance, to follow the progression of a song, or to bring out a different aspect of a Performance.
The Scene screen appears.
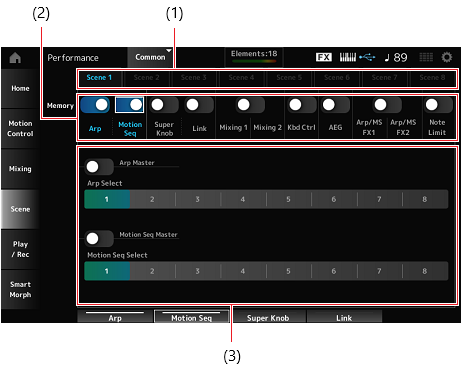
When the Memorize switch is On, the parameters for the function appear on the screen.
The functions to which Memory (Memorize Switch) has been set to On will be registered to the selected SCENE button.
The newly set Scene now becomes active when you press the appropriate SCENE button.
Make sure to save (store) the Scene settings you have just edited before changing to a different Performance or turning off the instrument. Without performing the Store operation, the Scene settings will be lost.
If a parameter that can be registered to a Scene is already assigned to a knob or a control slider, move the knob or the control slider. Then, simultaneously hold down the [SHIFT] button and press the SCENE button. After that, press the [STORE] button to save the Scene settings to the Performance.
 Print this page