Combining audio of another input source with video of the current input source
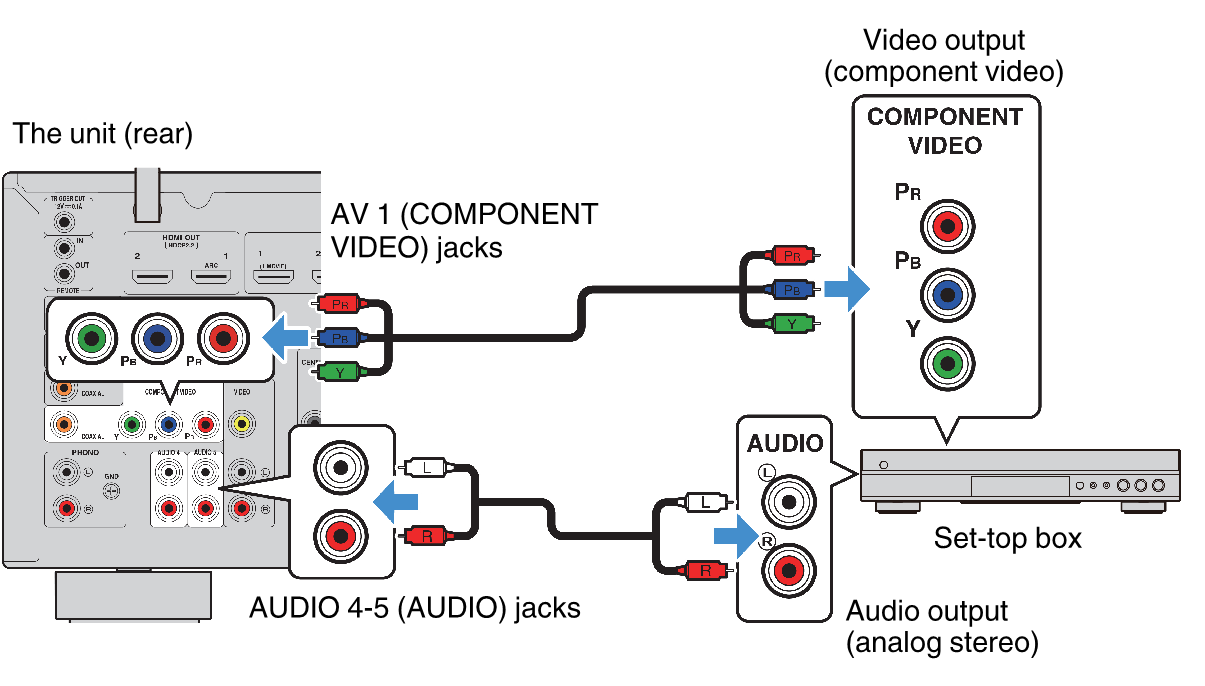
Select the audio of a different input source to play back together with the video of the currently selected input source. For example, use this function in the following cases.
- Connecting a playback device that supports HDMI video output, but not HDMI audio output
Setup menu
“System” > “Audio In”
Input sources
HDMI 1-7, AV 1-2
Settings
AV 1-2, AUDIO 1-5
Video/audio input jacks available on the unit
Output jacks on video device | Input jacks on the unit | ||
|---|---|---|---|
Video | Audio | Video | Audio |
HDMI | Digital optical | HDMI 1-7 | AUDIO 1 (OPTICAL) AUDIO 2 (OPTICAL) |
Digital coaxial | AV 1 (COAXIAL) AUDIO 3 (COAXIAL) | ||
Analog stereo | AV 2 (AUDIO) AUDIO 4-5 | ||
Component video | Digital optical | AV1 (COMPONENT VIDEO) | AUDIO 1 (OPTICAL) AUDIO 2 (OPTICAL) |
Analog stereo | AV 2 (AUDIO) AUDIO 4-5 (AUDIO) | ||
Composite video | Digital optical | AV2 (COMPOSITE VIDEO) | AUDIO 1 (OPTICAL) AUDIO 2 (OPTICAL) |
Digital coaxial | AV 1 (COAXIAL) AUDIO 3 (COAXIAL) | ||
Necessary setting
For example, if you have connected a video device to AV 1 (COMPONENT VIDEO) and AV 2 (AUDIO) jack of the unit, change the combination setting as follows.

- Press INPUT to select “AV 1” (video input jack to be used) as the input source.
- Press SETUP.
- Use the cursor keys to select “System” and press ENTER.
- Use the cursor keys to select “Audio In” and press ENTER.
- Use the cursor keys to select “AV 1” and then select “AV 2” (audio input jack to be used).
- Press SETUP.
- This completes the necessary settings.
- Checking the system information on the unit
- Setting the on-screen menu language
- Setting input sources to be skipped when operating the INPUT key
- Automatically changing the input source names displayed on the front display
- Manually changing the input source names displayed on the front display
- Setting the use of Auto Play function
- Setting sound programs to skip when operating the PROGRAM key
- Setting the function for the PROGRAM key on the remote control
- Setting the unit's functions for the RED/GREEN/YELLOW/BLUE keys of the remote control
- Adjusting the brightness of the front display
- Setting the scale of the volume display
- Setting the use of short messages on the TV
- Setting the image to be used as wallpaper on the TV
- Specifying the condition for the TRIGGER OUT jack to function
- Specifying the output level of the electronic signal transmitted with each input
- Switching the output level for electronic signal transmission manually
- Specifying the zone with which the TRIGGER OUT jack functions are synchronized
- Setting the amount of time for the auto-standby function
- Setting the use of the eco mode
- Preventing accidental changes to the settings
- Updating the firmware via the network

