Using Smart Pianist
Available functions on Smart Pianist vary depending on the connected instrument, and only the functions that can be used are shown in the Smart Pianist display. For the list of the available functions for each instrument, access here.
In this chapter, read “Basic operations” first, and then instructions for each function selected in the menu described below.
Basic operations
This section explains about the commonly used operation buttons ① – ⑦.

a Menu
This is the gateway to each function. From here, select the function you want to use. The menu differs depending on the connected instrument. To close the menu, tap anywhere in the background (where there are no icons).
![]() Piano Room (Enjoying piano performance)
Piano Room (Enjoying piano performance)
![]() Song (Playing and recording Songs, displaying scores)
Song (Playing and recording Songs, displaying scores)
![]() Voice (Playing the keyboard with various sounds)
Voice (Playing the keyboard with various sounds)
![]() Style (Playing with auto accompaniment)
Style (Playing with auto accompaniment)
![]() CFX Grand* (Resetting to the default Piano Voice)
CFX Grand* (Resetting to the default Piano Voice)
* The name of the default Piano Voice (for example, as “CFX Grand”) will be displayed.
![]() Utility (Making global settings)
Utility (Making global settings)
![]() Keyboard/Style Transpose (Transposing the pitch in semitones)
Keyboard/Style Transpose (Transposing the pitch in semitones)
![]() Manual (Displaying this guide)
Manual (Displaying this guide)
![]() Instrument (Connecting with an instrument)
Instrument (Connecting with an instrument)
![]() Demo (Viewing the demo videos)
Demo (Viewing the demo videos)
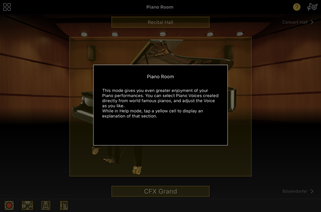
Shows the description of the function. You can call up the instructions by tapping an item highlighted in a yellow box.
c Settings
Calls up the Setting display for the function (Piano Room, Voice, Style, Song) selected from the menu. Various settings can be made for each function.
d Recording
Calls up the Recording window in which you can record your performance.
e Registration Memory
You can save the current settings such as Voice and Style all at once. This lets you easily call up desired settings when you need them.

Tap [Save Current Setting] to save the current settings. To call up the settings, select the desired Registration Memory from the list. You can see what settings are saved to the selected Registration Memory by tapping ![]() (Information).
(Information).
f Metronome/Rhythm
Calls up the Metronome/Rhythm window in which you can use the metronome or select and playback a rhythm. It also lets you set rhythm-related parameters, such as whether to record a rhythm or not when recording your performance.
g Volume balance
Calls up the Balance window in which you can adjust the volume balance among the sound of the keyboard, Style, Song, Mic, etc.
Piano Room (Enjoying piano performance)
You can enjoy playing the piano with your favorite sound. By flicking the picture of the piano or the background to the right or left, the piano type or environment can be changed.

In the Piano Room Setting display, you can change settings such as sound resonance and touch response as you like.
Voice (Playing the keyboard with various sounds)
You can play the keyboard by using a wide variety of instrumental Voices, including piano, strings, brass, wind instruments and more. To select the Voice, tap the picture of the instrument.

Not only can you play just one single Voice (Main), you can also layer a different Voice (Layer part) to the Main part. You can also play a different Voice in the left-hand section of the keyboard by turning the Left part on.
When the Left part is turned on, the point which divides the keyboard into the right-hand and left-hand sections (called Split Point) can be changed by moving the line to the right or left on the keyboard illustration. Double-tapping this line restores the default setting (F#2).
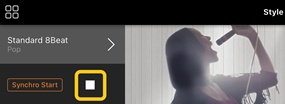
Style (Playing with auto accompaniment)
Various accompaniment and rhythmic backing patterns (together called a “Style”) can automatically be added to your performance. This lets you recreate the sound of a full band or orchestra — even if you’re playing by yourself.
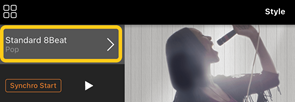
1. Tap the upper left of the Style display as indicated in the picture below to call up the Style Select display.
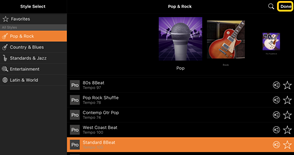
2. Select the desired Style in the Style Select display, and then tap [Done] at the top right corner.
3. When the Style display is shown, tap ![]() (Start) to start playback and play the keyboard.
(Start) to start playback and play the keyboard.
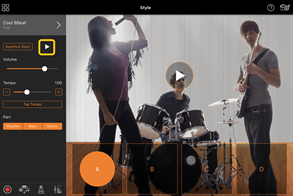
If [Synchro Start] is turned on, the Style starts playing back as soon as you play the keyboard (without the need to tap ![]() to start).
to start).
You can expressively change the variation of the accompaniment (Section A, B, C or D) depending on your playing dynamics.
4. After you finish your performance, tap ![]() (Stop) to stop playback. An ending plays back before the Style stops.
(Stop) to stop playback. An ending plays back before the Style stops.
Song (Playing and recording Songs, displaying scores)
“Song” refers to the music data which include preset songs, commercially available music files, etc. Not only can you play back a Song and listen to it, but you can also play the keyboard along with Song playback, and you can also record your performance. Moreover, you can display a preset or commercially available score data in PDF format and use various functions such as playing back the corresponding Song.
* There are two kinds of Song formats: Audio and MIDI. For details, refer to “What’s the difference between Audio and MIDI?” in the FAQs.
Playing back a Song
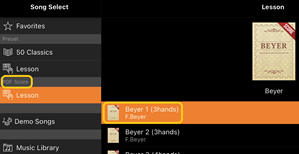
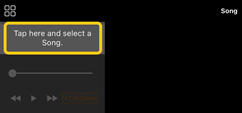
1. Tap the upper left of the Song display as indicated in the picture below to call up the Song Select display.
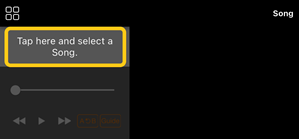
2. Select the desired Song in the Song Select display.

* The Songs you recorded with Smart Pianist can be selected from [User Songs], and the audio songs in the smart device can be selected from [Music Library].
If you select a Song from the “PDF Score” category, refer to Step 3 of “Displaying a PDF score and playing back the corresponding Song” for the following steps.
3. Tap ![]() (Start) at the bottom of the Song Select display to start playback.
(Start) at the bottom of the Song Select display to start playback.
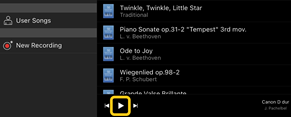
In the Song Select display, playback continues until ![]() (Pause) is tapped.
(Pause) is tapped.
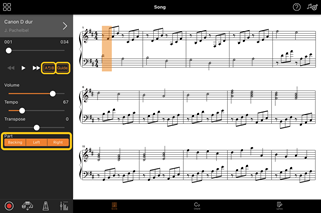
4. If you want to see the score, tap [Done] at the top right corner to return to the Song display, and then tap ![]() (Start) to start playback.
(Start) to start playback.

![]()

In the Song display, playback stops automatically when the selected Song reaches the end.
◆ To return to the Song Select display
Tap the Song name as indicated in the picture below to return to the Song Select display.

Practicing a Song
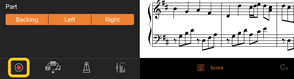
You can enhance your practicing by using the functions described in this section. To use these functions, select the desired Song for practicing, and then tap [Score] on the bottom of the Song display to show the score.
![]()
By tapping [Guide] to turn on the Guide function, you can practice at your own pace — since the accompaniment waits for you to play the notes correctly. On instruments that feature Guide Lamps or Stream Lights, the lamps indicate the notes you should play and when you should play them.
◆ Repeat playback (A-B Repeat)
![]()
You can specify a range of measures and play back the specified range repeatedly. This helps you to practice difficult phrases.
1. Tap ![]() (Start) to start playback of the Song.
(Start) to start playback of the Song.
2. When playback reaches the desired starting point (A), tap [A-B] to turn it on.
3. When playback reaches the desired ending point (B), tap [A-B] again. The range from Point A to Point B will be played back repeatedly. If you turn off [A-B], the repeat range will be cleared.
* You can move the playback position by using the slider located below the Song name.
* Point B cannot be set to the end of the Song. In the case of an Audio Song, the A/B points are set to the beat beginnings. When you move the slider to the right end, the current Song position is moved to the start of the last beat at the last measure of the Song.
In the case of a MIDI Song, the points are set to the measure beginnings. When you move the slider to the right end, the Current Song Position is moved to the start of the last measure of the Song.
* Repeat playback cannot be used while displaying a PDF score.
![]()
You can mute the part (Right/Left/Backing) to try practicing that part on your own. Practice the muted part along with playback of other parts.
Recording your performance
You can record your performance in Audio or MIDI format and save it as a Song. The recorded data is saved to the smart device. If you want to export the recorded data from Smart Pianist, see ”Can I transfer the recorded data to another device?” in the FAQs.
* When the instrument is connected by Bluetooth, Audio Recording is not available, even if the instrument has Audio Recording functionality. Connect by another method, or record in MIDI format.
1. Make the necessary settings such as Voice and Style selection.
2. Tap ![]() (Rec) in the basic displays (Piano Room, Voice, Style, Song) to call up the Record window.
(Rec) in the basic displays (Piano Room, Voice, Style, Song) to call up the Record window.
* To record your performance with Style playback, tap ![]() (Rec) in the Style display.
(Rec) in the Style display.
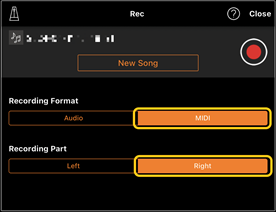
3. (Only for instruments with Audio Rec function:) Select the recording format [Audio] or [MIDI].
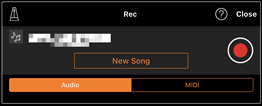
4. Tap [New Song].
* To record your performance while using the metronome, tap [![]() ] to start the metronome. (The metronome sound is not recorded.) To record your performance with Rhythm playback, tap [
] to start the metronome. (The metronome sound is not recorded.) To record your performance with Rhythm playback, tap [![]() ] to select a Rhythm. Finally, close the Metronome/Rhythm window to return to the recording window.
] to select a Rhythm. Finally, close the Metronome/Rhythm window to return to the recording window.
5. Tap ![]() (Rec) to start recording.
(Rec) to start recording.
* To stop the metronome or Rhythm playback, tap [![]() ].
].
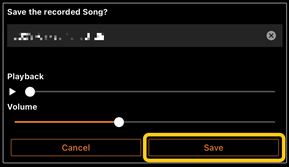
6. After you finish your performance, tap ![]() (Stop) to stop recording.
(Stop) to stop recording.
7. Tap [Save] to save your recorded performance to the smart device.
The recorded date and time are shown as the Song name, however, you can rename it by tapping the Song name.
To play back the saved data later, select the Song from [User Songs] in the Song Select display.
◆ Overdubbing data to an already recorded Song (Multi Track Recording)
You can add data to an existing Song by recording your performance while playing back the previously recorded parts. By recording each part independently, you can create a complete Song which may be difficult to play live. For example, you can record the right-hand part first and then record the left-hand part while listening to the already recorded right-hand part, or you can record the Style playback first and then record melodies while listening to the already recorded Style playback.
* You cannot overdub data to an already recorded Song while displaying a PDF score.
1. Record the first Song by following the instructions in “Recording a new Song” and save it.
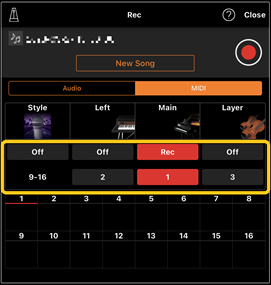
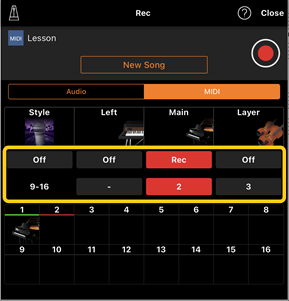
With MIDI recording, set the desired part for recording to [Rec] and any parts you do not want to record part to [Off]. Also, specify the channels (1 – 16) to which the recording parts are assigned.
This example display shows recording of the right-hand performance (Main part) to channel 1.
2. Select the already recorded Song in the Song Select display.
3. Tap ![]() (Rec) in the basic displays (Piano Room, Voice, Style, Song) to call up the Record window, and then make sure that the Song name saved in step 1 is shown.
(Rec) in the basic displays (Piano Room, Voice, Style, Song) to call up the Record window, and then make sure that the Song name saved in step 1 is shown.
4. (MIDI recording only:) Set the desired parts for recording to [Rec], and then specify the channels to which the recording parts are assigned.

This example display shows recording of the left-hand performance (Main part) to channel 2.
You can see that the channel 1 (right-hand) part recorded in step 1 contains data, as indicated by the instrument picture shown at the lower part of the display. If you set channels which have recorded data to [Rec], previously recorded data will be overwritten.
5. Tap ![]() (Rec) to start recording.
(Rec) to start recording.
6. After you finish your performance, tap ![]() (Stop) to stop recording.
(Stop) to stop recording.
7. Tap [Save] to save your recorded performance to the smart device.
If you want to save the Song as a different Song from the Song selected in step 2, rename the Song here before saving.
Displaying a PDF score and playing back the corresponding Song
* Depending on the connected instrument, you may not be able to play back the corresponding Song even if you import and display a commercially available PDF score. For a list of compatible models and functions, click here.
* “Commercially available PDF score” refers to score data that is sold commercially as data in PDF format. It does not include data such as scanned or photographed printed scores that have been saved in PDF format.
* In some cases, you may not be able to playback the corresponding Song even if you import a commercially available PDF score. For these cases, the playback button (![]() ) will not be shown on the display in Step 4. Even when you can playback the corresponding Song, the playback may not match that of the PDF score.
) will not be shown on the display in Step 4. Even when you can playback the corresponding Song, the playback may not match that of the PDF score.
* Song data that is created automatically from a commercially available PDF score cannot be exported.
1. (Only when displaying a preset PDF score:) Tap the upper left of the Song display as indicated below to call up the Song Select display, and then select the desired data in the “PDF Score” category.
![]()

2. (Only when displaying a commercially available PDF score:) Import a PDF score into Smart Pianist.
2-1 Save a commercially available PDF score to your smart device or online storage.
2-2 Tap the upper left of the Song display as indicated below to call up the Song Select display.

2-3 In the Song Select display, select [User Songs], and then tap ![]() (Import).
(Import).
2-4 Select the location to which you saved the PDF score in Step 2-1, and then tap the desired PDF score to import. For details, refer to the documentation of your smart device.
2-5 Tap [Import] when the confirmation message appears.
2-6 Tap the imported PDF score.
3. Tap [Done] at the top right corner to display the PDF score.

4. Tap ![]() (Start) at the top of the display to start playback.
(Start) at the top of the display to start playback.
![]()
* In case the PDF score cannot be analyzed, ![]() (Start) will not be shown.
(Start) will not be shown.
5. To return to the Song Select display, open the detailed settings by tapping ![]() (More), and then tap the Song name or file name as indicated in the picture below.
(More), and then tap the Song name or file name as indicated in the picture below.

You can set the following parameters in detailed settings.
![]() (Guide): Turn the Guide function on/off.
(Guide): Turn the Guide function on/off.
![]() : Close the detailed settings.
: Close the detailed settings.
![]() : If you change the playback tempo of an imported PDF score’s Song, you can save the changed tempo by tapping this icon.
: If you change the playback tempo of an imported PDF score’s Song, you can save the changed tempo by tapping this icon.
Part: Turn parts on/off.
* It is convenient to assign the page-turning function to a pedal. You can set this by [Utility]→[Pedal] (for some instruments, [Song Settings]→[Score]→[Page Turning by Pedals]).
Resetting to the default Piano Voice
The name of the default Piano Voice (such as “CFX Grand”) of the connected instrument is displayed in the menu. By tapping it, you can easily reset the Voice settings and play the entire keyboard with the default Piano Voice.
Utility (Making global settings)
In the Utility display, you can make various settings related to the entire instrument such as tuning, keyboard settings, pedal settings, and microphone settings.

Keyboard/Style Transpose (Transposing the pitch in semitones)
By taping the “Keyboard/Style Transpose” [−]/[+] buttons in the menu, you can transpose the pitch of the keyboard sound and Style playback. Settings here links with the “Transpose” settings of the Utility display.
Manual (Displaying this guide)
By tapping [Manual] in the menu, this guide will be displayed.
Instrument (Connecting with an instrument)
From [Instrument] in the menu, you can connect Smart Pianist to an instrument. While an instrument is connected, the model name is shown here. For details, refer to ”Connecting to Your Instrument.”
Demo (Viewing the demo videos)
You can see helpful videos of the connected instrument introducing its various functions. When the Demo display is shown, tap the desired video to start playback.