Connection
Connection A: Connection by using a USB cable
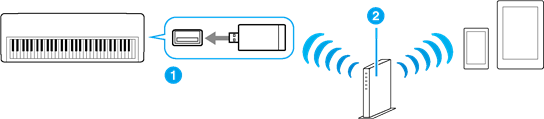
A commercially available USB cable and USB conversion connector are required for a wired connection between your instrument and smart device. Follow the steps below to prepare the necessary USB cable and USB conversion connector and connect them.
1. Check the shape of the USB TO HOST/USB terminal on your instrument and prepare the necessary USB cable.
Shape of the USB TO HOST/USB terminal on your instrument | Required USB Cable
|
USB Type B | USB Type B male -USB Type A male |
USB Micro B | USB Micro B male-USB Type A male |
USB Type C | USB Type-C male-USB Type A male |
NOTICE
Use a USB cable of less than 3 meters. USB 3.0 cables cannot be used.
2. Check the shape of the USB terminal on your smart device and prepare the necessary conversion connector.
Shape of the USB terminal on your smart device | Required USB conversion adaptor
|
USB Micro B | USB Type A female -USB Micro male |
USB Type C | USB Type A female -USB Type-C male |
3. Turn off the power of the instrument.
Quit any open app on your smart device.
4. Connect your smart device and your instrument using the cable and conversion connector prepared in steps 1 and 2.
Follow the step numbers in the illustration below to connect in proper order.

5. Turn on the power to the instrument.
6. Use the app on your smart device to communicate with the instrument.
NOTE
Some apps need the appropriate setting to communicate with the instrument. For details, refer to the relevant app manuals.
Connection B: Direct connection by using a USB wireless adaptor
This connection is only for instruments which have the Access Point mode function or Ad Hoc mode function. If you are using an instrument which does not have one of these functions, follow the instructions of Connection C.
Required devices
• USB wireless LAN adaptor UD-WL01 a (This is unnecessary if the wireless LAN function is included on the instrument.)
NOTE
• Please note that when the instrument is connected, no Internet access is available on your smart device, limiting part of their functions, such as mailing and searching.
• Since the operations differ depending on the instrument, refer to the Owner’s Manual or the Reference Manual of your instrument as well.

If the wireless LAN function is included to the instrument, skip the steps 1 and 2 below.
1. Turn off the power of the instrument.
Quit any open app on your smart device.
2. Connect the USB wireless LAN adaptor to the USB TO DEVICE terminal of the instrument.
3. Turn on the power to the instrument.
4. Switch the instrument’s wireless LAN setting to the Access Point mode or Ad Hoc mode.
5. As necessary, set the SSID and so on.
You can make various settings (such as SSID, security, password, channel, key), although the specific settings differ depending on the mode used by the instrument. If you have two or more instruments to connect, set the SSID and channel to different values on each instrument.
6. Save the settings on the instrument.
7. Connect the smart device to the instrument.
7.1 Call up the Wi-Fi display on your smart device by tapping “Settings” à “Wi-Fi.”
7.2 Turn on the Wi-Fi.
7.3 From the network list shown on the display, tap the instrument that you set to Access Point mode or Ad Hoc mode. If the key is required, input the key, then connect.
8. Use the app on your smart device to communicate with the instrument.
NOTE
• Some apps need the appropriate setting to communicate with the instrument. For details, refer to the relevant app manuals.
Connection C: Connection via an access point by using a wireless LAN adaptor
Required devices
• USB wireless LAN adaptor UD-WL01 a (This is unnecessary if the wireless LAN function is included on the instrument.)
• Access point with router b (This is unnecessary if your modem has router capability.)
NOTE
• Since the operations differ depending on the instrument, refer to the Owner’s Manual or the Reference Manual of your instrument as well.
If the wireless LAN function is included on the instrument, skip steps 1 and 2 below.
1. Turn off the power to the instrument.
Quit any open app on your smart device.
2. Connect the USB wireless LAN adaptor to the USB TO DEVICE terminal of the instrument.
3. Turn on the power to the instrument.
4. If your instrument has a wireless LAN mode setting, set it to Infrastructure mode.
5. Connect the instrument to the network.
There are three methods of connection:
• Displaying the networks in the wireless LAN and connecting to the network
6. Connect the smart device to the access point.
6.1Call up the Wi-Fi display on your smart device by tapping “Settings” à “Wi-Fi.”
6.2Turn on the Wi-Fi.
6.3From the network list shown on the display, tap on the network to which you connected your instrument in step 5. If the key is required, input the key, then connect.
7. Use the app on your smart device to communicate with the instrument.
NOTE
• Some apps need the appropriate setting to communicate with the instrument. For details, refer to the relevant app manuals.
Automatic Setup by WPS
If your access point supports WPS, you can easily connect the instrument to access point by WPS, without making settings, such as key input, etc.
NOTE
• Check whether your access point supports WPS by referring to the owner’s manual for the access point you are using.
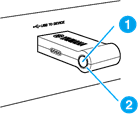
1. Press and hold the [WPS] button (a) on the USB wireless LAN adaptor (UD-WL01) for longer than three seconds to start WPS.
The LED lamp (b) of the adaptor flashes.
2. Press the WPS button on your access point within two minutes after step 1 above.
When the connection to the wireless network is completed, the LED lamp of the UD-WL01 lights, and then flashes during communication over the network. The necessary information is automatically set, and the connection between access point and the instrument has been completed.
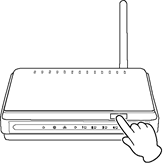 Press the WPS button on your access point.
NOTE
For details about the operations in the setting of the access point, read the owner’s manual for the access point you are using.
If you cannot set by WPS, follow the instructions in “Displaying the networks in the wireless LAN and connecting to the network."
3. Proceed to step 6 to connect the access point and smart device.
Displaying the networks in the wireless LAN and connecting to the network
You can connect the instrument to the network by selecting it in the wireless LAN setting display on the instrument.
1. Display the networks in the wireless LAN setting display of the instrument.
NOTE
• If no signal from the access point is received, the access point cannot be listed. Also, closed access points cannot be listed.
2. Connect the instrument to the access point.
From the networks listed on the display, select the desired one. For a network with a lock icon (![]() ), you need to enter the password, and for the network without the lock icon, you can connect the network only by selecting it. When connection is done successfully, the connection status is shown on the display, and the icon shown below appears according to the signal strength.
), you need to enter the password, and for the network without the lock icon, you can connect the network only by selecting it. When connection is done successfully, the connection status is shown on the display, and the icon shown below appears according to the signal strength.
Strong Weak
Weak
The connection between the instrument and the access point is complete.
If you cannot find the desired network on the display or you want to set by a method other than described above, follow the instructions in “Manual setup.”
NOTE
• The name of the function described above may differ or the function may not be supported depending on the instrument.
3. Proceed to step 6 to connect the access point and smart device.
Manual setup
If you cannot find the desired network on the display, it may be a network with closed or non-disclosure. In this case, you will need to manually input SSID, security and key settings for connection.
NOTE
• About the confirmation and changes in the access point settings, refer to the manual of the access point.
• For more information on successively inputting the SSID, Security and Password on the display of the instrument, refer to the Owner's Manual or the Reference Manual of your instrument.
1. On the wireless LAN setting display on the instrument, select “Other” network (or Manual Setup), then input in succession these settings: SSID, Security and Password.
2. Execute the connection operation on the instrument such as pressing the [Connect] button.
The necessary information is automatically set, and the connection between access point and the instrument has been completed.
3. Proceed to step 6 to connect the access point and smart device.
If you cannot find the desired network on the display or you want to set by a method other than described above, follow the instructions in “Direct connection by using a USB wireless adaptor.”