

UTILITY section
The UTILITY section is located on the top panel.
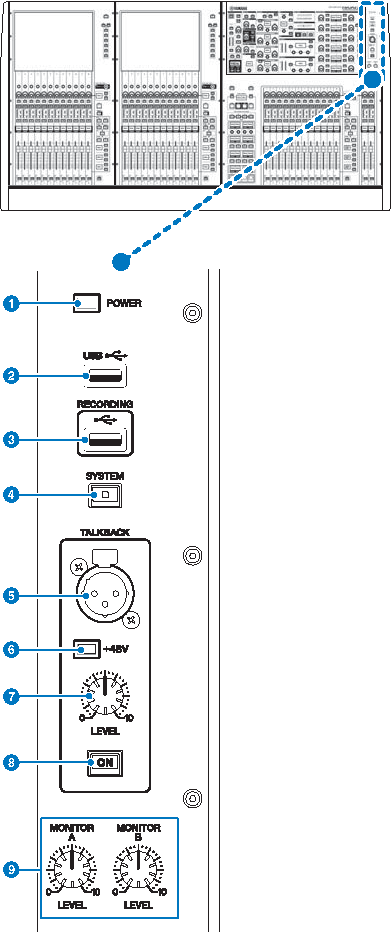
a | POWER Indicator Lights when AC power to the unit is ON. If both power switches A and B are turned on, this indicator will light green. If either power switch A or B is turned on, it will light red. If the RIVAGE PM series is not started, it will light orange. |
b | USB port Enables you to connect a USB device (such as a mouse, keyboard, or USB flash drive). Use a USB flash drive to store the system’s internal data and to load the stored data into the system. USB flash drive format The FAT16 and FAT32 formats are supported. Write Protection Some USB flash drives feature write protection that prevents data from being erased inadvertently. If your USB flash drive contains important data, we suggest that you use write protection to prevent accidental erasure. On the other hand, you will need to make sure that your USB flash drive’s write-protect setting is turned off before you save data onto the USB flash drive. For the latest information on USB flash drives that can be used with the system, visit the Yamaha Pro Audio website at: http://www.yamahaproaudio.com/ NOTICE
|
c | RECORDING port Enables you to connect a USB flash drive to record and play back audio files. Supported file formats include WAV and MP3. For the latest information on USB flash drives that can be used with the system, visit the Yamaha Pro Audio website at: |
d | [SYSTEM] key Press this key to display information about the RIVAGE PM series on the touch screens. Press and hold down the key for two seconds or longer to shut down the console. Be sure to shut down before turning off the power to the unit. |
e | TALKBACK jack This is a balanced XLR-3-31 jack to which a talkback mic can be connected. |
f | +48V indicator Lights up when +48V phantom power is supplied to the TALKBACK jack. |
g | TALKBACK [LEVEL] knob Adjusts the input level of the mic connected to the TALKBACK jack. |
h | TALKBACK [ON] key Switches the Talkback function on or off. Talkback remains on while you press and hold down this key. It turns off when you release the key. |
i | MONITOR A/B [LEVEL] knobs Adjust the output level of the monitoring signals.。 |