

Using the Flex15GEQ
You can use faders 1–12 and [ON] keys in the Channel Strip section to control the Flex15GEQ.
- Follow steps 1–8 under Inserting a GEQ/PEQ into a channel via the Selected Channel section, insert the Flex15GEQ into a channel.
- The system displays the EDIT screen for the GEQ/PEQ that you inserted.
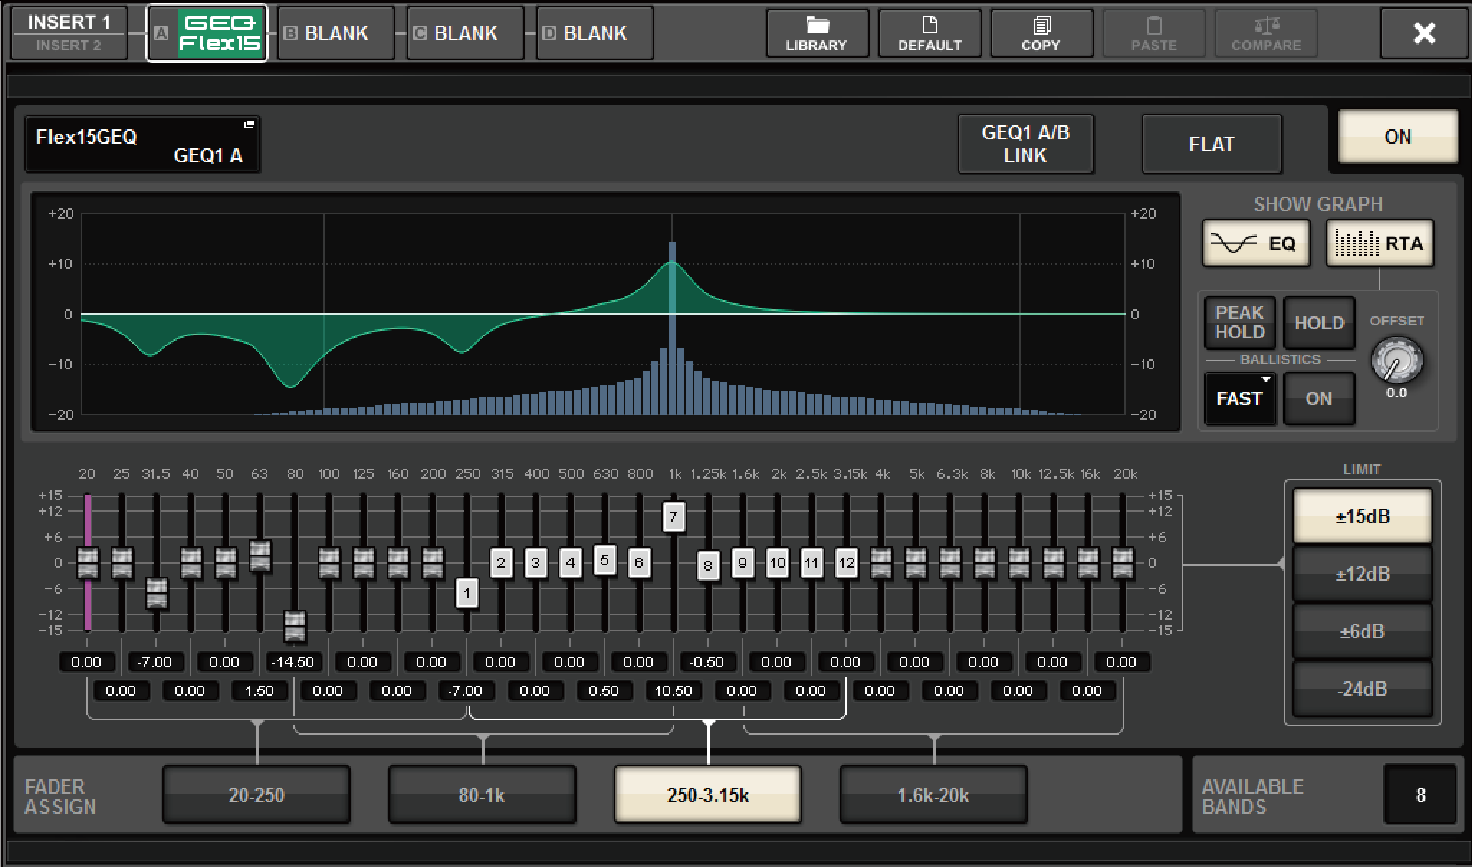
- This window is the same as that for the 31BandGEQ, except that the AVAILABLE BANDS field is a real-time indication of the number of additional bands (maximum 15) that can be controlled for the current GEQ.
- Press the GEQ ON/OFF button to turn the Flex15GEQ on.
- Press one of the buttons in the FADER ASSIGN field to select the group of bands you will control using the faders in the Channel Strip section.
- For details on the bands corresponding to each button in the FADER ASSIGN field, refer to step 4 under “Using the 31BandGEQ”. When you press one of these buttons, the faders for the bands selected on the touch screen will turn white, and the numbers of the corresponding faders in the Channel Strip section will be displayed. Also, you will be able to use the faders in the Channel Strip section to control the corresponding bands.
NOTE
- The above operation is possible even if the Channel Strip section is locked. When you turn off the button in the FADER ASSIGN field, the faders will return to the locked state.
- Raise the corresponding fader of the Channel Strip section.
- For each of a Flex15GEQ’s two GEQ units (A and B), a maximum of fifteen bands can be controlled. The real-time number of additional bands that can be controlled is shown to the right of “AVAILABLE BANDS" in the FADER ASSIGN field. If you have used all fifteen bands, you will have to return one of these bands to the flat position before you can operate any other band.

NOTE
- The [ON] key will light if you raise or lower a fader even the slightest amount. This indicates that the corresponding band is being modified.
- To quickly return a boosted or cut band to the flat position, press the corresponding [ON] key in the Channel Strip section to make it go dark.
- Repeat steps 3 and 4 to adjust up to fifteen bands.
NOTE
- If you switch the touch screen display to a different screen or to the GEQ window, the fader assignments in the Channel Strip section will forcibly be defeated. However, if you once again display the same GEQ, the group of bands you had previously been controlling will automatically be assigned to the faders.
- When you finish making settings, turn off the buttons in the FADER ASSIGN field.
- The faders and [ON] keys in the Channel Strip section will return to their previous function.
NOTE
- When you close the GEQ popup window, the buttons in the FADER ASSIGN field automatically turn off.