

Rear Panel
This will explain the functions and names of the components on the rear panel of the DM7 Series.
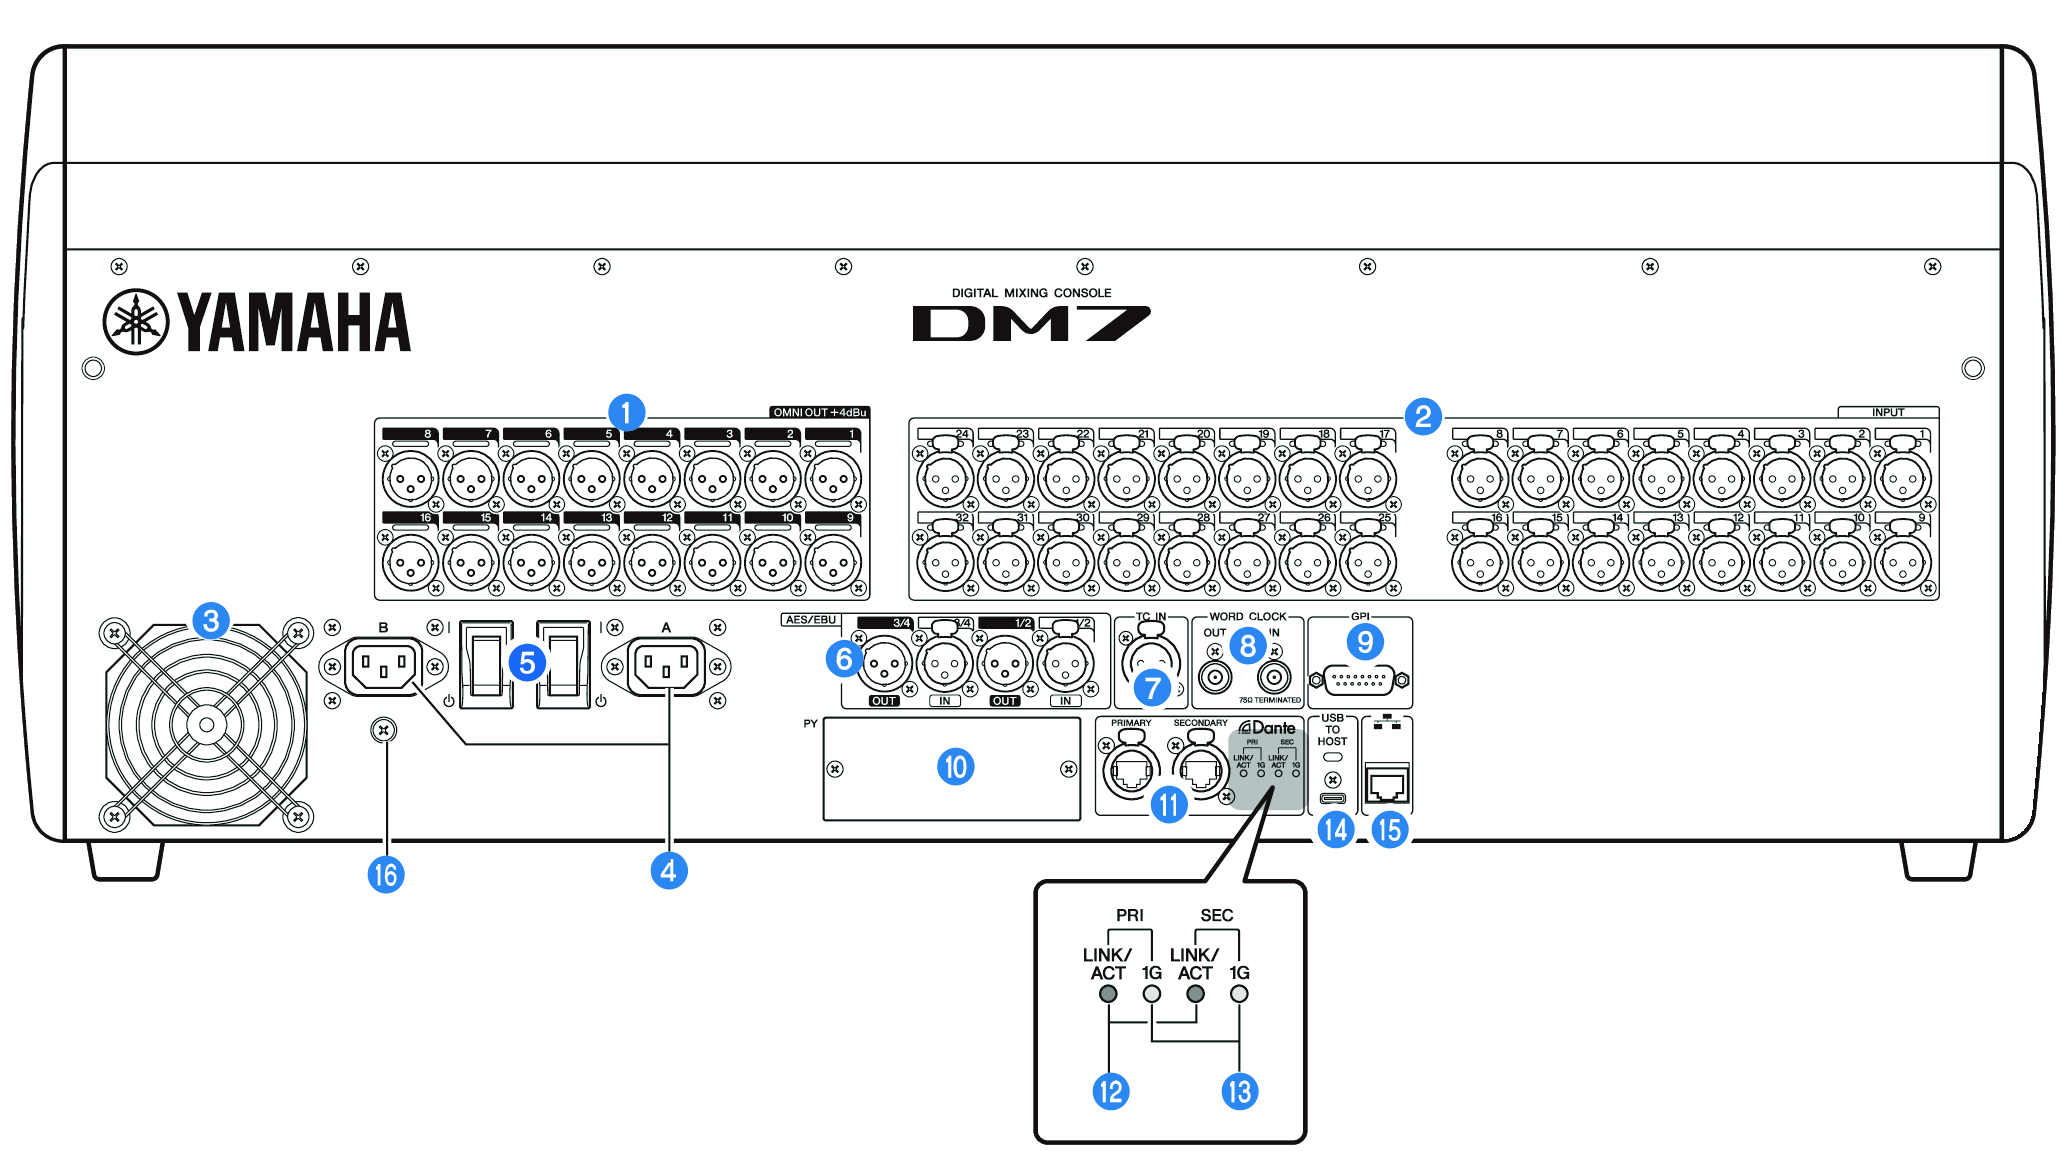
a | [OMNI OUT] Balanced XLR 3-pin chassis output connectors for analog audio signals. |
b | [INPUT] Balanced XLR 3-hole chassis input connectors for analog audio signals from line-level devices or microphones. |
c | Exhaust vent This product is equipped with a cooling fan. This vent lets warm air escape from the unit. Make sure that the vent is not blocked with obstructions or other objects. Intake air is provided through vents on the lower front and rear sides.
|
 CAUTION
d | AC IN connectors [A]/[B] Connects to the supplied power cords. Connect the power cords to this unit, then connect the plug ends into the outlet. When connecting the power cords, insert all the way until they lock in place securely. The supplied AC power cords feature a V-lock mechanism with a latch, which prevents the power cords from disconnecting accidentally.
To disconnect a power cord, remove it while pressing the latch on the plug. |
e | [ | ]/[ z] (Power switch) Toggles the power between ON ( | ) and OFF (z). If the unit will not be used for a long time, be sure to remove the power cord from the AC outlet. When the switch is (z), the power is off. NOTICE
NOTE
|
f | [AES/EBU] The DM7 is equipped with a sampling rate converter on both the [IN] and [OUT] chassis connectors. Please note that the DM7 Compact, which features only the [OUT] chassis connectors, is not equipped with a sampling rate converter. [IN] (DM7 only) These are balanced XLR 3-hole chassis input connectors that accept digital audio signals in the AES/EBU format. [OUT] These are balanced XLR 3-pin chassis output connectors for outputting digital audio signals in the AES/EBU format. |
g | [TC IN] This balanced XLR 3-hole chassis input connectors accepts time code signals from the connected external device. |
h | [WORD CLOCK OUT/IN] These are BNC connectors used to transmit/receive word clock signals to/from an external device. The [WORD CLOCK IN] connector is internally terminated by a 75-ohm resistor. |
i | [GPI] This is a D-sub 15-hole chassis connector that allows communication (5-in/5-out) with a GPI-compatible external device. |
j | [PY] This card slot allows you to install a PY card (sold separately) to expand the number of I/O ports. |
k | Dante [PRIMARY]/[SECONDARY] These terminals are used to connect to I/O devices such as the Rio3224-D2 to a Dante audio network. Use RJ-45 connectors that are compatible with Neutrik etherCON CAT5e connectors.
Do not use the network switch's EEE function(*) within a Dante network. Although power management should be negotiated automatically in switches that support EEE, some switches do not perform the negotiation properly. This may cause EEE to be enabled in the Dante network when it is not appropriate, resulting in poor synchronization performance and occasional dropouts. Therefore, we strongly recommend that: *The EEE (Energy Efficient Ethernet) function is a technology that reduces switch power consumption during periods of low network traffic. It is also known as Green Ethernet or IEEE802.3az. |
l | [LINK/ACT] [PRIMARY] and [SECONDARY] indicators show the respective communication status. If the Ethernet cables are connected properly, the indicators will flash rapidly. |
m | [1G] These indicators light up when the Dante network is functioning as Gigabit Ethernet. |
n | [USB TO HOST] This is a USB Type-C (USB2.0) port. By connecting a computer with a USB cable, the console can function as a 96 kHz/32-bit or 48 kHz/32-bit audio interface with a maximum of 18 inputs and 18 outputs. It also allows you to use USB-MIDI to control a DM7 Series unit and remotely control DAW software. The Yamaha Steinberg USB Driver must be installed to communicate with the computer. NOTICE
|
o | Network connector This RJ-45 connector allows the unit to be connected to a computer via an Ethernet cable (CAT5 or higher recommended). NOTICE
|
p | Grounding screw Each supplied power cord has a three-prong plug. If the AC outlets are grounded, this product will be properly grounded through the power cords. Also, grounding this screw may effectively eliminate noise such as hum and interference. |