Basic process
2. Basic process
2.1. Network settings from ProVisionaire Edge Setting
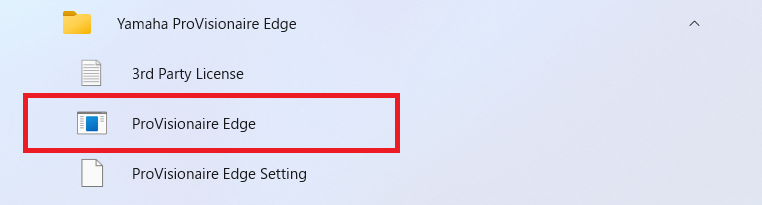
After installing ProVisionaire Edge, start ProVisionaire Edge Setting from the start menu of your computer and configure the network interface and devices to be monitored.
For details on ProVisionaire Edge Setting, refer to
“ProVisionaire Edge Setting” window
described below.
2.1.1. Configuring network interfaces
-
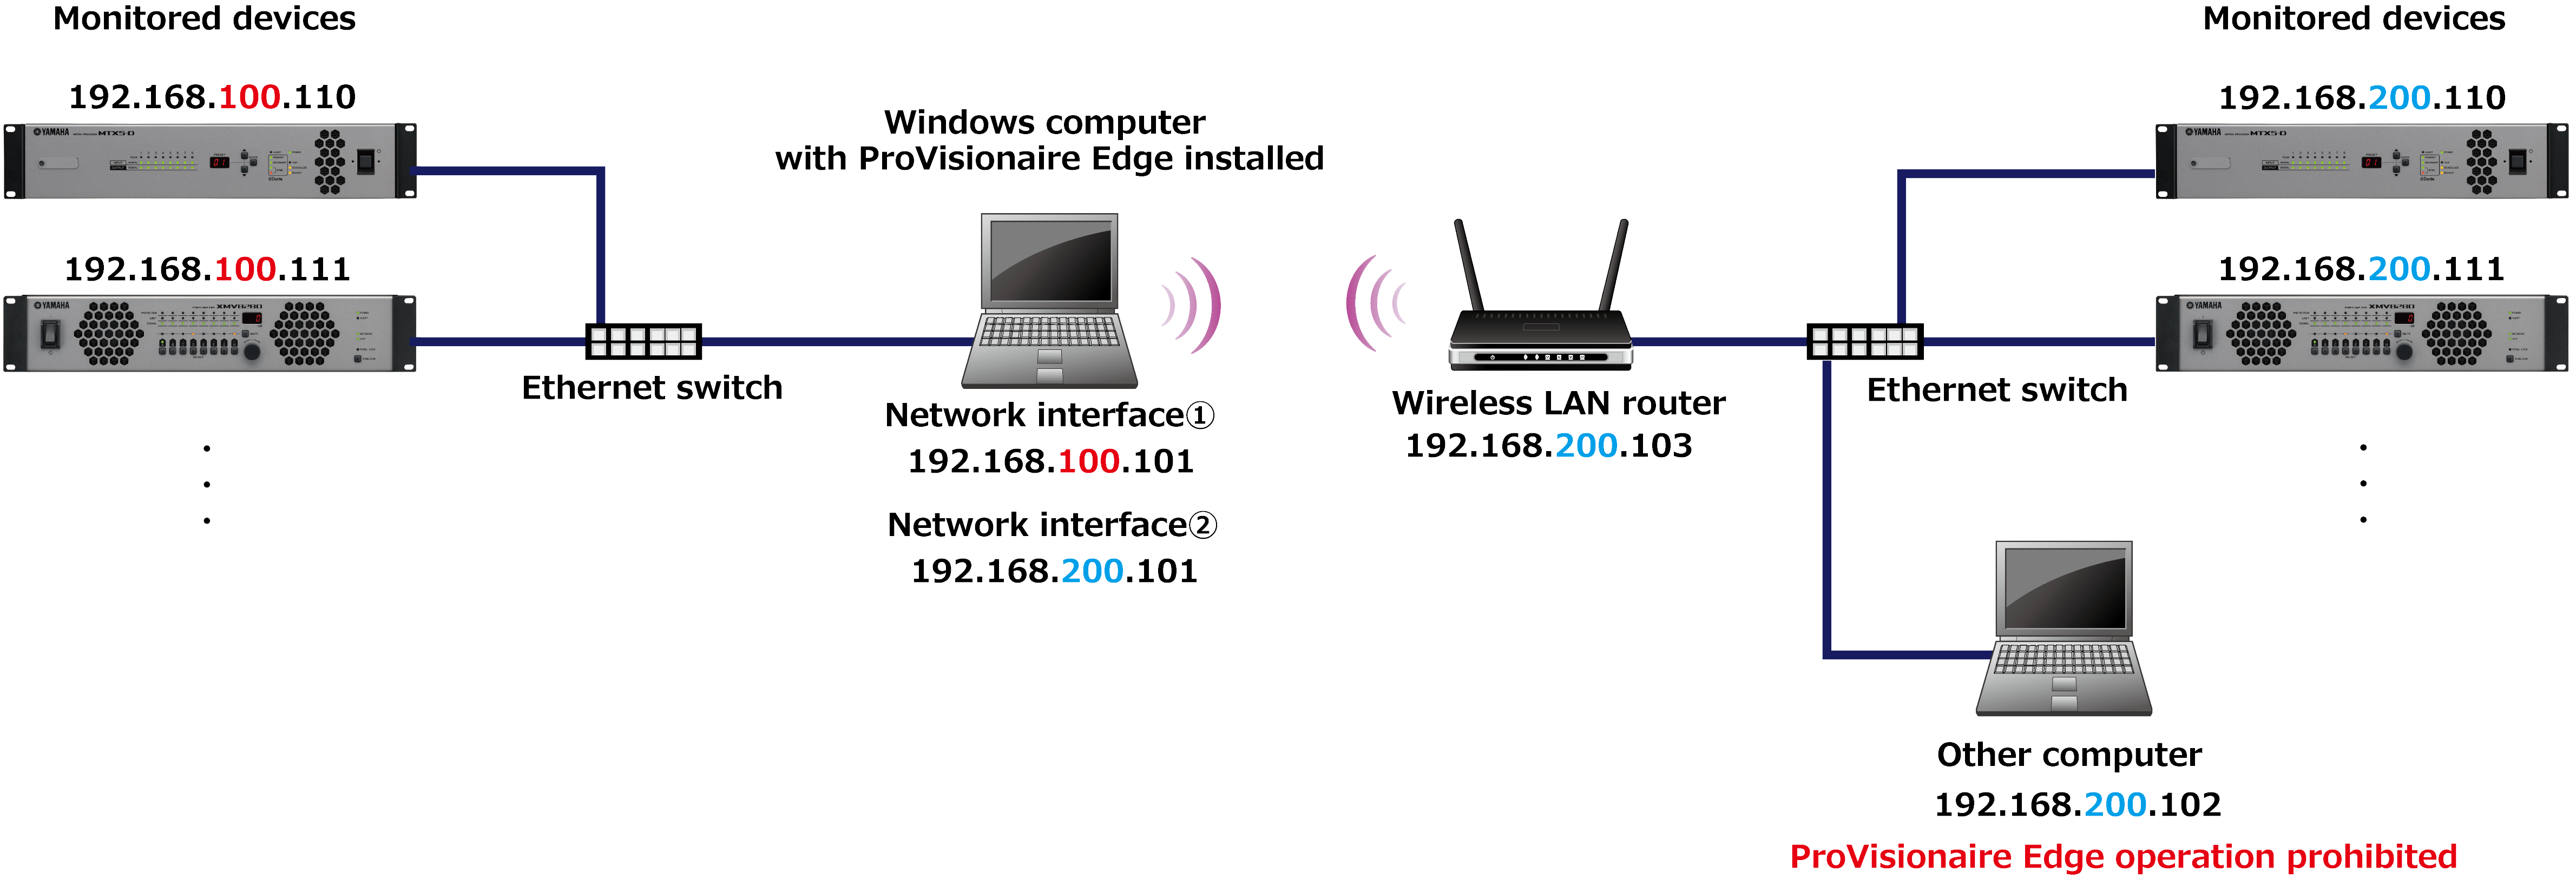
Set the IP address of the network interface on which to run ProVisionaire Edge so that it is in the same subnetwork as the devices to be monitored.
-
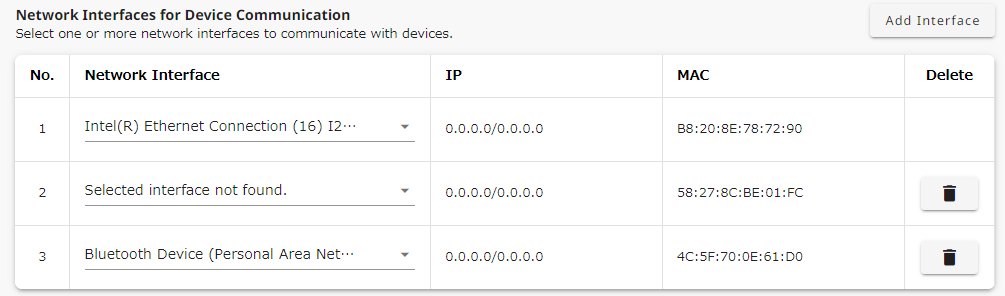
In the ProVisionaire Edge Setting monitoring window, select one or more network interfaces to be used for communication with the devices.
You can add a network interface by clicking the [Add Interface] button. -
Click the [Save] button in the upper right corner of the screen to save your settings.
![]() NOTE
NOTE
・Maximum number of network interfaces
ProVisionaire Edge can communicate with devices via up to eight network interfaces.
・IP address allocation restrictions for network interfaces
In ProVisionaire Edge, assign only one IP address to each network interface. If you want to assign multiple IP addresses to monitor multiple subnets, you will need to add additional network interfaces to your computer, one for each IP address.
・Number of PCs running ProVisionaire Edge
Only one computer can start and run ProVisionaire Edge on each subnet. If ProVisionaire Edge is running on multiple computers, communication may not be possible between other ProVisionaire applications and devices.
Also, it cannot be used together with ProVisionaire Monitoring Service.
2.1.2. Registering devices
Register the devices you want to monitor with ProVisionaire Edge.
-
In ProVisionaire Edge, devices on the selected network interface are automatically detected. Therefore, in principle, there is no need to manually register devices in ProVisionaire Edge Setting.
NOTE
Automatically-registered devices will not be displayed in the “Manual Device Registration” list on the ProVisionaire Edge Setting monitoring screen.
NOTE
The following cases will not be automatically detected. Manually register such devices in “Manual Device Registration” on the ProVisionaire Edge Setting monitoring screen.-
When monitoring a device on another network segment
-
When monitoring the following models, which do not support automatic discovery
・DM7 Control
・DM3 Standard (when connecting two or more devices)For the latest supported devices and firmware versions, refer to the compatibility table on the ProVisionaire Edge download page.
-
-
When you have manually registered a device, click the [Save] button in the upper right corner of the screen to save your settings.
Supported devices (as of ProVisionaire Edge V1.3)
| Device name | Connector | IP address | IP address setting method |
|---|---|---|---|
|
RIVAGE PM Series
|
NETWORK [PC] connector |
192.168.53.* (fixed) |
The address cannot be changed. |
|
DM7 Series *2 |
NETWORK connector |
Any |
SETUP → NETWORK → FOR MIXER CONTROL |
|
DM3 Series *3 |
NETWORK connector |
Any |
SETUP → NETWORK → FOR MIXER CONTROL |
|
CL Series
|
NETWORK connector |
Any |
SETUP → NETWORK → FOR MIXER CONTROL |
|
Rio Series(AD/DA)
|
Dante Primary connector |
Any |
SETUP → IP ADDRESS |
|
DME10 *4 |
NETWORK connector |
Any |
Settings → IP Settings → DME Control Port |
|
DME7 *4 |
NETWORK connector |
Any |
Settings → IP Settings → DME Control Port |
|
DME5, DME3 |
NETWORK connector |
Any |
ProVisionaire Design
|
|
MRX7-D, MTX5-D |
Dante Primary connector |
Any |
Set the address using a UNIT ID and DIP switch (192.168.0.xxx). Alternatively, you can set any address using MTX-MRX Editor. |
|
MTX3 *4 |
NETWORK connector |
Any |
Set the address using a UNIT ID and DIP switch (192.168.0.xxx). Alternatively, you can set any address using MTX-MRX Editor. |
|
XMS Series |
NETWORK connector |
Any |
NETWORK → CONTROL |
|
PC-D Series |
NETWORK connector |
Any |
NETWORK → CONTROL |
|
XMV Series
|
NETWORK connector |
Any |
Set the address using a UNIT ID and DIP switch (192.168.0. xxx). Alternatively, you can set any address using Amp Editor. |
|
XMV Series
|
Dante Primary connector |
Any |
Set the address using a UNIT ID (192.168.0.xxx). Alternatively, you can set any address using Amp Editor. |
|
NEXO NXAMPmk2 Series *5 |
Expansion slot connector |
Any |
REMOTE CONTROL SETTINGS |
|
DZR/DXS-D Series |
Dante Primary connector |
Any |
UTILITY → NETWORK |
*1 To avoid problems with control communications that use the NETWORK [PC] connector of the RIVAGE PM series, we recommend using a network interface dedicated to the RIVAGE PM series. Connect other devices to a different network interface.
*2 DM7 Control is not automatically detected. Specify the IP address using Manual IP.
*3 When connecting two or more DM3 Standard units, specify the IP address using Manual IP.
*4 For devices connected via NETWORK connectors, we recommend using a network interface separate from the Dante network, wherever possible. This measure can avoid placing a communication load on the NETWORK connector. Connect the devices connected via Dante connectors to a different network interface.
*5 When monitoring the NXAMPmkII series, use the NXRM104 or NXAE104 card.
2.2. Starting device monitoring
-
Connect the devices you want to monitor to your computer via a network.
-
Start ProVisionaire Edge from the start menu of your computer.
-
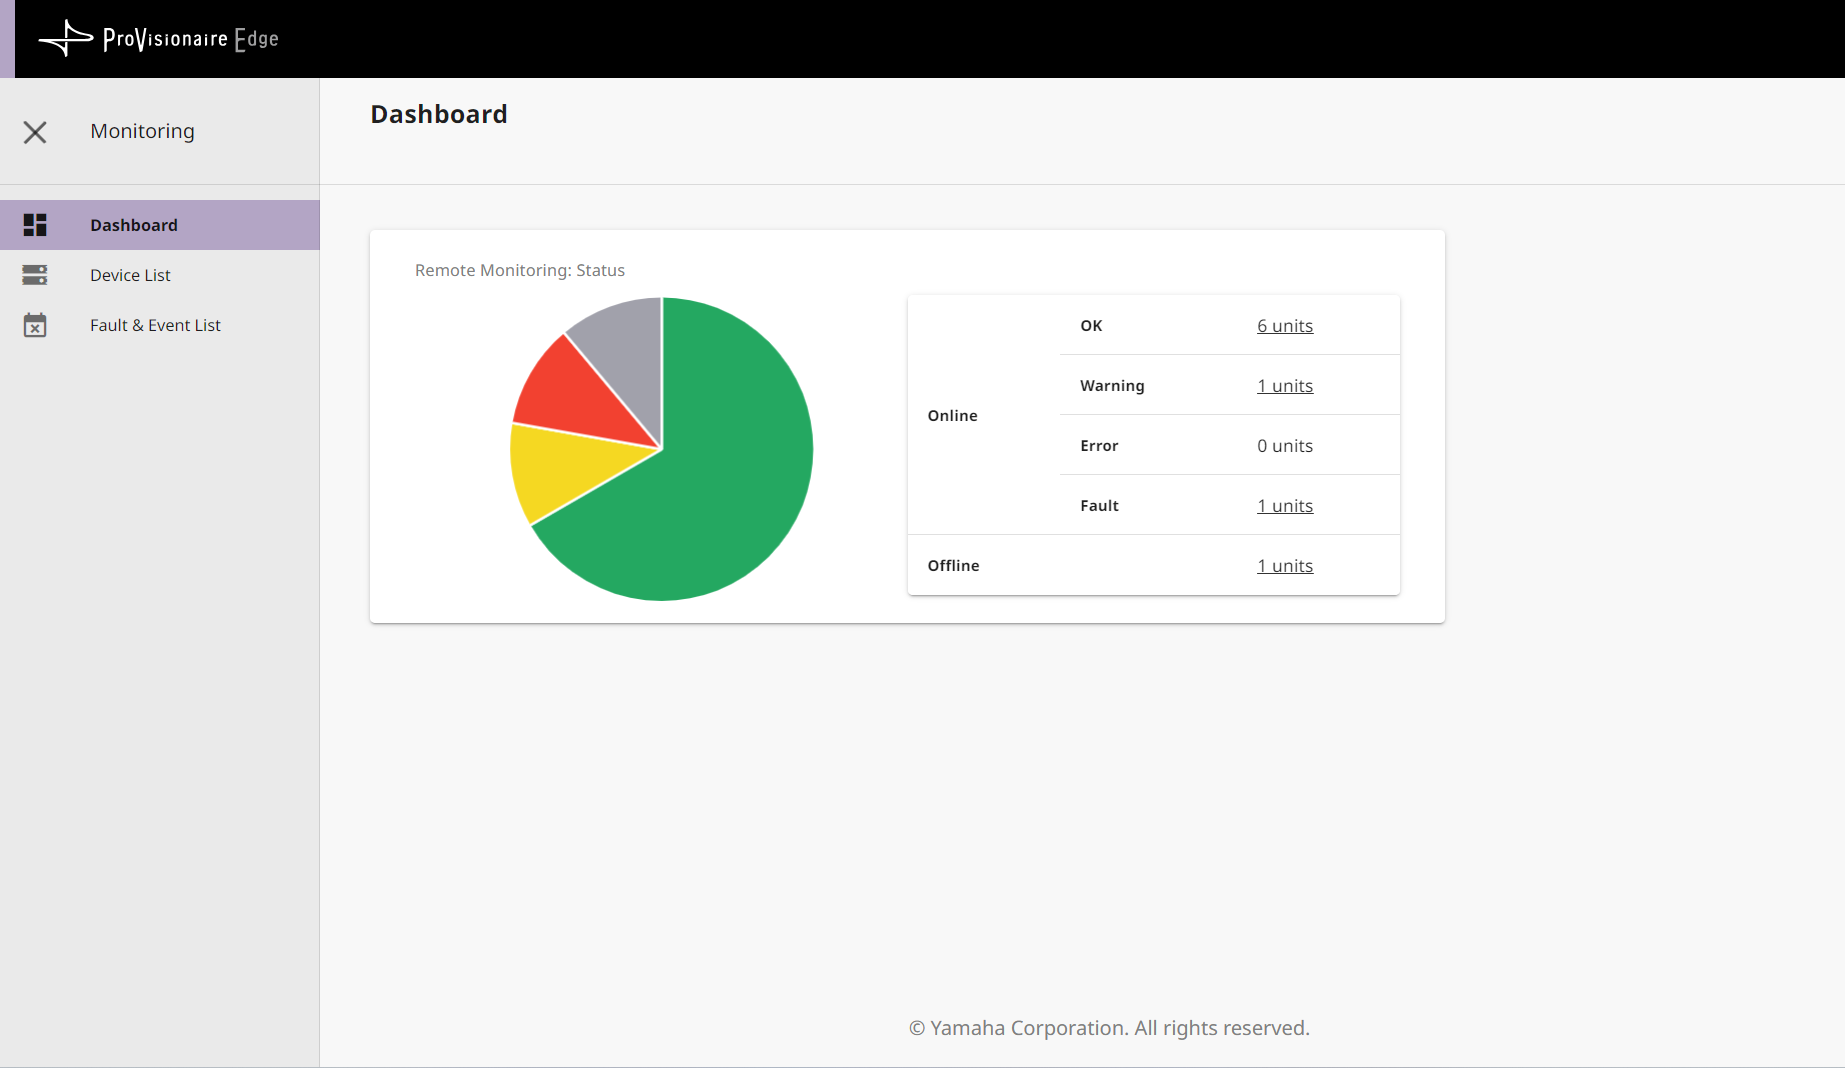
ProVisionaire Edge will start on your browser. Start monitoring devices.
For more information on device monitoring, refer to “ProVisionaire Edge” monitoring window described later.