MAIN Window
MAIN Window
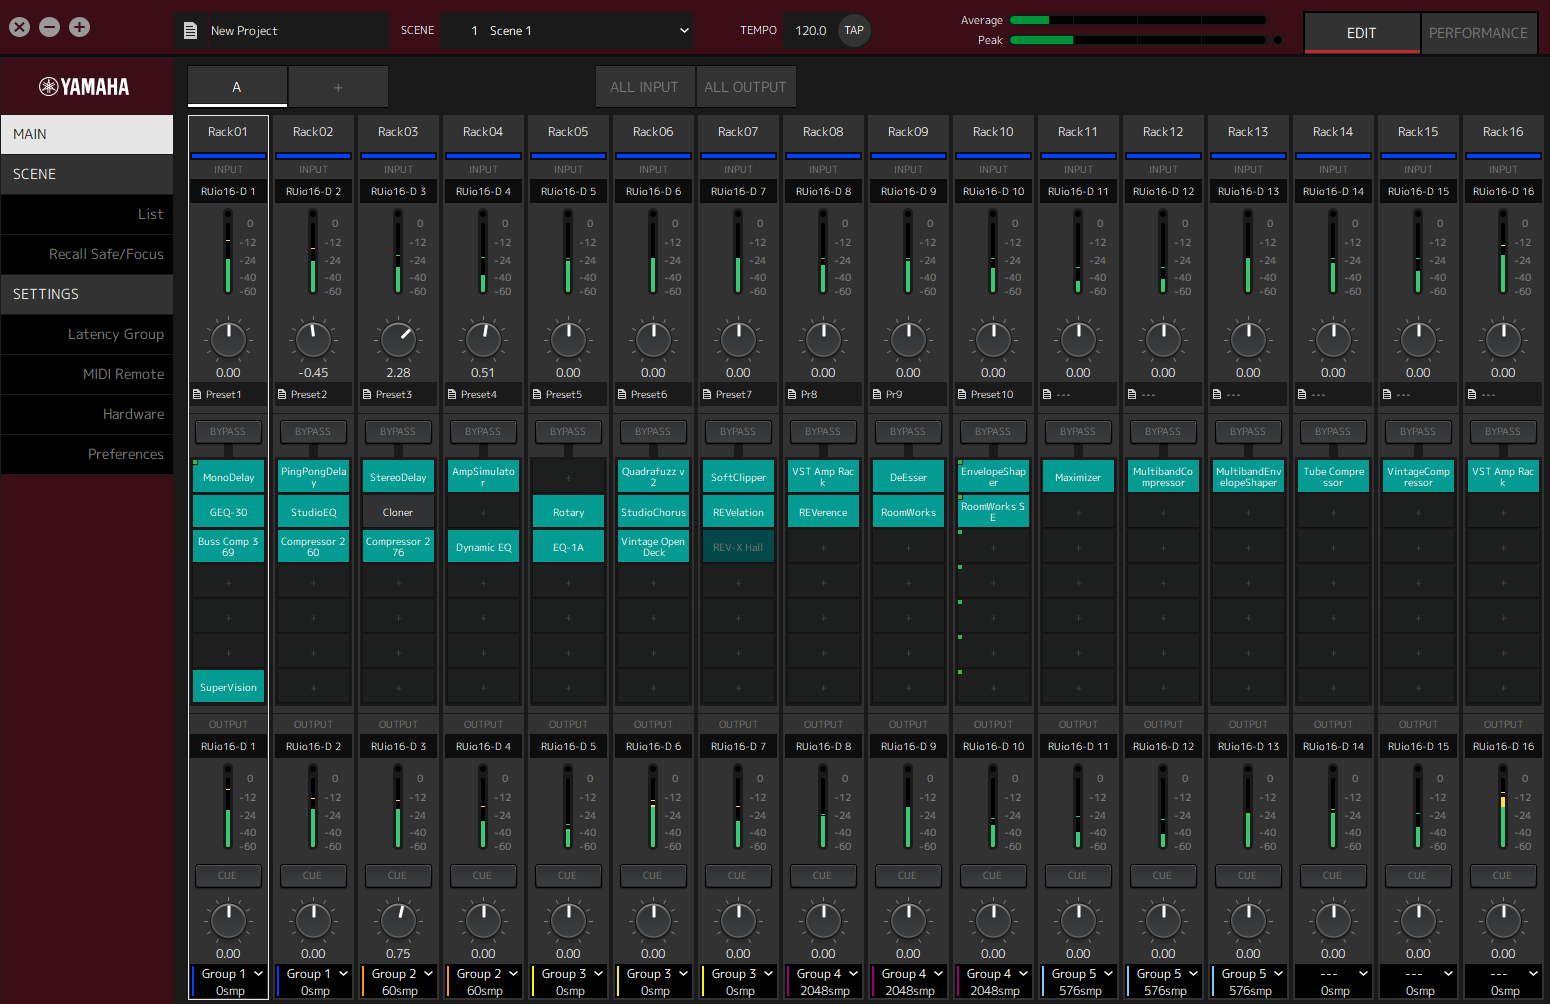
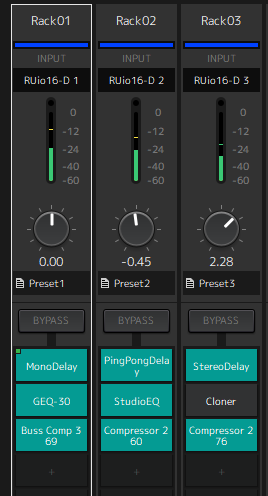
The MAIN window is equivalent to the console on a standard mixer. In the MAIN window, audio input/output is handled in units called racks.
Rack
A rack is equivalent to a channel strip on a standard mixer. Audio signals are processed along the signal path from the top of the window to the bottom of the window.

- ① Rack name
-
Shows the name of the rack. Double-click to edit the name.
- ② Rack color
-
You can specify the color for each rack. Click to display the color palette.
- ③ Input channel
-
Shows the input channel that has been set for the rack.
- ④ Input meter
-
Shows the level of the input signal for the rack.
- ⑤ Input gain knob
-
Adjusts the input gain. Drag to change the gain value.
- ⑥ Input gain value
-
Shows the input gain value. Double-click to enter a value.
- ⑦ Rack preset
-
Shows the preset name, if a preset is being used in the rack. Click to display the following menu.
Rack Preset Menu
| Setting | Description |
|---|---|
|
Load Rack Preset |
Loads a preset. |
|
Save Rack Preset |
Saves the current state of the rack as a preset. |
|
Factory Preset |
Loads a preset that has been prepared in advance. |

- ⑧ [BYPASS] button
-
Turns bypass on/off for the entire rack. Click the button to select on/off.
When bypass is on, the button is enclosed in an orange frame.

- ⑨ Plug-in slots
-
Show the names of plug-ins that are assigned to the rack. You can configure the plug-ins.
Assigning a New Plug-in
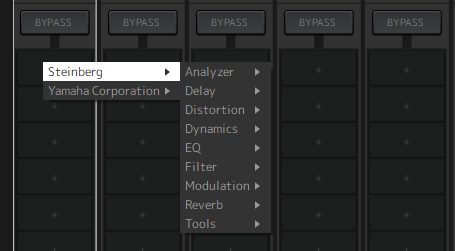
Left-click on an empty slot to display the list of plug-ins. Drag the mouse through the list, and click the desired plug-in name to assign that plug-in to the slot.
Bypassing, Removing, Disabling, Copying, Opening, and Closing Plug-ins
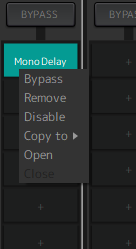
Right-click on a plug-in name to display the plug-in menu. Drag the mouse through the menu, and click the desired operation.
Plug-in Menu
| Setting | Description |
|---|---|
|
Bypass |
Turns bypass on/off for individual plug-ins. You can perform the same operation by placing the cursor over the plug-in name, and then holding down the [Alt]/[option] key while clicking. |
|
Remove |
Removes the plug-in from the slot. |
|
Disable (Enable) |
Enables/disables individual plug-ins. |
|
Copy to |
Copies the plug-in. The content to be copied also includes the values of the parameters that have already been manipulated. You can also copy a plug-in by holding down [Ctrl]/[option] while dragging. |
|
Open |
Opens the window for editing plug-ins (plug-in window). You can perform the same operation by double-clicking the plug-in name. |
|
Close |
Closes the plug-in window. You can also close the plug-in window by click the (x) at the top of the window. |
Plug-in Display
When Recall Safe is enabled for a plug-in, the indicator in the top left corner comes on.
You can turn bypass on/off for each plug-in by holding down the [Alt]/[option] key and left-clicking. Also, you can left-click to display a list of plug-ins that can be assigned. Drag a plug-in to move it.
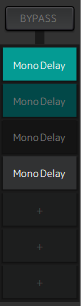
 Enabled with bypass off
 Enabled with bypass on
 Disabled with bypass on
 Disabled with bypass off

- ① Output channel
-
Shows the output channel that has been set for the rack.
- ② Output meter
-
Shows the amount of the audio signal that is output from the rack. The round red indicator comes on when the peak is reached.
- ③ [CUE] button
-
Outputs the audio signal to the channel that is set in “Settings” → “Hardware” → “Monitor”. The [CUE] button cannot be turned on for multiple racks at the same time.
- ④ Output gain
-
Adjusts the output gain. Drag to change the gain value.
- ⑤ Output gain value
-
Shows the output gain value. Double-click to enter a value.
- ⑥ Latency group
-
Shows the name of the latency group. Click and then select a latency group from the list that is displayed.
- ⑦ Latency value
-
Shows the latency for the rack.
Right-click to switch the units between samples and milliseconds.
Context Menu
Right-click on a rack (anywhere other than a plug-in slot) to display a context menu. Click the desired operation in the menu.
| Setting | Description |
|---|---|
|
Clear Rack |
Removes all plug-in slot assignments. |
|
Copy Rack to |
Copies everything except the input channel settings, output channel settings, and CUE settings. |
|
Move Rack to |
Moves the rack being manipulated to the position in front of the rack that is selected in the displayed list. If [Last] is selected, it is moved to the end. |
|
Pair (Unpair) |
Switches between pairing/unpairing with the rack immediately to the right. The settings for the rack on the left side of a pair are applied to both racks.
|
|
Reassign In/Out |
Assigns the channels in order from the beginning. |
| You can also move racks by dragging them left and right. |
Plug-in Window
The plug-in window is used to configure plug-ins and manipulate plug-in parameters. This section describes the tool area of the plug-in window. Refer to the VST Rack Elements V1.5 Plug-in Reference for parameters specific to each plug-in.
Tool Area
The tool area is at the top of the plug-in window.

- ① [Switch A/B Settings] button
-
Switches the parameter from the A (B) setting to the B (A) setting. This allows you to create sounds while comparing the A and B settings.
- ② [Apply Current Settings to A and B] button
-
Saves the current parameters to the selected setting (A or B).
- ③ Preset Name
-
Shows the preset name, if a preset is being used. Click to display the list of presets. The menu in the Results window is shown below.
Results Window Tool Bar
| Setting | Description |
|---|---|
|
Back* |
Moves to the folder used previously. |
|
Forward* |
Moves to the next folder. |
|
Up* |
Moves one folder up. |
|
Include Folders and Subfolders* |
Shows the content of folders and subfolders. |
|
Set up Result Columns |
Allows you to select the attributes to be displayed in the list of presets. |
|
Reset Filters |
Resets the filters. |
|
Shuffle Results |
Shuffles the list of presets. |
|
Update Results |
Updates the list of presets. |
|
Set up Window Layout |
Configures the layout of the window.
|
*These functions are for conveniently displaying presets that have a complicated hierarchical structure in Cubase and Nuendo. Due to the simple folder structure of VST Rack plug-ins, there might be no change in the window even when you perform these operations.
- ④ [Load previous Program] button
-
Loads the previous preset in the list of presets.
- ⑤ [Load next Program] button
-
Loads the next preset in the list of presets.
- ⑥ [Preset Management] button
-
Click to display the following menu.
Preset Management Menu
| Setting | Description |
|---|---|
|
Load Preset |
Loads a preset. |
|
Save Preset |
Saves the preset. Enter a name for the preset in the dialog that is displayed. |
|
Save as Default Preset |
Saves the current parameters as the default values for when the plug-in starts. |

- ⑦ Function button
-
Click to display the following menu.
Function Menu
| Setting | Description | |
|---|---|---|
|
Copy Setting |
Copies the current parameters. |
|
|
Paste Setting |
Pastes the copied parameters. |
|
|
Load Preset |
Loads a preset. |
|
|
Save Preset |
Saves the preset. Enter a name for the preset in the dialog that is displayed. |
|
|
Reset to Default Preset |
Save as Default Preset |
Saves the current parameters as the default preset for when the plug-in starts. |
|
Remove Default Preset |
Restores a default preset to its values at the time of installation. |
|
|
Switch to A/B setting |
Switches the parameter from the A (B) setting to the B (A) setting. |
|
|
Apply Current Settings to A and B |
Saves the current parameters to the selected setting (A or B). |
|
|
About |
Displays a window with the version information. |
|
A, B, C, D, ALL INPUT, ALL OUTPUT
In the MAIN window, you can switch the display according to the number of racks and the purpose of input/output.

- ① [A], [B], [C], [D] bank buttons
-
Switches the display every 16 racks. You can switch between four banks: A, B, C, and D. Use the [+] button to add a bank.
- ② [ALL INPUT] button
-
Switches to a display of inputs only. The items that are displayed are rack name, rack color, input channel, input meter, and BYPASS.
- ③ [ALL OUTPUT] button
-
Switches to a display of outputs only. The items that are displayed are rack name, rack color, output channel, output meter, and BYPASS.
About Racks
When you click a rack, it is selected and displayed in a white frame.
You can drag racks to reorder them within a bank. When doing so, channel assignments do not change.
Each bank can contain a maximum of 16 racks, whether Mono or Stereo. If the maximum number is exceeded when you bring in a rack from a different bank, the last rack in the bank (the rack in the rightmost position) moves to the next bank. The same applies if the maximum number of 16 racks is exceeded when you unpair two racks.
However, if there are already 16 racks assigned to the subsequent banks, the first rack in the bank moves to the previous bank.
You can copy all parameters other than the input/output channel settings by holding down the [Ctrl]/[option] key while dragging a rack.
| With the 64 Racks display, you can reorder racks even outside of a bank. |