Transferring files using Musicsoft Downloader
NOTE
• Certain instruments allow transferring and saving of files to your computer, such as user songs recorded on the instrument. For instruments that have files that can be transferred/saved, whether the file transfer is done using Music Software Downloader, or Explorer/Finder, etc. on the computer, depends on the particular instrument. For information on the types of files (data) that can be transferred and the file transfer method for each instrument, refer to "Target models and Functions" or the Owner’s Manual of your instrument.
System Requirements
Check the following Yamaha downloads website.
Musicsoft Downloader is not supported for the Mac.
How to install
1. On the computer, access the following site, and then download Musicsoft Downloader.
*After selecting your country and clicking on “Firmware/Software Updates” from the “Support” page, select the Product Category, and then enter “Musicsoft Downloader” into the search box.
Select “Musicsoft Downloader” from the search results. Information about the computer system requirements and the installing can be confirmed on the display shown.
2. Execute installation by following the on-screen instructions.
After installation is completed, confirm that the Shortcut icon is located on the screen or Musicsoft Downloader is added under Yamaha in the Start menu.
For detailed instructions of this application, refer to the Help.
NOTE
• Depending on the instrument and the computer OS used, menu and screen indications may differ from those shown in the instructions below.
1. Connect the instrument to a computer with a USB cable.
2. On the desktop of the computer, double-click the shortcut icon of Musicsoft Downloader.
If you cannot find the shortcut icon, select [Start] → [All Programs] → [YAMAHA] → [Musicsoft Downloader] → [Musicsoft Downloader].
Musicsoft Downloader launches, and the main window appears.
3. Click [Connection Check] at the bottom of the window.
This operation checks whether communication between the computer and instrument has been properly established or not. If an error message appears, follow the on-screen instructions to check the connection status with the Yamaha USB-MIDI driver.
4. Click [Add File] to call up the file selection window.
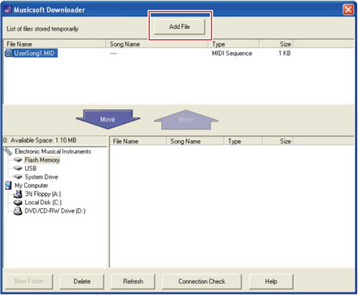
5. On the file selection window, select the desired file, then click [Open].
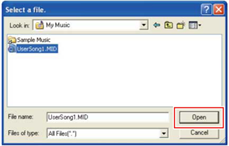
In the upper half box of the main window, the duplication of the selected file is shown.
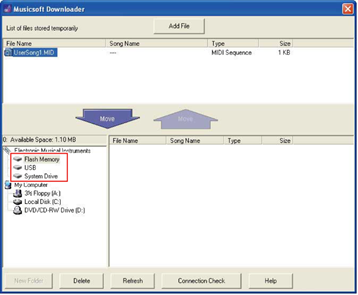
6. At the lower left box of the main window, click “Electronic Musical Instruments,” and then select the desired destination drive.
• If you wish to transfer Song (***.MID) or Style (***.STY) data to internal memory of the instrument, select “Flash Memory.”
• If you wish to transfer Song (***.MID) or Style (***.STY) data to the USB flash drive connected to the USB TO DEVICE terminal of the instrument, select “USB.”
• If you wish to transfer Backup file (****.BUP) data, select “System Drive.”
• When a “USER FILES” folder is located under “Flash Memory” or “USB”: For User Songs, select the “USER FILES” folder. Song files outside the “USER FILES” folder will be handled as External Songs. For External Songs, select a folder other than the “USER FILES” folder, or simply specify “Flash Memory” or “USB” (the area first displayed when clicking “Flash Memory” or “USB”). If you select the “USER FILES” folder for External Songs, they will not be played back on the instrument.
IMPORTANT
• Regarding Backup files, User Songs and User Styles created on the instrument, never change the file name on the computer. Doing so makes it impossible to transfer the Backup file to the instrument and prevents User Song and User Style data from being recognized by the instrument.
7. Select the file in the upper half box, then click the downward [Move ↓ ] button.
A confirmation message will appear. To cancel the operation, click [CANCEL] in this step.
8. Click [OK] to start data transfer from the computer to the instrument.
NOTICE
• Never unplug the USB cable during data transfer. Not only will the data transfer fail, but also operation of the memory media may become unstable and its contents may disappear completely when the power is turned on or off.
9. After data transfer is completed, close the window to quit the Musicsoft Downloader.
10. On the instrument, use the data to play music.
If you’ve transferred a Song (***.MID), select the corresponding number and then start playback. For details, refer to the Owner’s Manual of your instrument, or refer to the “Playing Back MIDI Files including Songs Transferred from a Computer.”
If you’ve transferred a Style (***.STY), confirm that the file transfer was successful according to the Owner’s Manual of your instrument.
NOTE
• Note that the instrument cannot be operated while Musicsoft Downloader is running.
NOTE
1. Connect the instrument to a computer with a USB cable.
2. From Desktop (on the computer), double-click the shortcut icon of Musicsoft Downloader.
If you cannot find the shortcut icon, select [Start] → [All Programs] → [YAMAHA] → [Musicsoft Downloader] → [Musicsoft Downloader].
Musicsoft Downloader launches, and the main window appears.
3. Click [Connection Check] at the bottom of the window.
This operation checks whether communication between the computer and instrument has been properly established or not. If an error message appears, follow the on-screen instructions to check the connection status with the Yamaha USB-MIDI driver.
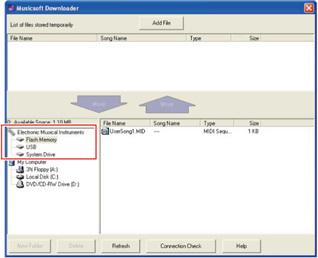
4. At the lower left box of the main window, click “Electronic Musical Instruments,” and then select the desired source drive.
• If you wish to transfer Song (***.MID) or Style (***.STY) data in internal memory of the instrument, select “Flash Memory.”
• If you wish to transfer Song (***.MID) or Style (***.STY) data in the USB flash drive connected to the USB TO DEVICE terminal of the instrument, select “USB.”
• If you wish to transfer Backup file (****.BUP) data, select “System Drive.”
5. In the lower right box of the window, select the desired file, and then click the upward [Move] button.
A confirmation message will appear. To cancel the operation, click [CANCEL] in this step.
6. Click [OK] to start data transfer from the instrument to the computer’s temporary storage area.
7. After a while, confirm that the transferred data appears in the box on the upper half of the window.
8. In the lower left box, select the desired destination folder, then click the upward [Move ↑ ] button.
A confirmation message will appear. To cancel the operation, click [CANCEL] in this step.
9. Click [OK] to start data transfer from the temporary storage area to the specified destination folder of the computer.
NOTICE
• Never unplug the USB cable during data transfer. Not only will the data transfer fail, but also operation of the memory media may become unstable and its contents may disappear completely when the power is turned on or off.
10. After data transfer is completed, confirm that the file is located in the specified folder of the computer.
11. Quit Musicsoft Downloader.