Transferring files with a Computer using Explorer, Finder, etc.
NOTE
• Depending on the instrument and the computer OS used, menu and screen indications may differ from those shown in the instructions below.
• Certain instruments allow transferring and saving of files to your computer, such as user songs recorded on the instrument. For instruments that have files that can be transferred/saved, whether the file transfer is done using Music Software Downloader, or Explorer/Finder, etc. on the computer, depends on the particular instrument. For information on the types of files (data) that can be transferred and the file transfer method for each instrument, refer to "Target model and Functions." or the Owner’s Manual of your instrument.
Windows 10 is used as an example in this manual.
1. Connect the instrument and the computer via a USB cable.
2. Set the instrument's function “Storage Mode” to “ON” according to the Owner’s Manual of your instrument.
NOTE
• The instrument is locked or cannot be used while “Storage Mode” is set to “ON.” “Storage Mode” should be set to “OFF” normally, except when you transfer the file between the instrument and the computer.
3. On the computer, start an application that can copy files, such as Explorer.
4. Confirm that the instrument is recognized as an external storage device using Explorer or a similar program.
• The device name depends on the instrument.
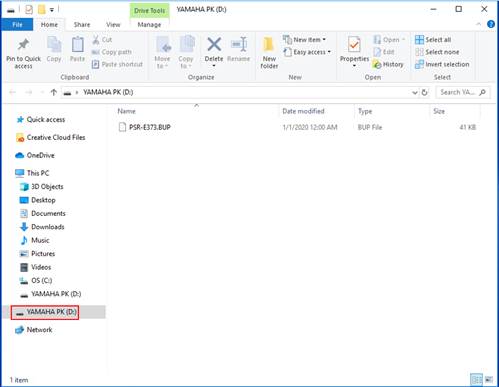
5. Copy files between the computer and the instrument (external storage device).
NOTICE
• When copying files from the computer to the instrument (external storage drive), make sure that the instrument (external storage drive) has enough free space.
• Do not change (rename) the backup file name (with the extension:.BUP) on the computer. The backup data will not be imported to the instrument.
• Regarding User Songs and User Styles created on the instrument, never change the file name on the computer. Doing so prevents User Song and User Style data from being recognized by the instrument.
• Do not create folders on the instrument (external storage drive). The instrument may not correctly recognize the copied file.
• Do not format the instrument (external storage drive). The instrument may not work properly.
• Do not disconnect the USB cable during data communication. Also, do not turn off the power of the instrument. Not only will the data being transferred not be saved, but the instrument and computer will become unstable, and all memory contents may be lost when the power is turned on or off.
• To remove the instrument (external storage drive), follow the procedures in this booklet. Failing to do this may result in damage to the file.
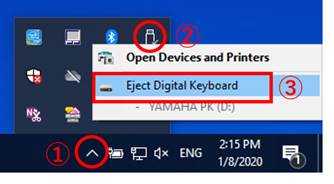
6. After copying is completed, remove the instrument (external storage drive) from the computer.
• The drive name depends on the instrument.
7. Disconnect the USB cable connecting the instrument to the computer.
8. Set the instrument's function “Storage Mode” to “OFF” according to the Owner’s Manual of your instrument.
9. If you transferred the file to the instrument, make sure that it was transferred correctly.
• If you’ve transferred a Backup file (****.BUP), confirm that the panel settings have been changed as expected.
• If you’ve transferred a Song (***.MID), select the corresponding number and then start playback. For details, refer to the Owner’s Manual of your instrument, or refer to the “Playing Back MIDI Files including Songs Transferred from a Computer.”
• If you’ve transferred a Style (***.STY), confirm that the file transfer is successful according to the Owner’s Manual of your instrument.