List screen
This screen displays the agents managed by Yamaha LAN Monitor as a list.
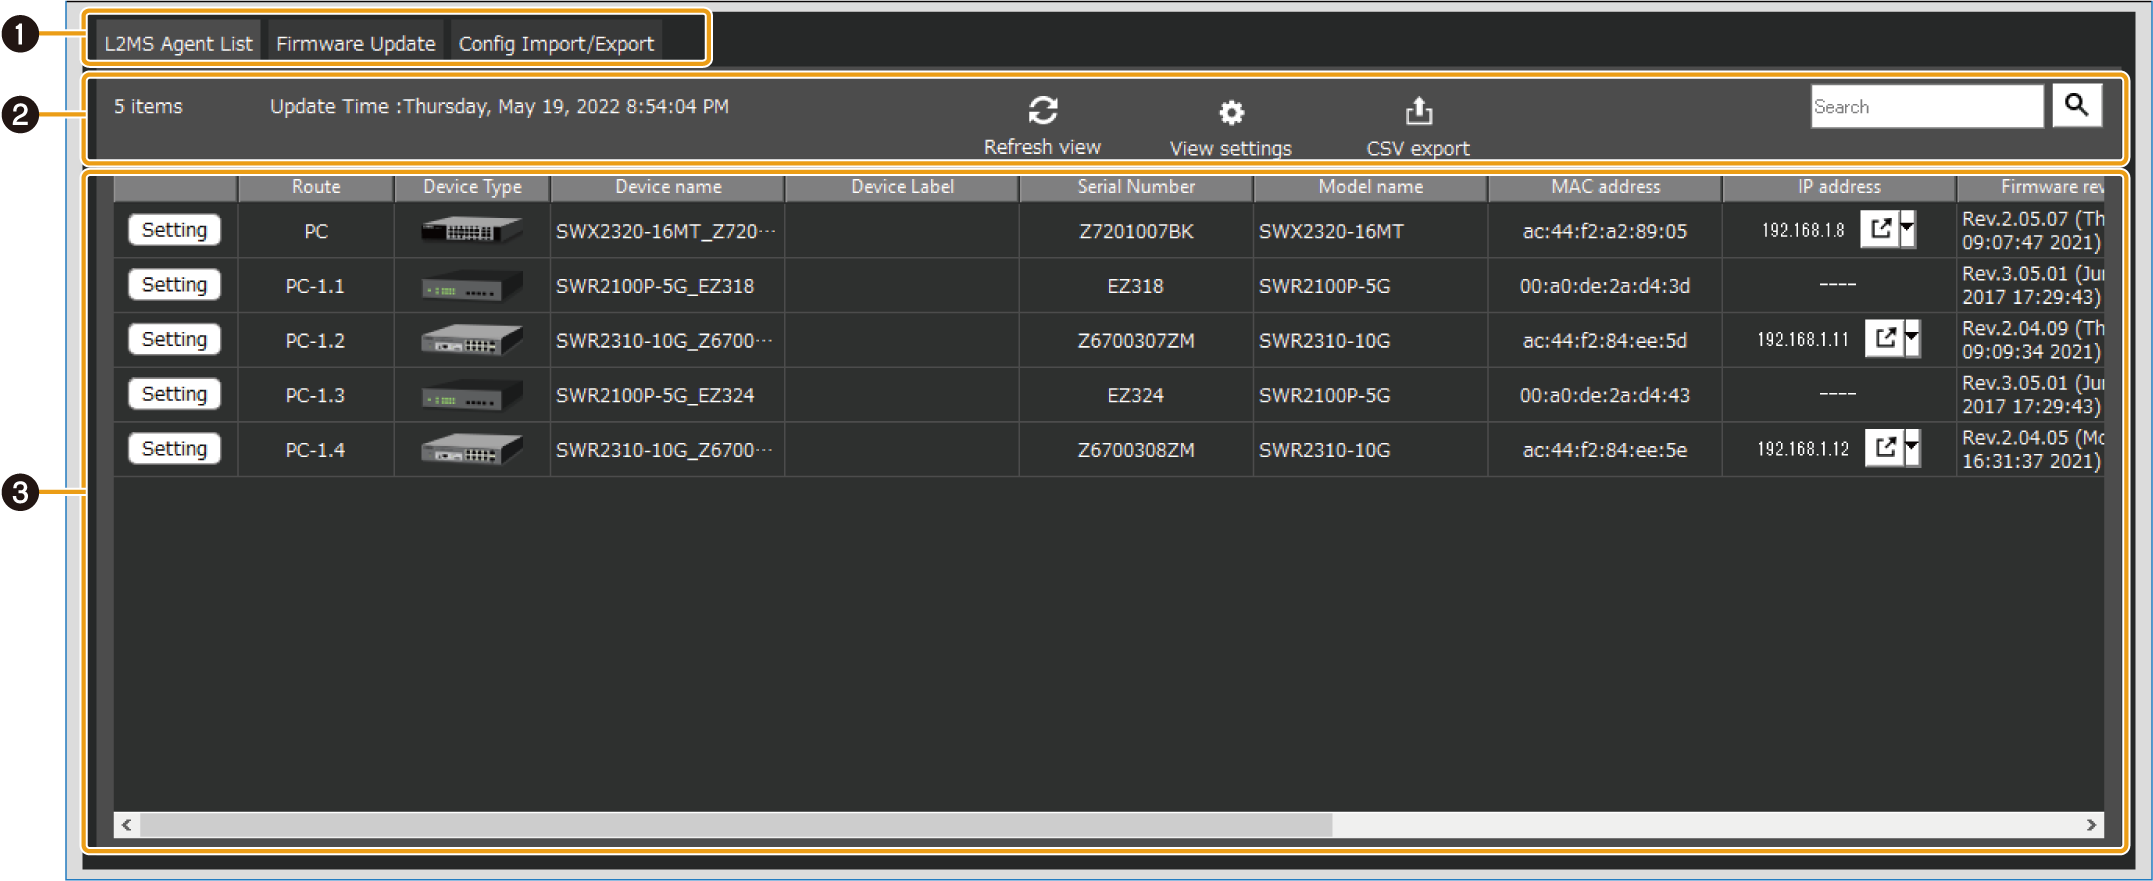
- ❶ List display switching button
-
Tab button to switch between the following three types of list views.
Tab name Descriptions L2MS Agent List
Displays a list of Yamaha switches and Yamaha wireless LAN access points being managed by LAN Monitor.
For details, refer to “L2MS Agent List” tab.Firmware Update
From this tab, you can update the firmware for devices being managed by LAN Monitor, and view information about the firmware.
For details, refer to “Firmware Update” tab.Config Import/Export
From this tab, you can import/export the CONFIG for devices being managed by LAN Monitor, and view information about the CONFIG.
For details, refer to “Config Import/Export” tab.-
“CONFIG import” is a function for applying the CONFIG file on the PC to the agent device.
-
“CONFIG Export” is a function for saving the CONFIG file of the agent device to your PC.

-
- ❷ Operation panel
-
This panel shows the buttons for controlling the list display, the buttons to operate on the currently selected device and a search box to narrow down the display by search term.
The buttons that appear on each tab are different.
For details, refer to “L2MS Agent List” tab, “Firmware Update” tab, “Config Import/Export” tab.
- ❸ Device list
-
Displays a list of devices corresponding to the currently selected tab.
Different devices are shown on each tab.
As with the list view of the “Connected Devices” view, clicking on the title line will sort the list by the item you click.
For details, refer to “L2MS Agent List” tab, “Firmware Update” tab, “Config Import/Export” tab.
1. “L2MS Agent List” tab
Displays a list of Yamaha switches and Yamaha wireless LAN access points being managed by LAN Monitor.
The content displayed will be automatically updated every 30 seconds.
You can also refresh the display manually by clicking the “Refresh view” button.
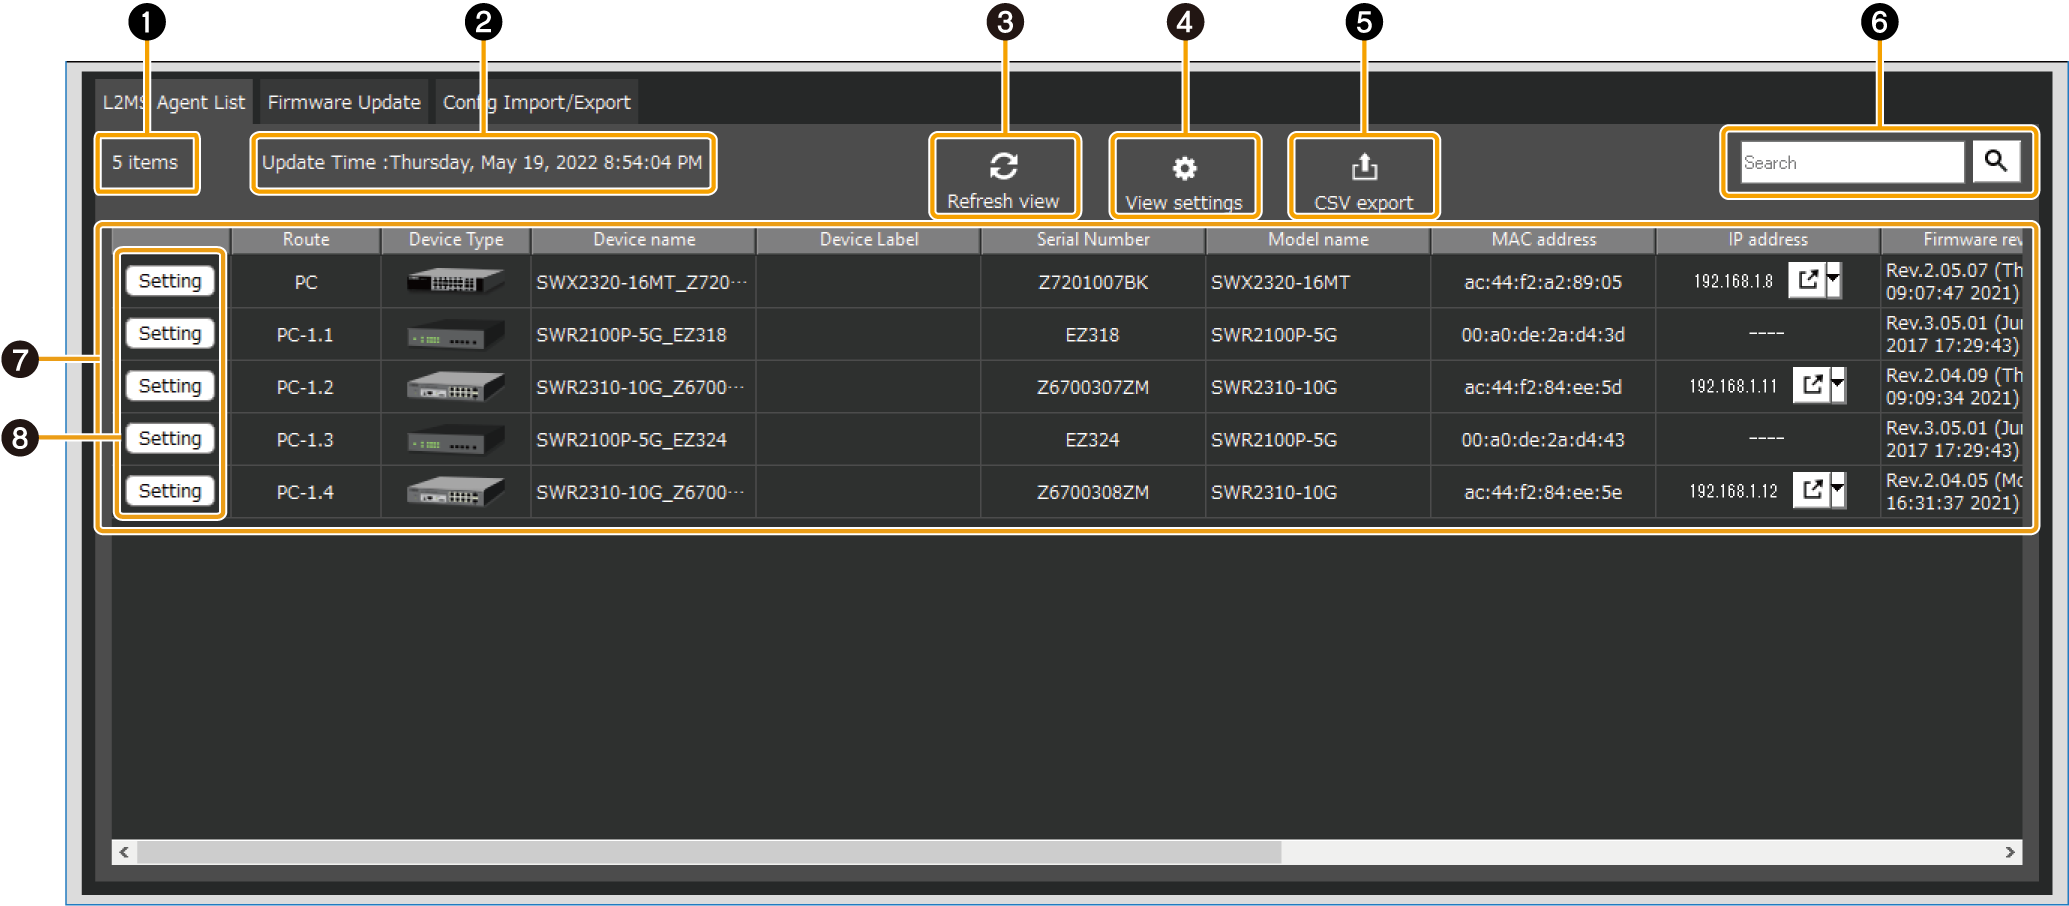
- ❶ Number of items displayed
-
Shows the number of entries displayed in the device list.
- ❷ “Update Time :”
-
Displays the date and time when the information for Yamaha switches and Yamaha wireless LAN access points being managed by LAN Monitor was last retrieved.
- ❸ “Refresh view” button
-
Press this to retrieve the information for the Yamaha switches and Yamaha wireless LAN access points being managed by LAN Monitor again. The display contents will be updated.
- ❹ “View settings” button
-
A dialog box for selecting items to be displayed in the “L2MS Agent List” tab will appear.
Items checked in the dialog will be displayed, and items unchecked will be hidden. - ❺ “CSV export” button
-
Exports the list of switches/wireless APs currently being displayed to a CSV file.
Items that are hidden in the “View settings” will not be included in the exported CSV file.
Also, when narrowing down the search results, devices that are not shown in the search results are not included in the exported CSV file. - ❻ “Search” box
-
Narrows down the currently displayed device by string.
Type the string you want to search in the text box and press Enter key or the Search button to execute the search.
When a search is performed, only devices with information that matches the string entered in the text box will be displayed in the device list.
The title line of the table turns blue while the search is in progress, and “Displaying search results” is shown below the search box.
To cancel the search, empty the text box and press the Enter key or the Find button, or switch to a different tab.
- ❼ Device list
-
The following information will be displayed for each device managed by LAN Monitor. Some items may not be displayed depending on the device.
In addition, items that are hidden in “View settings” will not be displayed.“Route”
Displays routing information showing where the device is, respective to the PC running LAN Monitor.
For example, the device labeled “PC” is directly connected to the LAN Monitor, and the device labeled “PC-3” is connected to port 3 of the switch connected to LAN Monitor.
The switch port numbers that support the stack function are displayed in the format “<Stack ID>.<Port number>”.“Device Type”
Shows an icon that indicates the type of device.
“Device name”
The device names of the Yamaha switch and Yamaha wireless LAN access point will be displayed.
The device name is a character string set in the device itself.“Device Label”
You can enter any text you like to identify the individual device.
The device label is the information stored in LAN Monitor, and the edited information is not reflected in the device itself.
This information is the same as the label information used in the “Connected Devices” view.“Serial Number”
Shows the serial number of the device.
“Model name”
Shows the model name.
“MAC address”
Shows the MAC address of the device.
“IP address”
Shows the IPv4 address of the device.
As with the “Connected Devices” view, you can use the opens the Web browser button.“Firmware revision”
Shows the firmware revision of the device.
“Date and time of last CONFIG import”
Shows the date and time of the last CONFIG import.
When you perform a CONFIG import, the information to be displayed in this area will be saved.
This information will also be saved in the exported “Label Settings file”.“CONFIG file of last import”
Shows the file path of the last imported CONFIG file.
When you perform a CONFIG import, the information to be displayed in this area will be saved.
This information will also be saved in the exported “Label Settings file”.“Comment”
Allows you to freely assign a comment. You can enter information about the on-site cabling or the role of the device.
This is the same as the “Comment” used in the “Connected Devices” view.When using the snapshot function, as well as the “Connected Devices” view, if a device saved in the snapshot is no longer found, the corresponding device is shown in red. If a device that had not been saved previously is newly found, the corresponding device is shown in blue. - ❽ “Setting” button
-
This button opens the “Device Settings” dialog.
2. “Firmware Update” tab
From this tab, you can update the firmware for devices being managed by LAN Monitor, and view information about the firmware.
Only devices that support firmware update from LAN Monitor will be displayed in this screen.
When you select a device and then press the “Firmware Update” button, a dialog box will appear that confirms the firmware update of all selected devices at once.
For details, refer to “Update firmware on multiple units at once”.
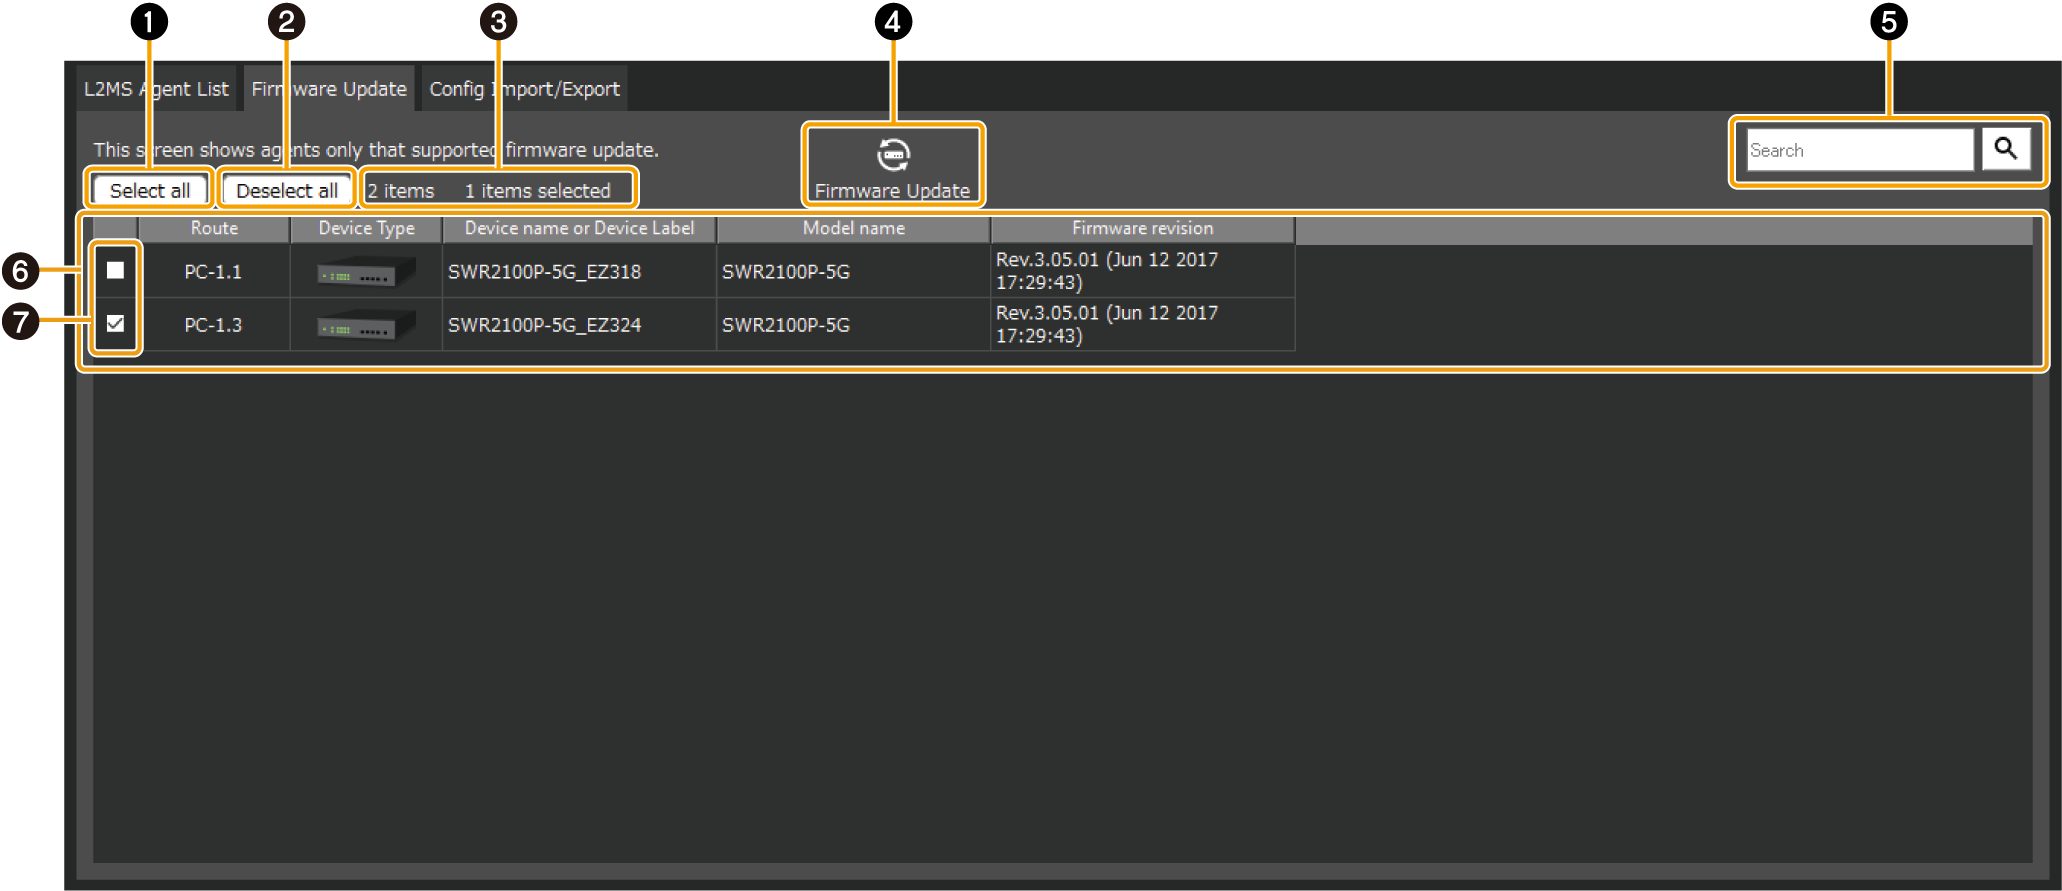
- ❶ “Select all”
-
Press the button to check the checkboxes of all the displayed devices, and all the devices will be selected.
- ❷ “Deselect all”
-
Press the button to remove the check from the checkboxes of all devices displayed, leaving all devices unselected.
- ❸ Number of items displayed and number of items selected
-
The number of devices displayed in the device list and the number currently selected will be displayed.
- ❹ “Firmware Update”
-
Displays the dialog to update the firmware of the selected devices at once.
- ❺ “Search” box
-
Narrows down the currently displayed device by string.
The behavior is equivalent to the “L2MS Agent List” tab. - ❻ Device list
-
Displays a list of devices that support firmware update from LAN Monitor.
The items that will be displayed are as follows.Check box
Used to select or deselect a device.
“Route”
The same contents as the “L2MS Agent List” tab will be displayed.
“Device Type”
The same contents as the “L2MS Agent List” tab will be displayed.
“Device name or Device Label”
If a device label has been set, the device label will be displayed; otherwise, the device name will be displayed.
“Model name”
The same contents as the “L2MS Agent List” tab will be displayed.
“Firmware revision”
The same contents as the “L2MS Agent List” tab will be displayed.
- ❼ Check box
-
Used to select or deselect a device.
3. “Config Import/Export” tab
From this tab, you can import/export the CONFIG for devices being managed by LAN Monitor, and view information about the CONFIG.
Only devices that support CONFIG import/export from LAN Monitor will be displayed in this screen.
When you select a device and then press the “CONFIG import” button or “CONFIG export” button, a dialog box will appear that confirms the CONFIG import/export of all selected devices at once.
For details, refer to “Import CONFIG on multiple units at once” and “Export CONFIG on multiple units at once”.
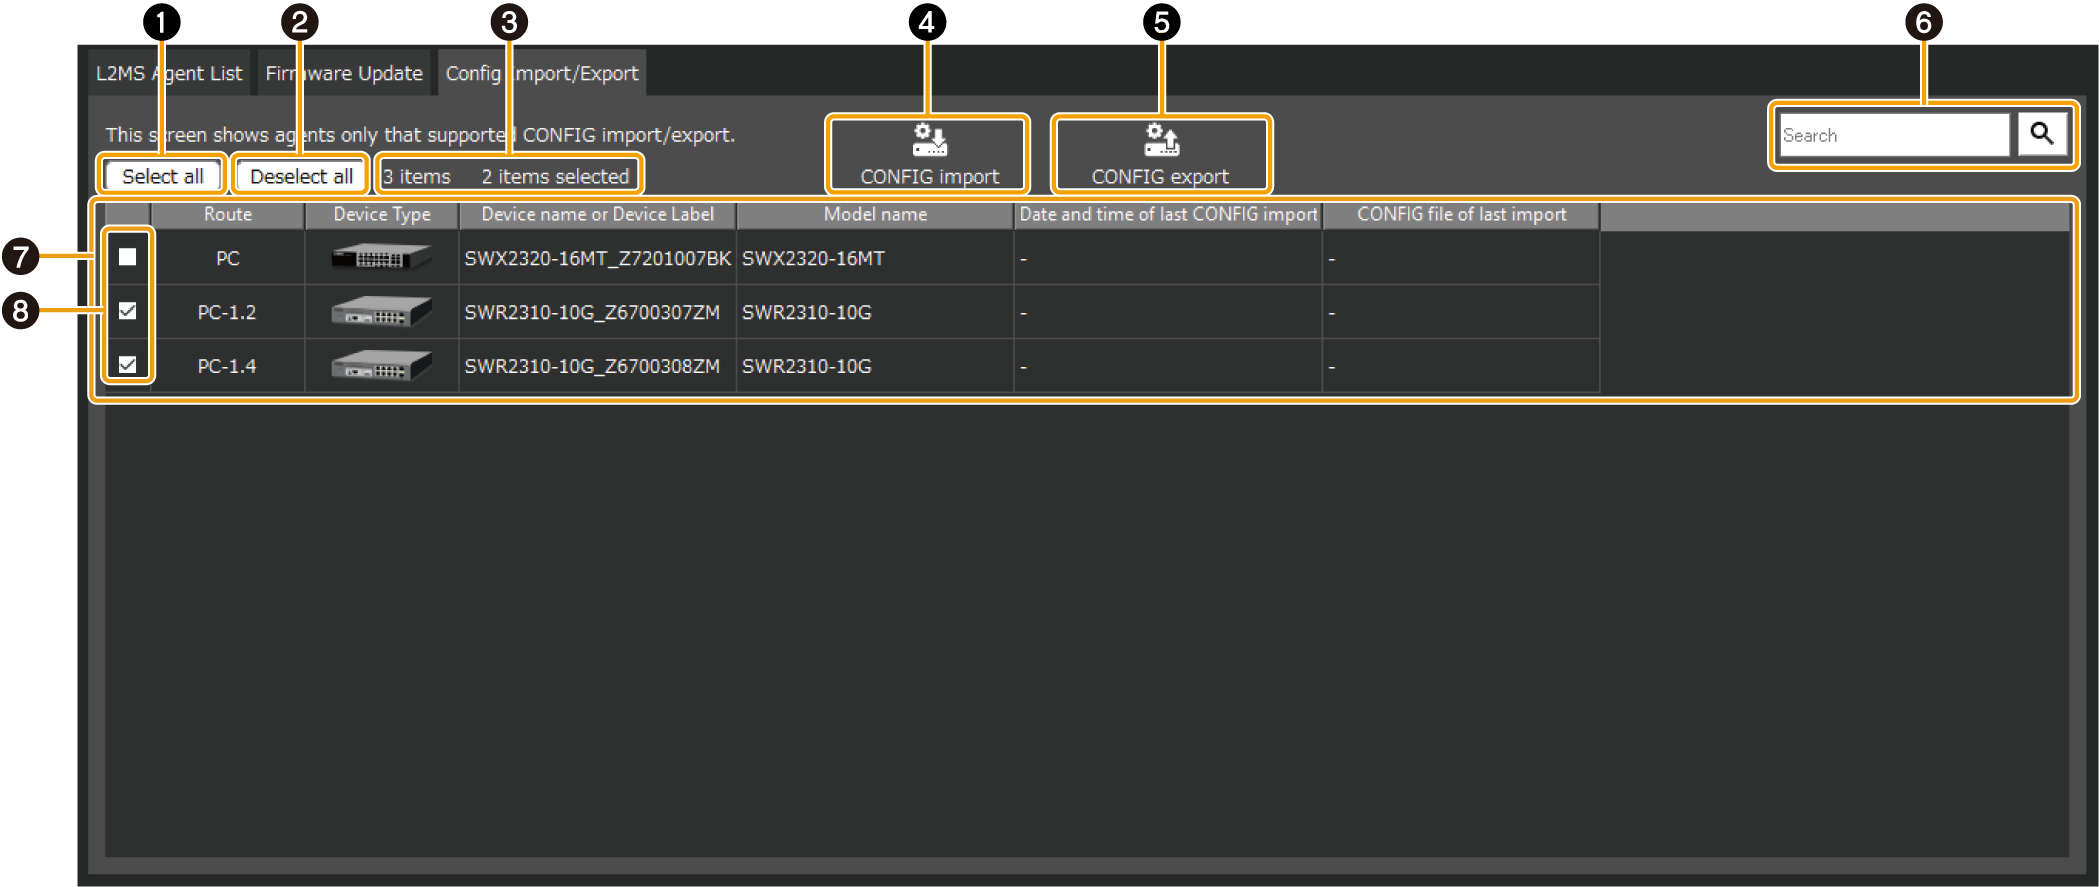
- ❶ “Select all”
-
Press the button to check the checkboxes of all the displayed devices, and all the devices will be selected.
- ❷ “Deselect all”
-
Press the button to remove the check from the checkboxes of all devices displayed, leaving all devices unselected.
- ❸ Number of items displayed and number of items selected
-
The number of devices displayed in the device list and the number currently selected will be displayed.
- ❹ “CONFIG import” button
-
Displays a dialog box to confirm importing CONFIG files in bulk for the currently selected devices.
- ❺ “CONFIG export” button
-
Displays a dialog box to confirm exporting CONFIG files of the currently selected devices in bulk.
- ❻ “Search” box
-
Narrows down the currently displayed device by string.
The behavior is equivalent to the “L2MS Agent List” tab. - ❼ Device list
-
Displays a list of devices that support CONFIG import/export by LAN Monitor.
The items that will be displayed are as follows.Check box
Used to select or deselect a device.
“Route”
The same contents as the “L2MS Agent List” tab will be displayed.
“Device Type”
The same contents as the “L2MS Agent List” tab will be displayed.
“Device name or Device Label”
If a device label has been set, the device label will be displayed; otherwise, the device name will be displayed.
“Model name”
The same contents as the “L2MS Agent List” tab will be displayed.
“Date and time of last CONFIG import”
The same contents as the “L2MS Agent List” tab will be displayed.
“CONFIG file of last import”
The same contents as the “L2MS Agent List” tab will be displayed.
- ❽ Check box
-
Used to select or deselect a device.