

Connecting to your computer and configuring the settings (Windows)
First, you must download and install the “Yamaha Steinberg USB Driver” from the following Yamaha website, so that your computer can recognize this product.
https://www.yamaha.com/2/ag08/
NOTE
- For the installation steps, see the installation guide found in the compressed file you downloaded.
- For a list of compatible operating systems, see the Yamaha website listed above.
- Remove all USB devices from your computer except for the mouse and keyboard.
- Make sure that the volume on this product and on the connected device is turned all the way down.
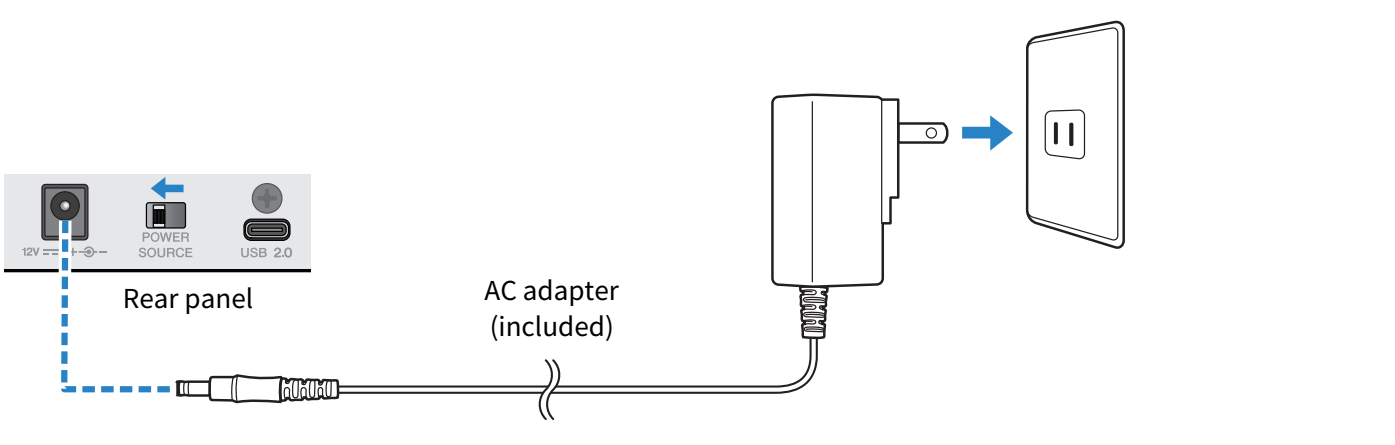
- Connect the included AC adapter to the [12V] DC port on the rear panel, and slide the [POWER SOURCE] selector switch to [12V] DC (left side).
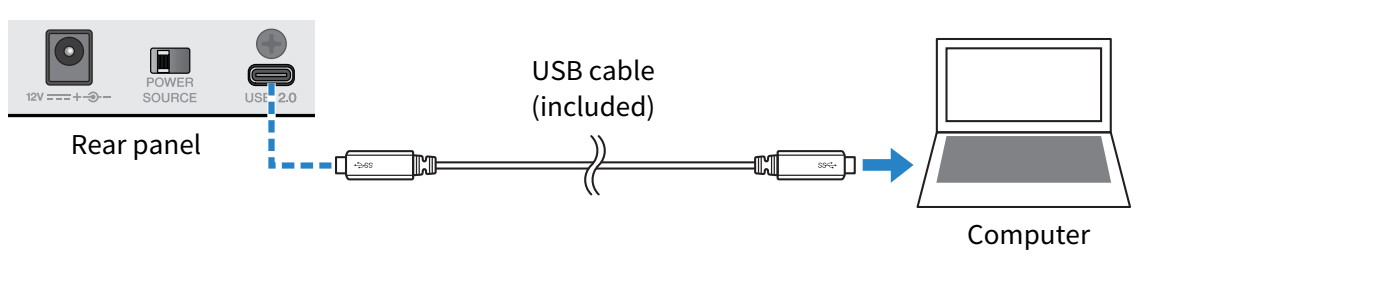
- After installing the driver, use the included USB cable to connect this product to the computer.
- Connect the devices directly without using a USB hub.
NOTE
- If you are using a computer that doesn’t have a USB-C port, use a commerically available USB-A to USB-C cable to connect the devices.
- Turn the [z] (standby/on) switch on.
- After the LED light animation on the top panel of this unit finishes, check whether the LED of the [z] (standby/on) switch on this product is lit.
- If you’ve connected the devices before installing the driver, go ahead and install the driver.
Settings on the computer
Change the output/input setting on your computer to “AG08”.
- Open the “Search” box from the “Taskbar”.
- The method of opening the “Search” box may differ depending on your computer’s settings.
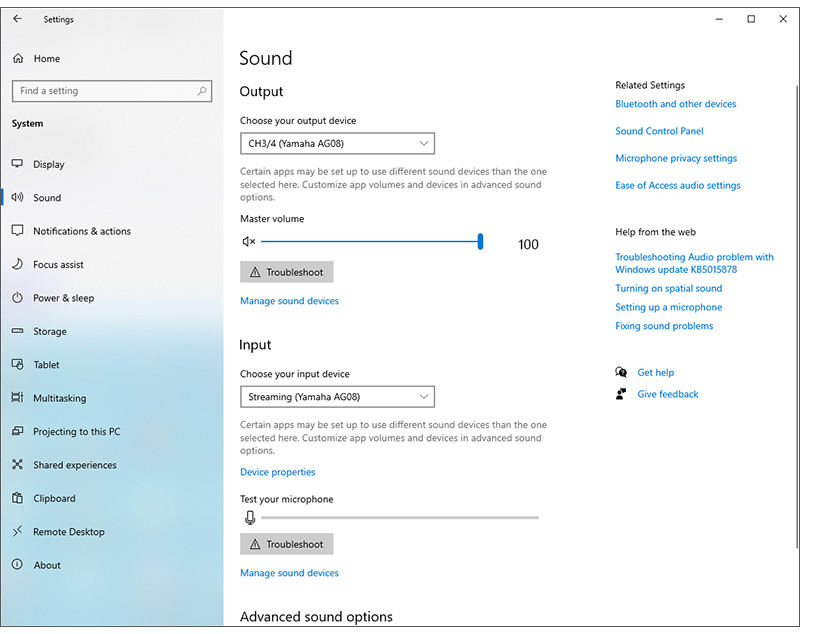
- Type “Sound” into the “Search” box screen, and then select “Sound Settings” from the menu that appears.
- On the “Sound” screen, select [CH3/4 (Yamaha AG08)] in Output, and use the [LINE/USB] selector switch for channels 3/4 on this product to select “USB”.
NOTE
- In step 3, when you select [CH5/6 (Yamaha AG08)] for Output, the computer starts outputting to the USB inputs of channels 5/6 on this product. Use the [LINE/USB] selector switch for channels 5/6 on this product to select “USB”.
- In step 3, when you select [CH7/8 (Yamaha AG08)] for Output, the computer starts outputting to the USB inputs of channels 7/8 on this product. Use the [LINE/USB] selector switch for channels 7/8 on this product to select “USB”.
- AG08 Controller app SOUND PAD audio files used for import or while adjusting the sound are output according to these settings.
- On the “Sound” screen, select “Streaming (Yamaha AG08)” for the input.
- The STREAMING OUT (mix for livestreaming) output from this product is inputted to the computer.
NOTE
- In step 4, when you select [Voice (Yamaha AG08)] for the input, only the channel 1 and channel 2 mix is inputted to the computer.
- In step 4, when you select [AUX (Yamaha AG08)] for the input, the AUX OUT from this product (see the block diagram for details) is inputted to the computer.
This product can be powered by a computer that has a USB Type-C port supplying at least 5 V/1.5 A of current via a USB-C to USB-C cable, without the need to connect a AC adapter.
The LED of the [z] (standby/on) switch on this product flashes when there is not enough power supplied from the computer, and this product will not start up normally. In this case, use the included AC adapter. |