Distortion Plug-ins
Distortion Plug-ins
AmpSimulator
AmpSimulator is a distortion effect that emulates the sound of various types of guitar amp and speaker cabinet combinations. A wide selection of amp and cabinet models is available.
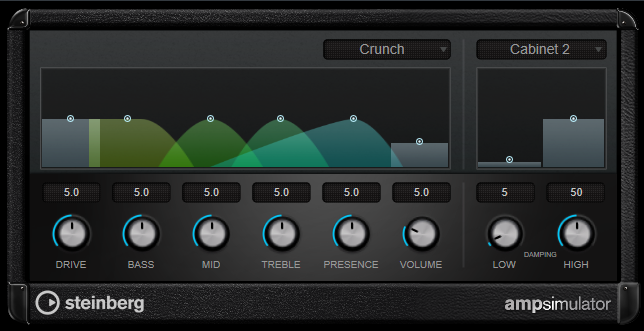
- Select Amplifier Model
-
This pop-up menu allows you to select an amplifier model. You can bypass this section by selecting [No Amp].
- DRIVE
-
Controls the amount of amp overdrive.
- BASS
-
Tone control for the low frequencies.
- MID
-
Tone control for the mid frequencies.
- TREBLE
-
Tone control for the high frequencies.
- PRESENCE
-
Boosts or dampens the higher frequencies.
- VOLUME
-
Controls the overall output level.
- Select Cabinet Model
-
This pop-up menu allows you to select a speaker cabinet model. You can bypass this section by selecting [No Speaker].
- DAMPING LOW/HIGH
-
These tone controls allow you to shape the sound of the selected speaker cabinet.
Quadrafuzz v2
Quadrafuzz v2 is a multi-band distortion and multi-effect plug-in for processing drums and loops, but also for treatment of vocals. You can distort up to 4 bands. 5 different distortion modes with several sub-modes are available.
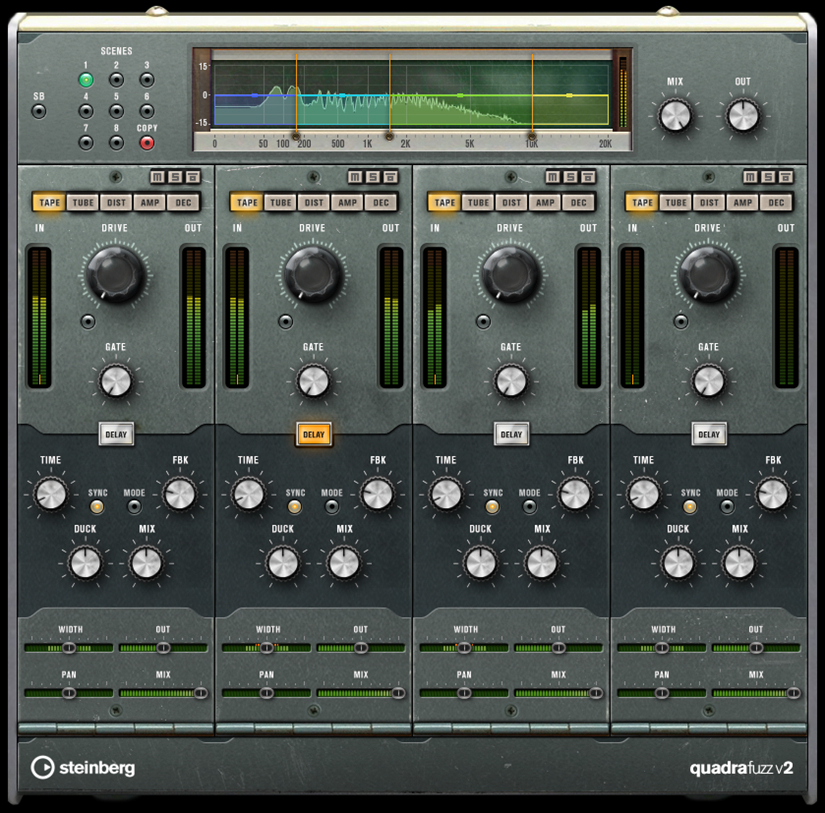
Frequency Band Editor
The frequency band editor in the upper half of the panel is where you set the width of the frequency bands as well as the output level. The vertical value scale to the left shows the gain level of each frequency band. The horizontal scale shows the available frequency range.
-
To define the frequency range of the different frequency bands, use the handles at the sides of each frequency band.
-
To attenuate or boost the output level of each frequency band by ±15 dB, use the handles on top of each frequency band.
Global Settings
- SB
-
Switches between multi band and single band mode.
- SCENES
-
You can save up to 8 different settings. If the default setting of a scene is active, the selected scene button lights up yellow.
If you change the default settings, the button lights up green, indicating that this scene has customized settings.

To copy the settings of a scene to another scene, select the scene that you want to copy, click [Copy], and click one of the numbered buttons.
You can automate the selection of scenes.
- MIX
-
Sets the level balance between the dry signal and the wet signal.
- OUT (-24 to 24 dB)
-
Sets the output level.
Band Settings
- Mute
-
To mute a frequency band, activate the [M] button in each section.
- Bypass Frequency Band
-
To bypass a frequency band, activate the [Band] button in each section.
- Solo Frequency Band
-
To solo a frequency band, activate the [S] button on each section. Only one frequency band can be soloed at a time.
- [IN/OUT] Meters
-
Display the input and output level.
- GATE
-
Determines the level at which the gate is activated. Signal levels above the set threshold open the gate and signal levels below the set threshold close the gate.
TAPE
This band mode simulates the saturation and compression of recording on analog tape machines.
- DRIVE
-
Controls the amount of tape saturation.
- TAPE MODE DUAL
-
Simulates the use of two machines.
TUBE
This band mode simulates the saturation effects using analog tubes.
- DRIVE
-
Controls the amount of tube saturation.
- Tube(s)
-
Determines the number of tubes that are simulated.
DIST
This band mode adds distortion to your rack.
- DRIVE
-
Controls the amount of distortion.
- FBK
-
Feeds part of the output signal back to the effect input. Higher settings increase the distortion effect.
AMP
This band mode simulates the sound of various types of guitar amps.
- DRIVE
-
Controls the amount of amp overdrive.
- Amp Types
-
- You can select the following types of guitar amps
-
-
Amp Clean
-
Amp Crunch
-
Amp Lead
-
DEC
This band mode allows you to decimate and truncate the input audio signal to create a noisy, distorted sound.
- DECIMATOR
-
Controls the resulting bit-resolution. The lower the resolution, the higher the distortion effect.
- MODE
-
Allows you to select one of the four operating modes. In each mode, the effect sounds differently. Modes [I] and [III] are nastier and noisier, while modes [II] and [IV] are more subtle.
- S&H
-
Sets the amount by which the audio samples are decimated. At the highest setting, nearly all of the information describing the original audio signal is eliminated, turning the signal into unrecognizable noise.
Delay
To open the [Delay] section, click the [Delay] button.
- TIME
-
If tempo sync is activated, this is where you specify the base note value for tempo-syncing the effect (1/1 to 1/32, straight, triplet, or dotted).
If tempo sync is deactivated, the delay time can be set freely with the [Time] knob. - SYNC
-
Activates/Deactivates tempo sync for the corresponding delay.
- DUCK
-
Determines how much the delay signal ducks when an audio signal is present.
- MIX
-
Sets the level balance between the dry signal and the wet signal.
- FBK
-
Sets the number of repeats for each delay.
- MODE
-
If this option is activated, the delay signal is routed back into the distortion unit to create a feedback with distortion.
| High [FBK] values and low [DUCK] values in combination with activated [MODE] can lead to unwanted noise. |
Slider
- WIDTH
-
Sets the stereo width for the corresponding band.
- OUT
-
Sets the output gain for the corresponding band.
- PAN
-
Sets the stereo position for the corresponding band.
- MIX
-
Sets the level balance between the dry signal and the wet signal.
SoftClipper
SoftClipper adds soft overdrive, with independent control over the second and third harmonic.
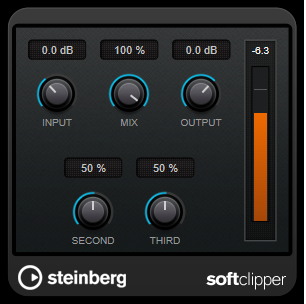
- INPUT (-12 to 24 dB)
-
Sets the pre-gain. Use high values if you want an overdriven sound just on the verge of distortion.
- MIX
-
Sets the level balance between the dry signal and the wet signal.
- OUTPUT
-
Sets the output level.
- SECOND
-
Controls the second harmonic.
- THIRD
-
Controls the third harmonic.
VST Amp Rack
VST Amp Rack is a powerful guitar amp simulator. It offers a choice of amplifiers and speaker cabinets that can be combined with stomp box effects.
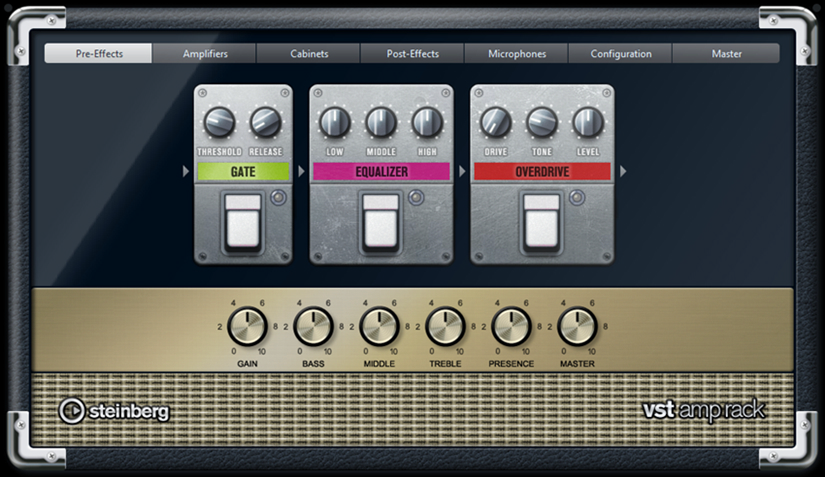
At the top of the plug-in panel, there are seven buttons, arranged according to the position of the corresponding elements in the signal chain. Each button opens a different page in the display section of the plug-in panel ([Pre-Effects], [Amplifiers], [Cabinets], [Post-Effects], [Microphone], [Configuration], and [Master]).
Below the display section, the selected amplifier is shown. The color and texture of the area below the amplifier indicate the selected cabinet.
Pre-Effects/Post-Effects
On the [Pre-Effects] and [Post-Effects] pages, you can select up to six common guitar effects. On both pages, the same effects are available, the only difference being the position in the signal chain (before and after the amplifier). On each page, every effect can be used once.
Each effect features an [On/Off] button known from stompbox effects, as well as individual parameters.
- Wah Wah
-
Pedal – Controls the filter frequency sweep.
- Volume
-
Pedal – Controls the level of the signal passing through the effect.
- Compressor
-
Intensity – Sets the amount by which an input signal is being compressed.
- Limiter
-
Threshold – Sets the maximum output level. Signal levels above the set threshold are cut off.
Release – Sets the time after which the gain returns to the original level. - Maximizer
-
Amount – Sets the loudness of the signal.
- Chorus
-
Rate – Allows you to set the sweep rate. This parameter can be synchronized to the project tempo.
Width – Sets the depth of the chorus effect. Higher settings produce a more pronounced effect. - Phaser
-
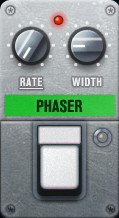
Rate – Allows you to set the sweep rate. This parameter can be synchronized to the project tempo.
Width – Determines the width of the modulation effect between higher and lower frequencies. - Flanger
-
Rate – Allows you to set the sweep rate. This parameter can be synchronized to the project tempo.
Feedback – Determines the character of the flanger effect. Higher settings produce a more metallic sounding sweep.
Mix – Sets the level balance between the dry signal and the wet signal. - Tremolo
-
Rate – Allows you to set the modulation speed. This parameter can be synchronized to the project tempo.
Depth – Governs the depth of the amplitude modulation. - Octaver
-
Direct – Adjusts the mix of the original signal and the generated voices. A value of 0 means only the generated and transposed signal is heard. By raising this value, more of the original signal is heard.
Octave 1 – Adjusts the level of the signal that is generated one octave below the original pitch. A setting of 0 means that the voice is muted.
Octave 2 – Adjusts the level of the signal that is generated two octaves below the original pitch. A setting of 0 means that the voice is muted. - Delay
-
Delay – Sets the delay time in milliseconds. This parameter can be synchronized to the project tempo.
Feedback – Sets the number of repeats for the delay.
Mix – Sets the level balance between the dry signal and the wet signal. - Tape Delay
-
Delay – Tape Delay creates a delay effect known from tape machines. Sets the delay time in milliseconds. This parameter can be synchronized to the project tempo.
Feedback – Sets the number of repeats for the delay.
Mix – Sets the level balance between the dry signal and the wet signal. - Tape Ducking Delay
-
Delay – Tape Ducking Delay creates a delay effect known from tape machines with a ducking parameter. The Delay parameter sets the delay time in milliseconds. This parameter can be synchronized to the project tempo.
Feedback – Sets the number of repeats for the delay.
Duck – Works like an automatic mix parameter. If the level of the input signal is high, the portion of the effect signal is lowered, or ducked (low internal mix value). If the level of the input signal is low, the portion of the effect signal is raised (high internal mix value). This way the delayed signal stays rather dry during loud or intensely played passages. - Overdrive
-
Drive – Overdrive creates a tube-like overdrive effect. The higher this value, the more harmonics are added to the output signal of this effect.
Tone – Works as a filter effect on the added harmonics.
Level – Adjusts the output level. - Fuzz
-
Boost – Fuzz creates a rather harsh distortion effect. The higher this value, the more distortion is created.
Tone – Works as a filter effect on the added harmonics.
Level – Adjusts the output level. - Gate
-
Threshold – Determines the level at which the gate is activated. Signal levels above the set threshold open the gate and signal levels below the set threshold close the gate.
Release – Sets the time after which the gate closes. - Equalizer
-
Low – Changes the level of the low-frequency portion of the incoming signal.
Middle – Changes the level of the mid-frequency portion of the incoming signal.
High – Changes the level of the high-frequency portion of the incoming signal. - Reverb
-
Type – A convolution-based reverb effect. This parameter allows you to switch between different reverb types ([Studio], [Hall], [Plate], and [Room]).
Mix – Sets the level balance between the dry signal and the wet signal.
Sync Mode
Some parameters can be synchronized to the tempo of VST Rack.
The names of these parameters are bordered. Click a knob to activate or deactivate tempo sync. An LED at the top right of the knob indicates that sync mode is active. You can then select a base note value for tempo syncing from the pop-up menu above the control.
Using Effects
-
To insert a new effect, click the [+] button that appears if you point the mouse at an empty plug-in slot or at one of the arrows before or after a used effect slot.
-
To remove an effect from an effect slot, click the effect name and select [No Effect] from the pop-up menu.
-
To change the order of the effects in the chain, click on an effect and drag it onto the line at the destination location.
-
To activate or deactivate an effect, click the pedal-like button below the effect name. If an effect is active, the LED next to the button is lit.
| ・ Pre-effects and post-effects can be mono or stereo, depending on the rack configuration. |
Amplifiers
The amps available on the [Amplifiers] page are modeled on real-life amplifiers. Each amp features settings typical for guitar recording, such as gain, equalizers, and master volume. The sound-related parameters Bass, Middle, Treble, and Presence have a significant impact on the overall character and sound of the corresponding amp.
- Plexi
-
Classic British rock tone; extremely transparent sound, very responsive.
- Plexi Lead
-
British rock tone of the 70s and 80s.
- Diamond
-
The cutting edge hard rock and metal sounds of the 90s.
- Blackface
-
Classic American clean tone.
- Tweed
-
Clean and crunchy tones; originally developed as a bass amp.
- Deluxe
-
American crunch sound coming from a rather small amp with a big tone.
- British Custom
-
Produces the sparkling clean or harmonically distorted rhythm sounds of the 60s.
The different amps keep their settings if you switch models. If you want to use the same settings after reloading the plug-in, you need to set up a preset.
Selecting and Deactivating Amplifiers
To switch amps on the [Amplifiers] page, click the model that you want to use. Select [No Amplifier] if you only want to use the cabinets and effects.
Cabinets
The cabinets available on the [Cabinets] page simulate real-life combo boxes or speakers. For each amp, a corresponding cabinet type is available, but you can also combine different amps and cabinets.
Selecting and Deactivating Cabinets
-
To switch cabinets on the [Cabinets] page, click the model that you want to use. Select [No Cabinet] if you only want to use the amps and effects.
-
If you select [Link Amplifier & Cabinet Choice], the plug-in automatically selects the cabinet corresponding to the selected amp model.
Microphones
On the [Microphones] page, you can choose between different microphone positions. These positions result from two different angles (center and edge) and three different distances from the speaker, as well as an additional center position at an even greater distance from the speaker.
You can choose between two microphone types: a large-diaphragm condenser microphone and a dynamic microphone. You can crossfade between the characteristics of the two microphones.
-
To select one of the microphone types or blend between the two types, turn the [Mix] control between the two microphones.
Placing the Microphone
-
To select a microphone position, click the corresponding ball in the graphic. The selected position is marked in red.
Configuration
On the [Configuration] page, you can specify whether you want to use VST Amp Rack in stereo or in mono mode.
-
To process the pre-effects, the amplifier, and the cabinets in full stereo mode, make sure that the plug-in is inserted on a stereo rack, and activate the [Stereo] button.
| In stereo mode, the effect requires more processing power. |
Master
Use the [Master] page to fine-tune the sound.
Input/Output Level Meters
The input and output level meters on the left and the right of the Master section show the signal level of your audio. The rectangle on the input meter indicates the optimum incoming level range. In compact view, the input and output levels are indicated by two LEDs at the top left and right.
Using the Master Controls
-
To activate/deactivate the equalizer, click the pedal-like [On/Off] button. If the equalizer is active, the LED next to the button is lit.
-
To activate/deactivate an equalizer band, click the corresponding [Gain] knob. If a band is active, the LED to the left of the [Gain] knob is lit.
-
To tune your guitar strings, click the pedal-like [On/Off] button to activate the Tuner and play a string. If the correct pitch is displayed and the row of LEDs below the digital display is green, the string is tuned correctly.
If the pitch is too low, red LEDs are lit on the left. If the pitch is too high, red LEDs are lit on the right. The more LEDs are lit, the lower/higher is the pitch. -
To mute the output signal of the plug-in, click the pedal-like [Master] button. If the output is muted, the LED is not lit. Use this to tune your guitar in silence, for example.
-
To change the volume of the output signal, use the [Level] control on the [Master] page.
View Settings
You can choose between 2 views: the default view and a compact view, which takes up less screen space.
In the default view, you can use the buttons at the top of the plug-in panel to open the corresponding page in the display section above the amp controls. You can horizontally resize the plug-in panel by clicking and dragging the edges or corners.
In the compact view, the display section is hidden from view. You can change the amp settings and switch amps or cabinets using the mouse wheel.
Using the Smart Controls
Smart controls become visible on the plug-in frame when you move the mouse pointer over the plug-in panel.
Switching between Default and Compact View
-
To toggle between the different views, click the down/up arrow button ([Show/Hide Extended Display]) at the top center of the plug-in frame.

Changing the Amplifier and Cabinet Selection in the Compact View
In the compact view, a smart control on the lower border of the plug-in frame allows you to select different amplifier and cabinet models.
-
To select a different amplifier or cabinet, click the name and select a different model from the pop-up menu.
-
To lock the amplifier and cabinet combination, activate the [Link/Unlink Amplifier & Cabinet Choice] button. If you now select another amp model, the cabinet selection follows. However, if you select a different cabinet model, the lock is deactivated.

Previewing Effect Settings
In both views, you can show a preview of the pre- and post-effects that you selected on the corresponding pages:
-
Click and hold the [Show Pre-Effects] button at the bottom left or [Show Post-Effects] button at the bottom right of the plug-in frame.
