Dynamics Plug-ins
Dynamics Plug-ins
DeEsser
DeEsser is a special type of compressor that reduces excessive sibilance, primarily for vocal sounds.
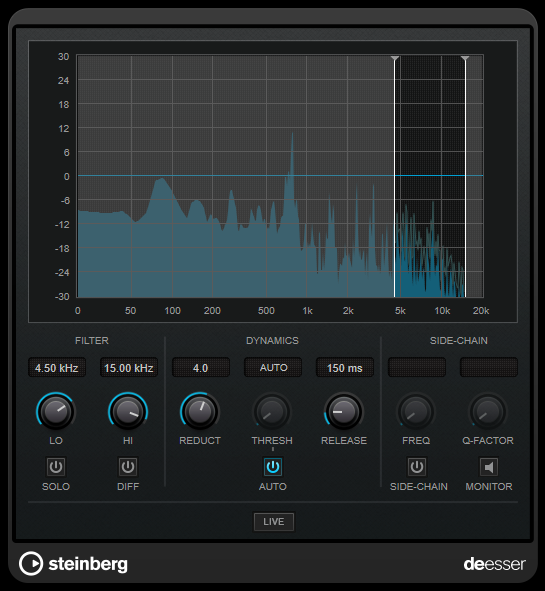
You can use it, for example, when close proximity microphone placement and equalizing lead to situations where the overall sound is just right, but where unwanted sibilants occur.
When recording a voice, the position of DeEsser in the signal chain is usually after the microphone pre-amp and before a compressor/limiter. This keeps the compressor/limiter from unnecessarily limiting the overall signal dynamics.
Display
Shows the spectrum of the input signal.
-
To adjust the frequency band, drag the border lines or click in the middle of the band and drag.
-
To change the width of the frequency band, hold [Shift] and drag to the left or right.
FILTER
- LO/HI
-
Sets the left and right border of the frequency band. You can set the frequency either in Hz or as a note value. If you enter a note value, the frequency is automatically displayed in Hz accordingly. For example, a note value of A3 sets the frequency to 440 Hz. When you enter a note value, you can also enter a cent offset. For example, enter “A5 -23” or “C4 +49.” When you enter a note value, you can also enter a cent offset. For example, enter “A5 -23” or “C4 +49.”
| Make sure that you enter a space between the note and the cent offset. Only in this case, the cent offsets are taken into account. |
- SOLO
-
Solos the frequency band. This helps you to find the appropriate position and width of that band.
- DIFF
-
Plays back what DeEsser removed from the signal. This helps you to adjust the frequency band, threshold, and reduction parameters, so that only sharp s-sounds are removed, for example.
DYNAMICS
- REDUCT
-
Controls the intensity of the de-essing effect.
- THRESH (-50 to 0 dB)
-
If the [Auto] option is deactivated, you can use this control to set a threshold for the incoming signal level above which the plug-in starts to reduce the sibilants.
- RELEASE (1 to 1000 ms)
-
Sets the time after which the de-essing effect returns to zero when the signal drops below the threshold.
- AUTO
-
Automatically and continually sets an optimum threshold setting independent of the input signal. The [Auto] option does not work for low-level signals (< -30 db peak level). To reduce the sibilants in such a file, set the threshold manually.
SIDE-CHAIN
- FREQ (25 Hz to 20 kHz)
-
If [Side-Chain] is activated, this sets the frequency of the filter. You can set the frequency either in Hz or as a note value. If you enter a note value, the frequency is automatically displayed in Hz accordingly. For example, a note value of A3 sets the frequency to 440 Hz. When you enter a note value, you can also enter a cent offset. For example, enter “A5 -23” or “C4 +49.” When you enter a note value, you can also enter a cent offset. For example, enter “A5 -23” or “C4 +49.”
| Make sure that you enter a space between the note and the cent offset. Only in this case, the cent offsets are taken into account. |
- SIDE-CHAIN
-
Activates the internal side-chain filter. You can now shape the input signal according to the filter parameters. Internal side-chaining can be useful for tailoring how the gate operates.
- Q-FACTOR
-
If [Side-Chain] is activated, this sets the resonance or width of the filter.
- MONITOR
-
Allows you to monitor the filtered signal.
- LIVE
-
If this button is activated, the look-ahead feature of the effect is deactivated. Look-ahead produces more accurate processing, but adds a specific amount of latency as a trade-off. If [Live] mode is activated, there is no latency, which is better for live processing.
Positioning the DeEsser in the Signal Chain
When recording a voice, the position of DeEsser in the signal chain is usually after the microphone pre-amp and before a compressor/limiter. This keeps the compressor/limiter from unnecessarily limiting the overall signal dynamics.
EnvelopeShaper
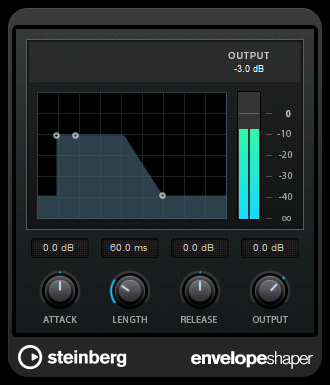
EnvelopeShaper can be used to attenuate or boost the gain of the attack and release phase of audio material.
You can use the knobs or drag the breakpoints in the graphical display to change parameter values. Be careful with levels when boosting the gain and if needed reduce the output level to avoid clipping.
- ATTACK (-20 to 20 dB)
-
Sets the gain of the attack phase of the signal.
- LENGTH (5 to 200 ms)
-
Sets the length of the attack phase.
- RELEASE
-
Sets the gain of the release phase of the signal.
- OUTPUT
-
Sets the output level.
Maximizer
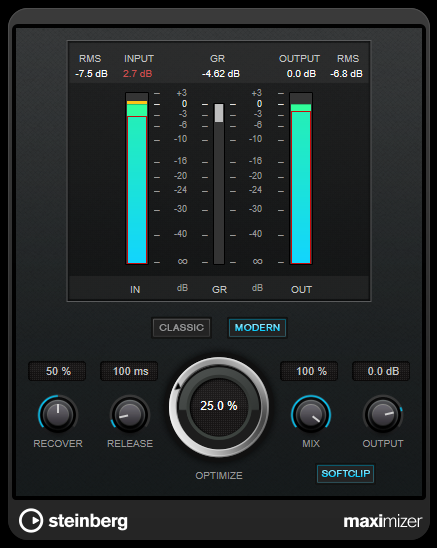
Maximizer raises the loudness of audio material without the risk of clipping. The plug-in provides two modes, [Classic] and [Modern], that offer different algorithms and parameters.
- CLASSIC
-
[Classic] mode provides the classic algorithms from previous versions of this plug-in. This mode is suited for all styles of music.
- MODERN
-
In [Modern] mode, the algorithm allows for more loudness than in [Classic] mode. This mode is particularly suited for music that requires loud volume.
[Modern] mode also provides additional settings to control the release phase:-
[Release] sets the overall release time.
-
[Recover] allows for a faster signal recovery at the beginning of the release phase.
-
- OPTIMIZE
-
Determines the loudness of the signal.
- MIX
-
Sets the level balance between the dry signal and the wet signal.
- OUTPUT
-
Sets the maximum output level.
- SOFT CLIP
-
If this button is activated, Maximizer starts limiting or clipping the signal softly. At the same time, harmonics are generated, adding a warm, tube-like characteristic to the audio material.
MultibandCompressor
MultibandCompressor allows a signal to be split into four frequency bands. You can specify the level, bandwidth, and compressor characteristics for each band.
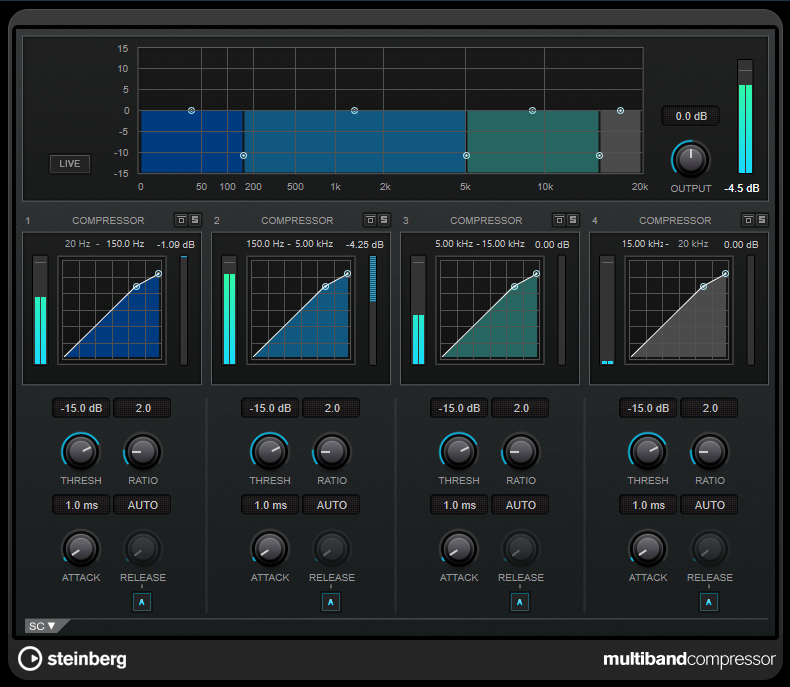
| To compensate for output gain loss that is caused by compression, MultibandCompressor uses an automatic make-up gain. If side-chaining is activated for a frequency band in the side-chain section, the automatic make-up gain is deactivated for this band. |
Frequency Band Editor
The frequency band editor in the upper half of the panel is where you set the width of the frequency bands as well as their level after compression. The vertical value scale to the left shows the gain level of each frequency band. The horizontal scale shows the available frequency range.
-
To define the frequency range of the different frequency bands, use the handles at the sides of each frequency band.
-
To attenuate or boost the gain of the frequency bands by ±15 dB after compression, use the handles at the top of each frequency band.
- LIVE
-
If this button is activated, the look-ahead feature of the effect is deactivated. Look-ahead produces more accurate processing, but adds a specific amount of latency as a trade-off. If [Live] mode is activated, there is no latency, which is better for live processing.
- Bypass Frequency Band
-
To bypass a frequency band, activate the [Band] button (
 ) in each section.
- Solo Frequency Band
-
To solo a frequency band, activate the [S] button on each section. Only one frequency band can be soloed at a time.
- OUTPUT (-24 to 24 dB)
-
Sets the output level.
[COMPRESSOR] Section
You can specify the [Threshold] and [Ratio] by moving breakpoints or using the corresponding knobs. The threshold is marked by the first breakpoint where the line deviates from the straight diagonal.
- THRESH (-60 to 0 dB)
-
Determines the level where the compressor kicks in. Only signal levels above the set threshold are processed.
- RATIO
-
Sets the amount of gain reduction applied to signals above the set threshold. A ratio of 3:1 means that for every 3 dB the input level increases, the output level increases by 1 dB.
- ATTACK (0.1 to 100 ms)
-
Determines how fast the compressor responds to signals above the set threshold. If the attack time is long, more of the early part of the signal passes through unprocessed.
- RELEASE (10 to 1000 ms or [AUTO] mode)
-
Sets the time after which the gain returns to the original level when the signal drops below the threshold. If [Auto Release] is activated, the plug-in automatically finds the best release setting for the audio material.
SC (Side-chain Section)
To open the side-chain section, click the [SC] button at the bottom left of the plug-in window.
Important
To be able to use the side-chain function for the bands, global side-chain must be activated for the plug-in.

- SIDE-CH
-
Activates the internal side-chain filter. The side-chain signal can then be shaped according to the filter parameters.
- FREQ
-
If [Side-Chain] is activated, this sets the frequency of the side-chain filter.
- Q-FACTOR
-
If [Side-Chain] is activated, this sets the resonance or width of the filter.
- MONITOR
-
Allows you to monitor the filtered signal.
MultibandEnvelopeShaper
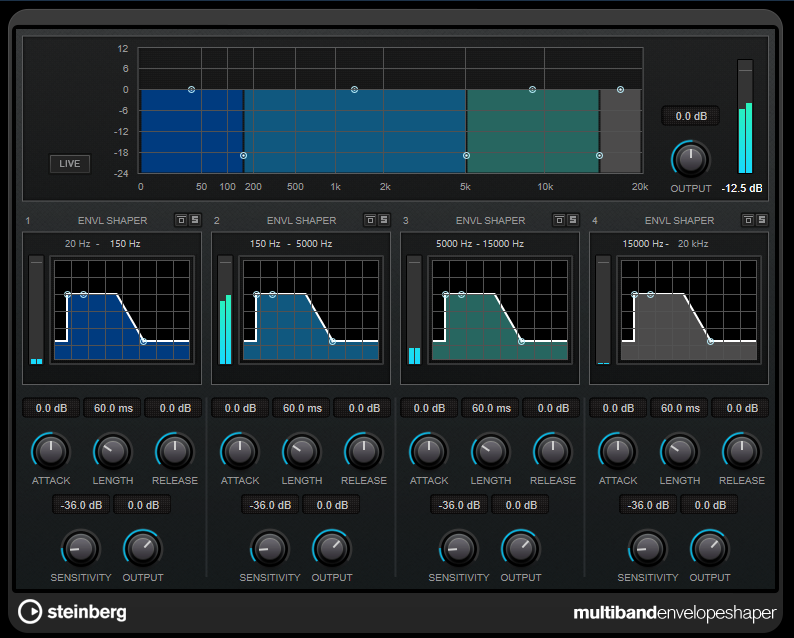
MultibandEnvelopeShaper allows a signal to be split into four frequency bands. You can attenuate or boost the gain of the attack and release phase of audio material for each band.
Frequency Band Editor
The frequency band editor in the upper half of the panel is where you set the width of the frequency bands as well as their level. The vertical value scale to the left shows the gain level of each frequency band. The horizontal scale shows the available frequency range.
-
To define the frequency range of the different frequency bands, use the handles at the sides of each frequency band.
-
To attenuate or boost the gain of the frequency band, use the handles at the top of each frequency band.
- LIVE
-
If this button is activated, the look-ahead feature of the effect is deactivated. Look-ahead produces more accurate processing, but adds a specific amount of latency as a trade-off. If [Live] mode is activated, there is no latency, which is better for live processing.
- Bypass Frequency Band
-
To bypass a frequency band, activate the [Band] button (
 ) in each section.
- Solo Frequency Band
-
To solo a frequency band, activate the [S] button on each section. Only one frequency band can be soloed at a time.
- OUTPUT (-24 to 24 dB)
-
Sets the output level.
Shaper Section
You can specify the [Attack], [Length], and [Release] by moving breakpoints or using the corresponding knobs. Be careful with levels when boosting the gain. You can reduce the output level to avoid clipping.
- ATTACK (-20 to 20 dB)
-
Sets the gain of the attack phase of the signal.
- LENGTH (5 to 200 ms)
-
Sets the length of the attack phase.
- RELEASE
-
Sets the gain of the release phase of the signal.
- SENSITIVITY (-40 to -10 dB)
-
Sets the sensitivity of the detection.
- OUTPUT
-
Sets the output level.
Tube Compressor
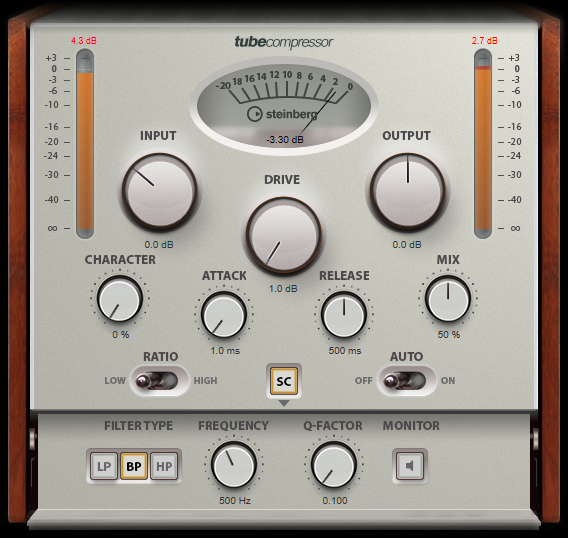
This versatile compressor with integrated tube-simulation allows you to achieve smooth and warm compression effects.
The VU meter shows the amount of gain reduction. Tube Compressor features an internal side-chain section that lets you filter the trigger signal.
- VU Meter
-
Shows the amount of gain reduction.
- [IN/OUT] Meters
-
Shows the highest peaks of all available input and output channels.
- INPUT
-
Determines the compression amount. The higher the input gain, the more compression is applied.
- DRIVE (1.0 to 6.0 dB)
-
Controls the amount of tube saturation.
- OUTPUT (-12 to 12 dB)
-
Sets the output gain.
- CHARACTER
-
Keeps the bass tight and preserves its attacks by decreasing the tube saturation for lower frequencies, and adds brilliance by adding harmonics for higher frequencies.
- ATTACK (0.1 to 100 ms)
-
Determines how fast the compressor responds. If the attack time is long, more of the early part of the signal passes through unprocessed.
- RELEASE (10 to 1000 ms or [Auto] mode)
-
Sets the time after which the gain returns to its original level. If [Auto Release] is activated, the plug-in automatically finds the best release setting for the audio material.
- MIX
-
Adjusts the mix between dry signal and wet signal, preserving the transients of the input signal.
- RATIO
-
Toggles between a low and a high ratio value.
- SC(Side-Chain)
-
Activates the internal side-chain filter. The input signal can then be shaped according to the filter parameters. Internal side-chaining can be useful for tailoring how the gate operates.
Side-Chain Section
- FILTER TYPE (Low-Pass/Band-Pass/High-Pass)
-
If [Side-Chain] is activated, these buttons allow you to set the filter type to low-pass, band-pass, or high-pass.
- Center (50 to 20000 Hz)
-
If [Side-Chain] is activated, this sets the center frequency of the filter.
- Q-FACTOR
-
If [Side-Chain] is activated, this sets the resonance or width of the filter.
- MONITOR
-
Allows you to monitor the filtered signal.
VintageCompressor
VintageCompressor is modeled after vintage type compressors.
This compressor features separate controls for [Input] and [Output] gain, [Attack], and [Release].
In addition, there is a [Punch] mode which preserves the attack phase of the signal and a program-dependent [Auto Release] function.

- VU Meter
-
Shows the amount of gain reduction.
- [IN/OUT] Meters
-
Shows the highest peaks of all available input and output channels.
- INPUT
-
Determines the compression amount. The higher the input gain, the more compression is applied.
- ATTACK (0.1 to 100 ms)
-
Determines how fast the compressor responds. If the attack time is long, more of the early part of the signal passes through unprocessed.
- [PUNCH] Button
-
If this is activated, the early attack phase of the signal is preserved, retaining the original punch in the audio material, even with short Attack settings.
- RELEASE (10 to 1000 ms or [AUTO] mode)
-
Sets the time after which the gain returns to its original level. If the [Auto] button is activated, the plug-in automatically finds the best release setting for the audio material.
- MIX
-
Adjusts the mix between dry signal and wet signal, preserving the transients of the input signal.
- OUTPUT (-48 to 24 dB)
-
Sets the output gain.
