


Configuring advanced function settings (Function)
Setting input names automatically or manually
This renames the input name.
Automatic input name setting is available only for HDMI, and the information set on the connected input device is automatically applied.
SETTINGS menu | “Function” > “Input Rename” > Each Input |
- Select the input whose name you want to change.
- Choose “Manual” or “Auto” (available only for HDMI inputs), and press the ENTER key.
- If you selected “Manual”, edit the name, and select “OK”.
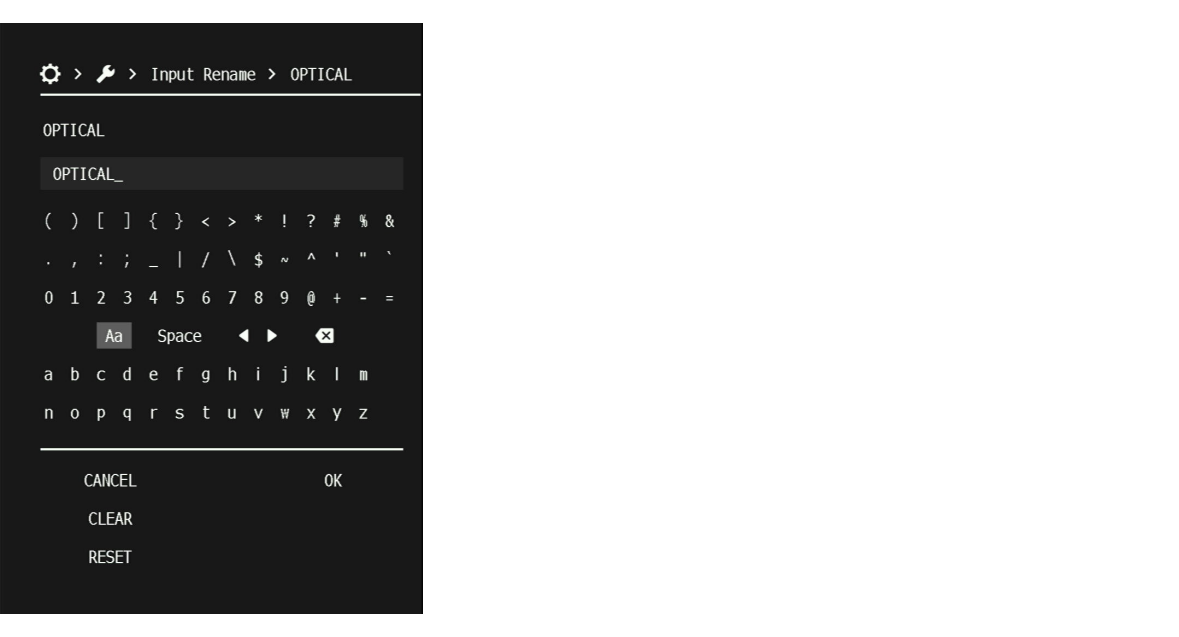
- To change the name of another input, repeat steps 1–2 (or 1–3 for manual entry).
- This completes the setting.
- Even if an external device is disconnected, the assigned input name is retained. To restore an input name set by “Auto” to its default, temporarily switch it to “Manual” with nothing connected to the corresponding input port, and then switch back to “Auto”.
- To delete all characters entered in “Manual”, select “CLEAR”.
- Selecting “RESET” restores the input name to its default setting.
Setting input skip
Select the inputs to be skipped when using the INPUT key or the INPUT knob on the front panel. By skipping unused inputs, you can quickly select the desired input.
SETTINGS menu | “Function” > “Input Skip” > Each Input |
Settings |
|
Default setting | Off |
Setting the audio input jack for TV audio
Select the audio input jack used for playback when the input is set to “TV”. This setting is available only when the eARC function is disabled or the ARC setting is set to “Off”.
SETTINGS menu | “Function” > “TV Audio Input” > “TV Audio Input” |
Settings | OPTICAL/COAXIAL/Analog RCA 1/Analog RCA 2 |
Default setting | OPTICAL |
- When using the ARC function to input audio via an HDMI cable, in the SETTINGS menu, set “HDMI Control” to “On” and “ARC” to “On”.
- To use the eARC function, “ARC” does not need to be set. If the TV supports eARC, it is automatically recognized and connected.
- You may have to change settings on your TV. Please also refer to the user's manual for your TV.
Setting the brightness of the front display (Dimmer)
You can adjust the brightness of the front display. The closer the value is to 0, the higher the brightness.
SETTINGS menu | “Function” > “Dimmer” > “Dimmer” |
Settings | -4 to 0 |
Default setting | 0 |
Setting the sleep timer
Once the specified time elapses, the product goes into standby.
SETTINGS menu | “Function” > “Sleep” > “Sleep” |
Settings | 120 minutes/90 minutes/60 minutes/30 minutes/Off |
Default setting | Off |
Protecting settings
You can protect the product’s settings to prevent them from being changed.
SETTINGS menu | “Function” > “Memory Guard” > “Memory Guard” |
Settings |
|
Default setting | Off |
Setting the auto-standby time
You can set the amount of time before the product power automatically switches to standby mode.
SETTINGS menu | “Function” > “Auto Power Standby” > “Timer” |
Settings |
|
Default setting | 20 minutes |
- Just before switching to standby, the front display shows “auto standby xxs” (where xx is the number of seconds) indicating the number of seconds remaining until standby.
- If the auto-standby time is set to “5 minutes/20 minutes” and the Analog RCA 1 or Analog RCA 2 input is selected, this product will remain continuously active. As a result, the “Auto Power Standby” function will not operate.
Checking the firmware version
You can confirm the version of the current firmware.
SETTINGS menu | “Function” > “Firmware” > “Version” |
Selecting the firmware update method
SETTINGS menu | “Function” > “Firmware” > “USB Update” or “Network Update” |
- For instructions on how to perform updates, see “Firmware Update”.
- “Network Update” cannot be selected until the product is ready to update the firmware.
- Do not execute this other than when updating the firmware. Before executing an update, check the information provided with the firmware.
- A firmware update via a network takes about 20 minutes.
- Firmware update over the network may fail if the Internet connection speed is not fast enough or due to network conditions during connection to a wireless network. If this occurs, try updating the firmware again later, or perform the update using a USB flash drive.
Initializing the settings
You can reset (initialize) the various settings of the product.
SETTINGS menu | “Function” > “Factory Reset” |
Settings |
|
 RX500A