
Reviewing and Adjusting the Plan
Reviewing the Results Screen
The results screen allows you to review the plan and the evaluation results. This screen appears when automatic generation of a plan is finished, and can also be displayed by pressing the [Result] button after the plan has already been generated.
Description of results screen
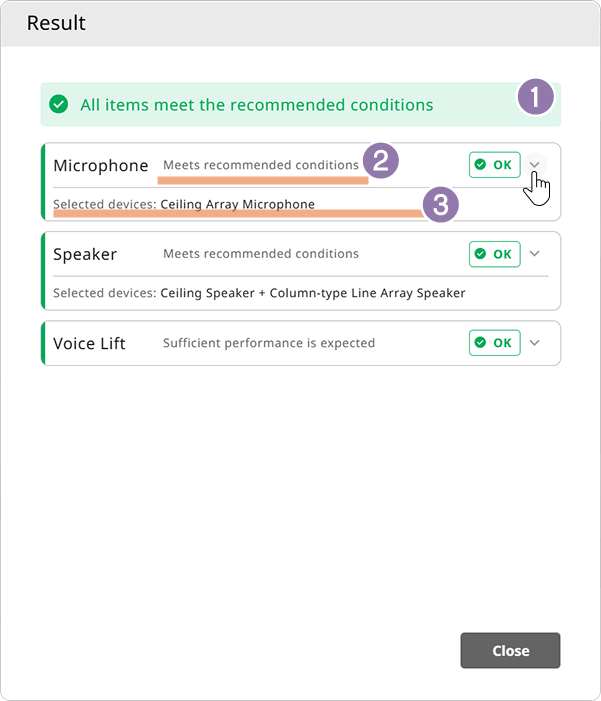
- 1 Result
-
Displays an overall evaluation, indicating whether the generated plan or results meet the recommended conditions.
- 2 Item results
-
Displays whether the corresponding item meets the recommended conditions.
-
“Voice Lift” appears only if Voice Lift has been selected as a room requirement.
-
- 3 Selected devices
-
Displays the specific devices selected for “Microphone” and “Speaker”.
To check the quantities of the selected devices, click the [Close] button to close the results screen, and then review the device list screen.
Expand each item to display the sound coverage ratio and room requirements that were used to select those devices.
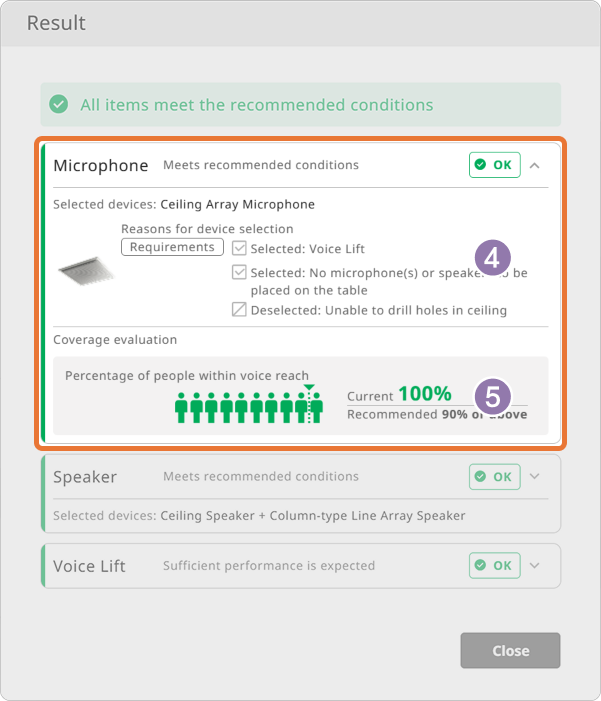
- 4 Reasons for device selection
-
Displays the room requirements (from those that were selected) that were reasons for the device selection.
- 5 Coverage evaluation
-
Displays the coverage ratio (percentage of the specified coverage area that is actually covered by the microphones, speakers and Voice Lift). Check whether the coverage ratio meets the recommended standards.
If any item does not meet the recommended conditions
If the recommended conditions for “Speaker” or “Microphone” are not met, “ ” appears beside that item. (If Voice Lift does not meet the recommended conditions, “
 ” appears.)
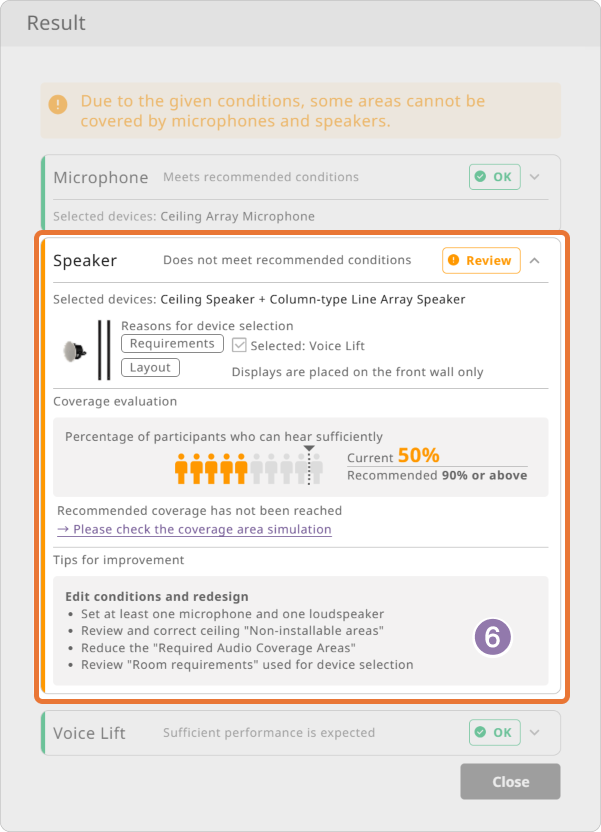
Expand the items marked “” or “” to review the details, and then adjust the conditions and regenerate the plan.
-
For illustrative purposes, the examples show the entire screen. In reality, after expanding an item, you may need to use the scroll bar to view all of the content.
-
Expand an item marked “
”. -
In this example, (5) shows that the actual coverage area does not meet the recommended coverage ratio for the target area.
Using the link to the simulation, display the sound coverage simulation screen, and review the coverage areas. -
Open the results screen again.
-
Under “TIPS FOR IMPROVEMENT” (6), review what can be done to meet the recommended conditions.
-
Based on the details reviewed in step 4, adjust the room conditions.
-
Regenerate the plan.
Opening the Results Screen
Once the plan has been generated, the [Result] button appears. Clicking the [Result] button opens the results screen that appeared after the plan was generated.
If  or
or  appears on the [Result] button, open the results screen to review the details. Adjust the room conditions according to the information under “TIPS FOR IMPROVEMENT”, and then regenerate the plan.

|
All items meet the recommended conditions |
|
Due to the given conditions, some areas cannot be covered by microphones and speakers. |
|
The function for automatic setup with Voice Lift is not available because some areas cannot be covered by microphones or speakers. |
Redesign
Return tothe Edit stepto edit the room conditions or arrangement. A notification badge (  ) will appear on the [Design] button. To apply the changes to the plan, click the [Design] button to regenerate a plan.

|
If you want to perform a redesign using the current room conditions and the [Design] button is not displayed, you can make the [Design] button appear by performing an action that does not affect the room conditions (for example, selecting or clearing a check box in Room Requirements or selecting furniture in the furniture arrangement screen), and then perform the redesign. |
Reviewing the simulation of the sound coverage area
The results screen allows you to view a simulation of the coverage areas for the microphones and speakers. Confirm that the microphone and speaker coverage areas are as desired.
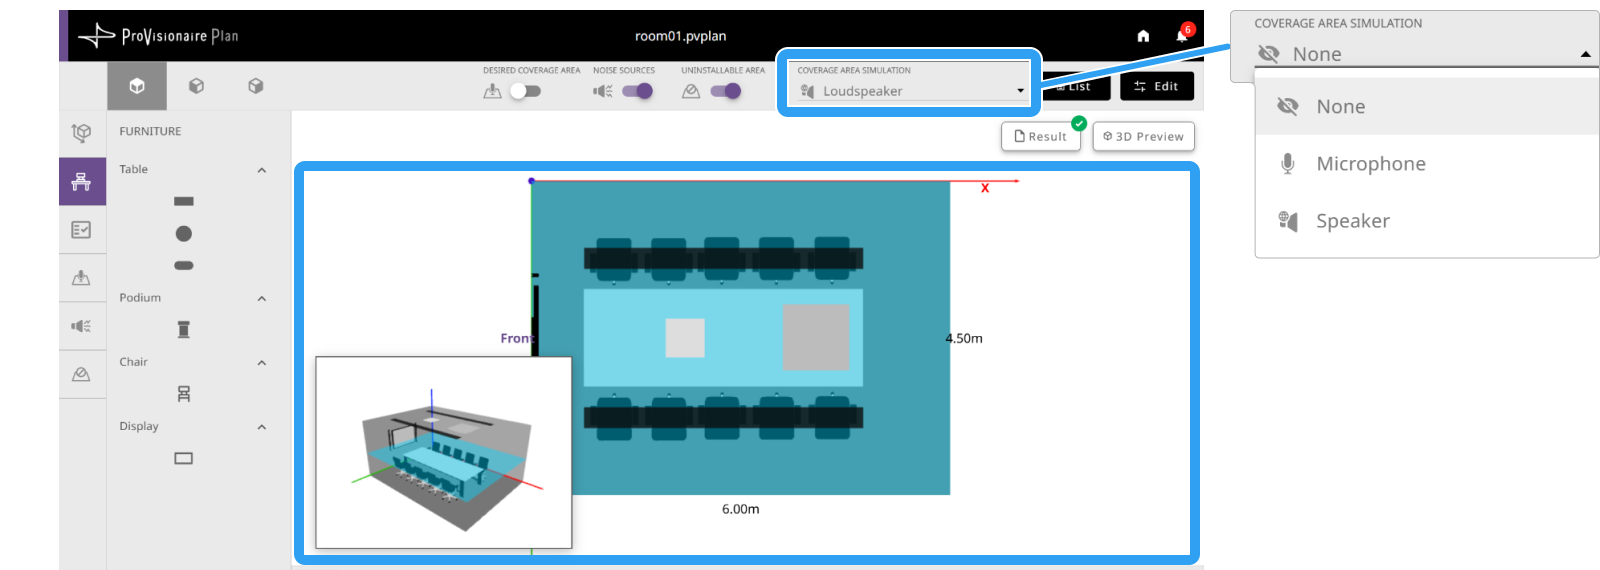
In the [COVERAGE AREA SIMULATION] drop-down list, select the coverage area to be displayed.
None |
Displays no coverage area. |
|---|---|
Microphone |
Displays the microphone coverage area. |
Loudspeaker |
Displays the speaker coverage area. |
- For a plan that supports Voice Lift
-
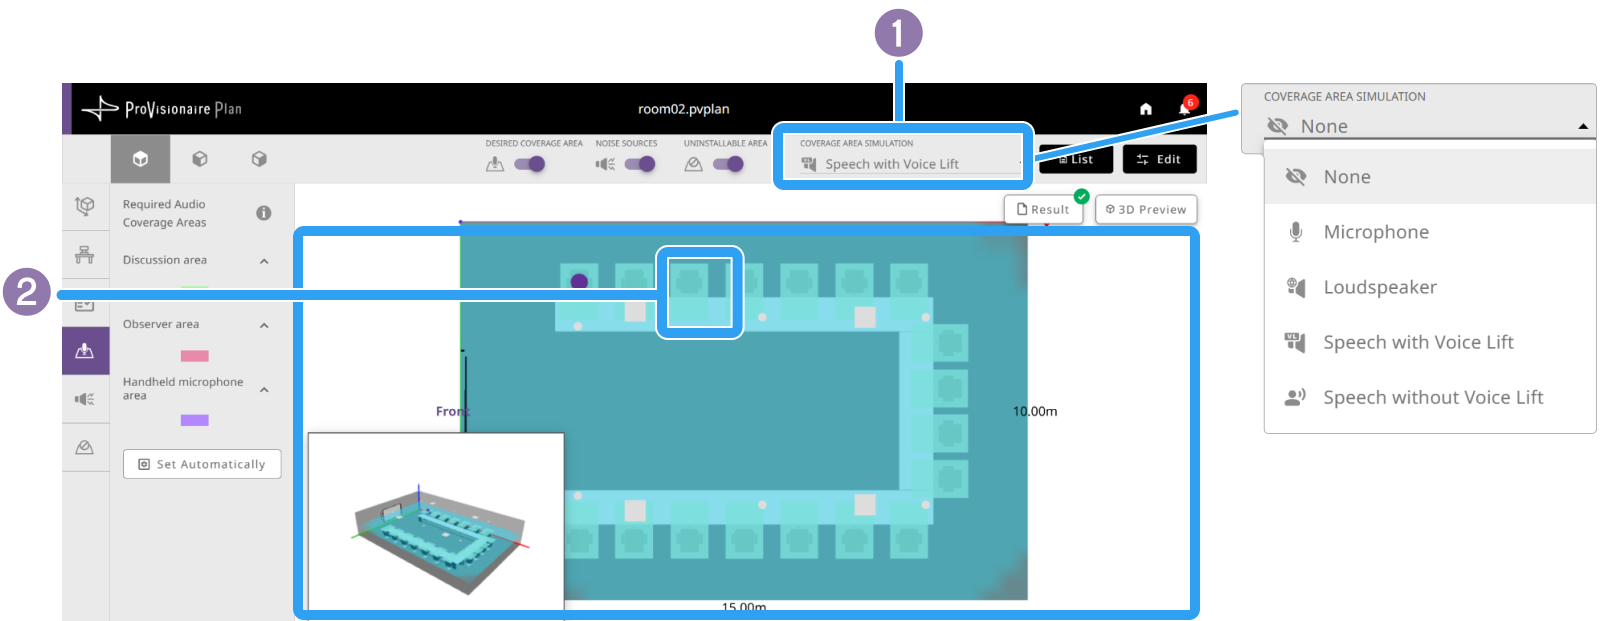
If the “Voice Lift” check box was selected under “Advanced Settings” of the request selection screen, a Voice Lift simulation can also be viewed.
-
In the [COVERAGE AREA SIMULATION] drop-down list, select the coverage area to be displayed.
None
Displays no coverage area.
Microphone
Displays the microphone coverage area.
Loudspeaker
Displays the speaker coverage area.
Speech with Voice Lift
Displays the coverage area of a speaker’s voice amplified by Voice Lift.
Speech without Voice Lift
Displays the audible area of a speaker’s natural voice (human voice).
-
If [Speech with Voice Lift] or [Speech without Voice Lift] was selected:
 (presenter) appears in the arrangement view. Drag the presenter to their expected position to view how the coverage area changes according to the presenter’s position. Check for issues in the coverage area with all potential locations.
The presenter can only be positioned at the (available locations), which appear when the presenter is dragged.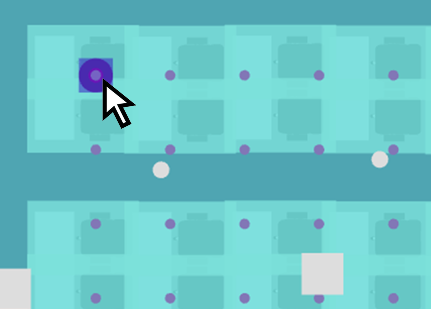
-
Reviewing the device list
The device list screen allows you to review the devices selected in the automatically generated plan. In addition to the devices that were selected, you can also review their quantities and the coordinates of their placement locations. The content of this screen can also be exported as a PDF file.
-
Click the [List] button.

An equipment list appears.
-
Review the information proposed by the automatically generated plan.
- [Count]tab
-
On the [Count] tab, the devices with their quantities are listed by type.
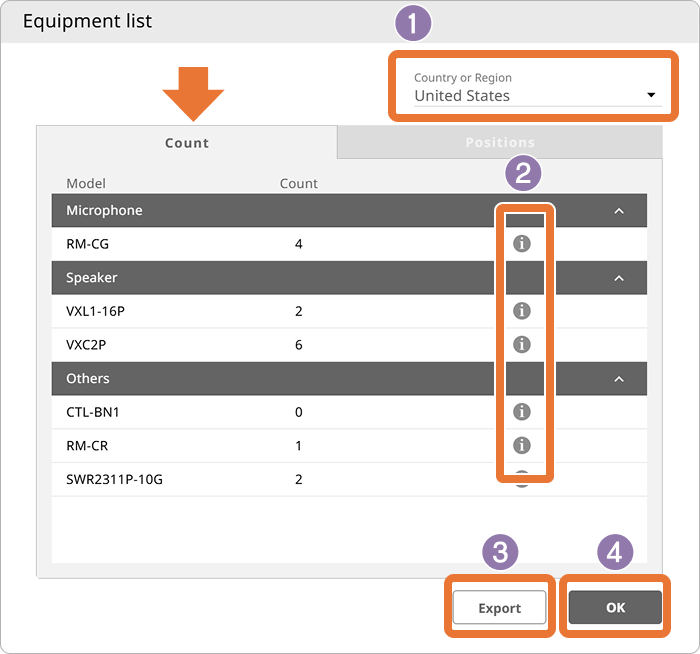 The device list > [Count]tab
-
Specify your country or region
Specify your location from the [Country or Region] list in the top right of the screen.
-
View the product website
Click the
 (information) mark in the row of the model number to open the desired product website of the specified country or region.
-
If a product is not sold in the selected region, a label appears indicating that the product is unavailable.
-
-
Exporting the results in the PDF format
Click the [Export] button to download the room conditions and plan results as a PDF file.
-
Closing the list
Click the [OK] button to close the device list.
-
- [Positions]tab
-
On the [Positions] tab, the location of each device is listed.An image of the device arrangement can be viewed in the arrangement view.
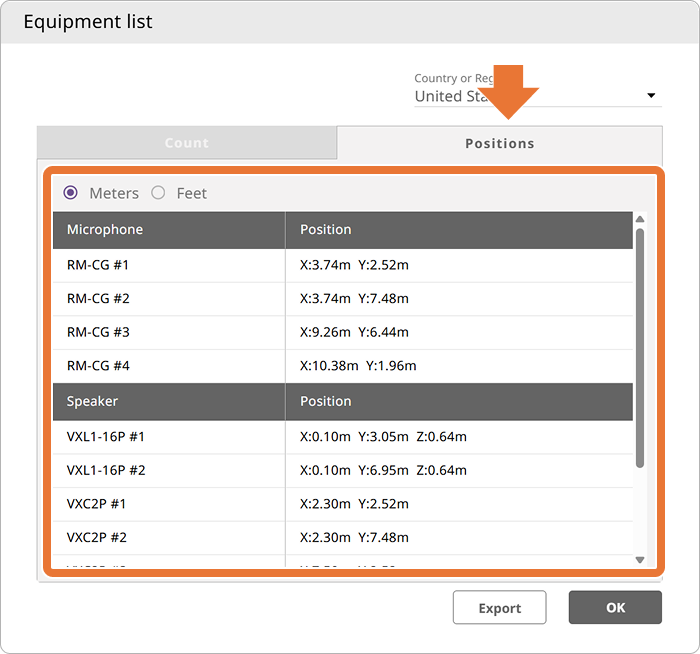 The device list > [Positions]tab
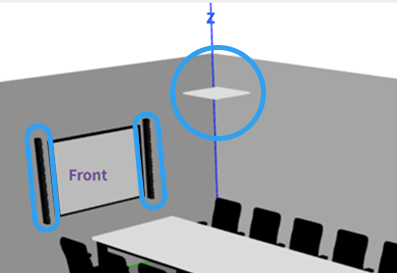 Arrangement view
Changing the device quantities (if desired)
If the automatically generated plan results in a large number of devices, the quantity of each device can be reduced, and then the plan can be regenerated. You can also add devices, such as controllers, in this screen.
-
Click the [Edit] button, and then select [Device Quantity].
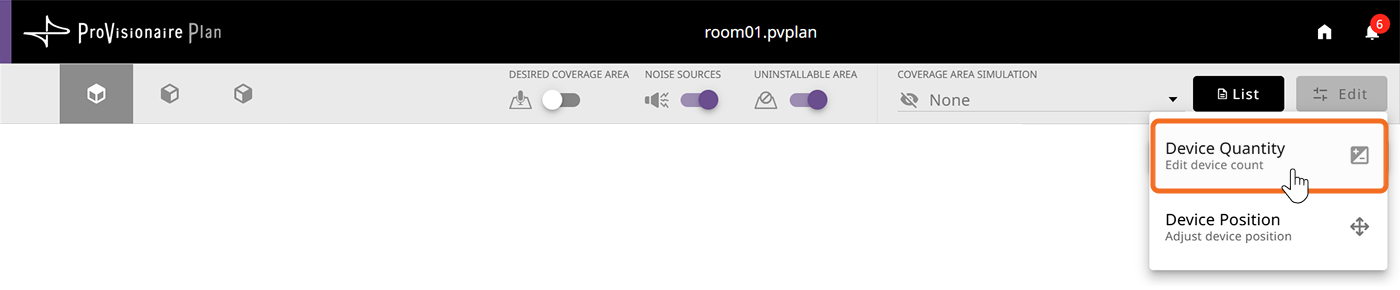
The Edit equipment list screen appears.
-
In the Edit equipment list screen, change the quantities of the devices.
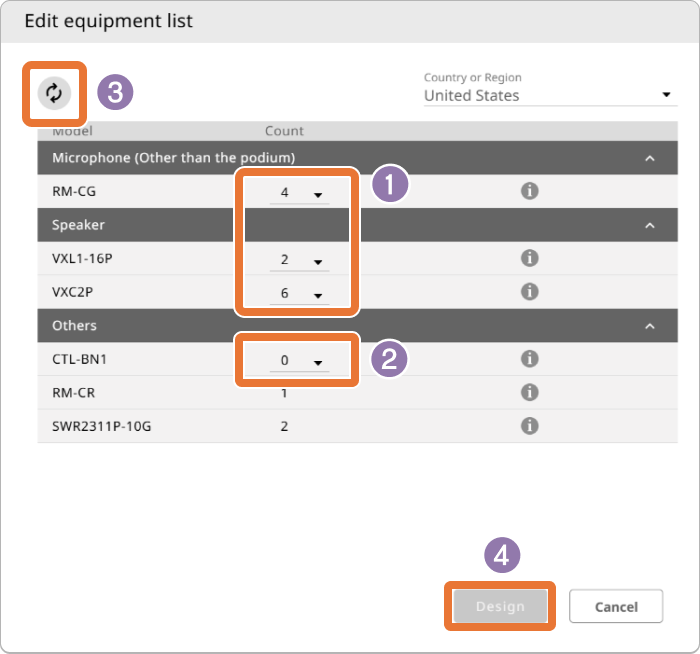 The Edit equipment list screen
- 1 Changing the quantity of a device
-
A drop-down list for selecting the quantity appears for devices whose quantity can be changed.
Select the desired quantity from the drop-down list. - 2 Adding a device
-
A drop-down list for selecting the quantity appears for devices that can be added.
Select the desired quantity from the drop-down list. - 3 Reverting to the device quantities of the original plan
-
Clicking the
 (reset) button reverts any changed quantities to those in the original plan.
 - 4 Redesigning
-
If the device quantities have been changed, the [Design] button becomes available.
-
In the Edit screen, click the [Design] button (4)to regenerate a plan with the changed quantities.
-
When the plan has been generated, the adjusted quantities are reflected in the results.
-
Make sure that the sound coverage areas meet your needs.
Adjusting device positions (if desired)
From the device position adjustment screen, the positions of microphones and speakers in an automatically generated plan can be adjusted. After repositioning devices, evaluate the new positions to check for any issues.
Devices that can be repositioned and their movement range
Model |
Movement range |
|---|---|
RM-CG (Ceiling Array Microphone) |
Can only be moved horizontally along the ceiling. |
VXC2P (Ceiling Speaker) |
Can only be moved horizontally along the ceiling. |
VXL1-16P (Line array speaker) |
Can only be moved along the wall on which they are mounted. |
Locations where placement is not possible
-
Locations obstructed by furniture on the surface where the device is to be installed, areas where installation is not permitted, or locations that are affected by noise sources
-
Locations where the device will interfere with other devices
Procedure for adjusting device positions
-
Click the [Edit] button, and then select [Device Position].
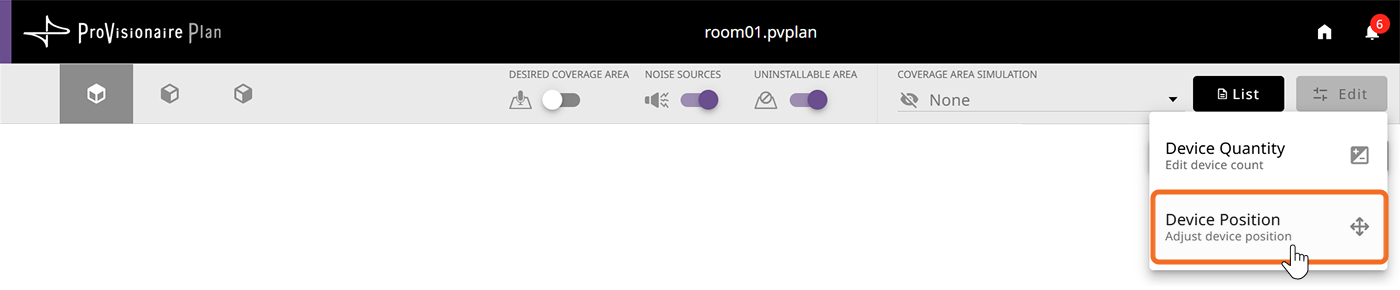
The device position adjustment screen appears.
-
Review the device’s position in the device position adjustment screen.
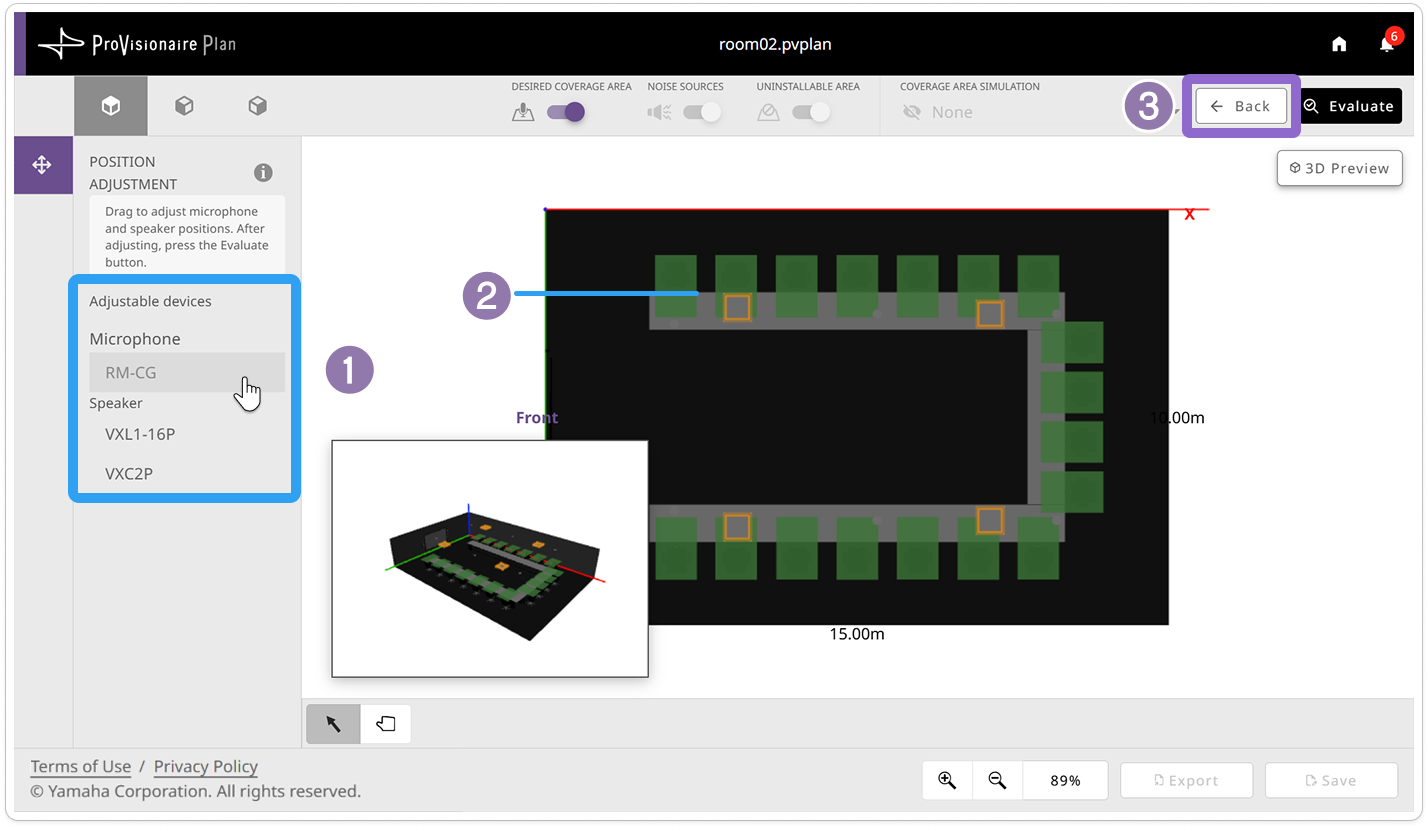 The device position adjustment screen(The selected device is highlighted.)
- 1 Adjustable devices
-
Displays the devices with adjustable positions. Select an adjustable device.
- 2 Device position
-
The device selected in 1 is highlighted.
- 3 [Back] button (closes device position adjustment screen)
-
Cancels all adjustments and closes the device position adjustment screen.
-
Drag and drop the devices that you want to reposition.
Move devices by dragging and dropping one at a time.
-
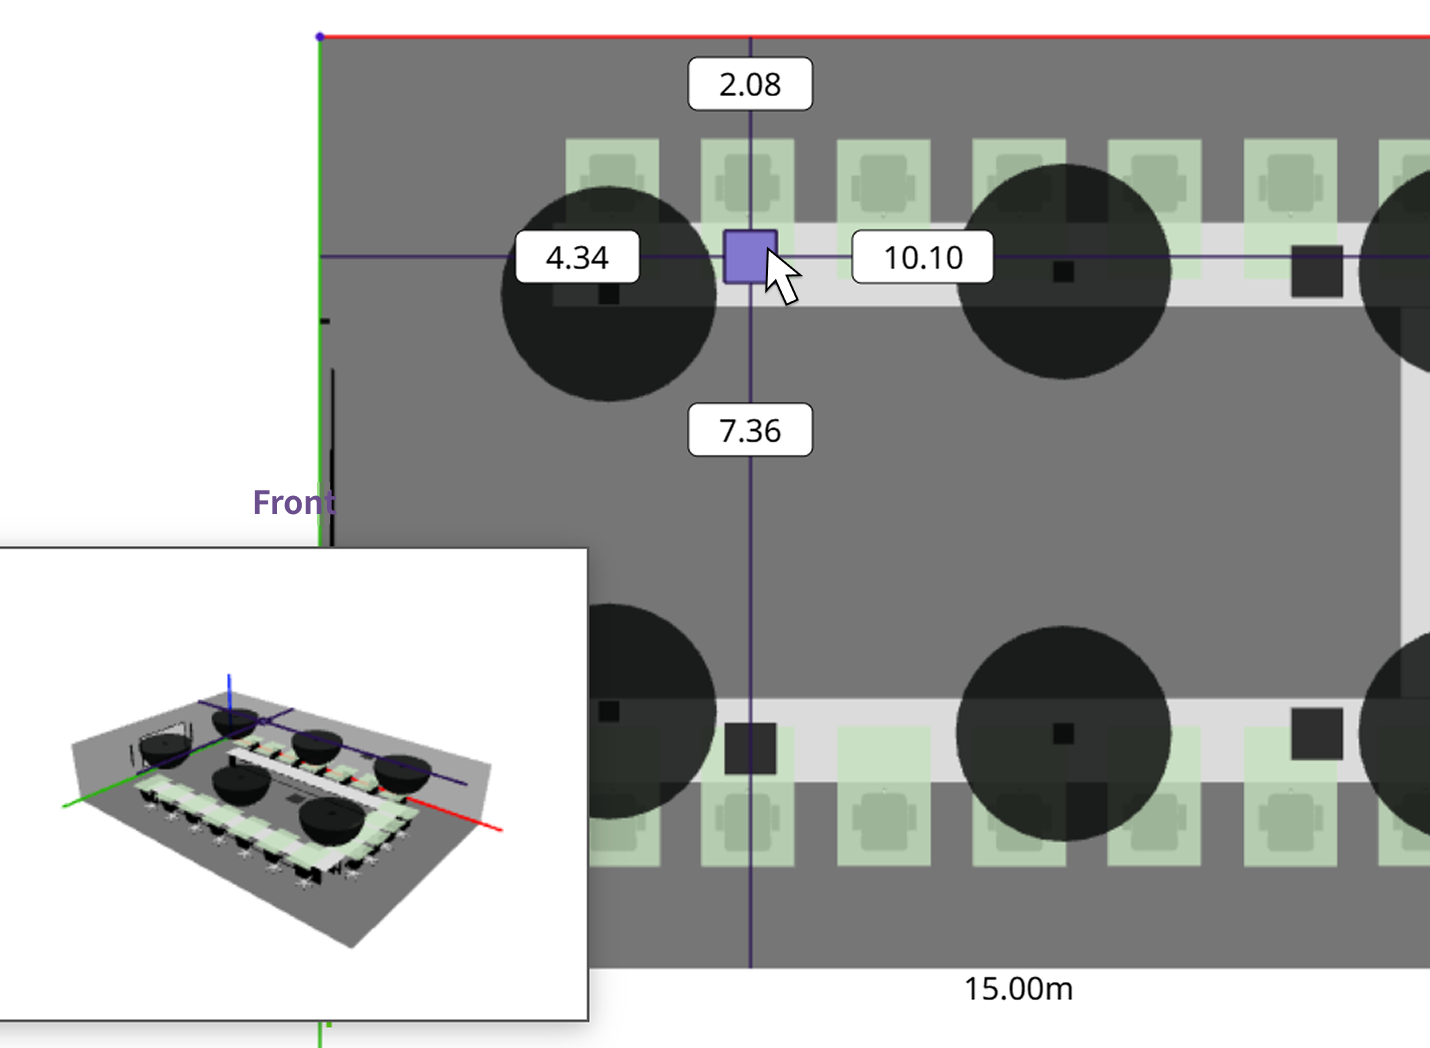
Drag to adjust microphone and speaker positions. After adjusting, press the Evaluate button.
While the device is being dragged, locations where it cannot be placed are indicated.
-
Drop the device at the desired position.
A warning appears if a device is placed in a location where placement is not possible.
-
-
Click the [Evaluate] button to perform an evaluation.

After position adjustment is finished, perform an evaluation to check whether there are issues with the changes. Clicking the [Evaluate] button applies the current adjustments and starts the evaluation.
-
Once the evaluation is finished, the results screen appears.
|