Setup
5. Setup
5.1. Setting up the unit
You can control the DME from ProVisionaire Design.
-
Connect the computer to be used for setup directly to the NETWORK connector on the rear panel of the unit, or connect it via a switch unit.
-
Plug the power cord connected to the unit into an AC outlet to turn the power on (see “Power On/Off”).
-
Set the IP address of the computer so that it is on the same network as the DME.
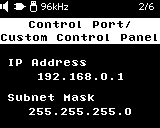
How to check the DME control IP address
On the startup screen, press the [ ] NEXT button once to display the currently set IP address on the display.
 NOTE
NOTE
Default IP address
When a DHCP server is available: Automatically assigned
When no DHCP server is available: Link-local address -
Launch ProVisionaire Design on the computer.
You can download ProVisionaire Design from the Yamaha Pro Audio website. -
Use ProVisionaire Design to configure the DME to suit your system.
Refer to the “Basic operation” section in the "ProVisionaire Design User Guide" for instructions on setting up ProVisionaire Design.
5.2. Changing and Checking Basic Settings
The basic settings of the DME can be changed or checked in the locations listed below.
For details on how to set up ProVisionaire Design, refer to the
"ProVisionaire Design User Guide"
.
For details on how to set up Dante Controller, refer to the Dante Controller User Guide.
https://www.audinate.com/
The information in the table below is current as of device firmware version 3.0.0. For the latest information, refer to the above manual.
| Setting items | Change/check location | ||
|---|---|---|---|
|
Device Information |
Sampling Frequency |
ProVisionaire Design > Properties area |
|
|
Device date and time |
ProVisionaire Design > System Menu > Clock > Non-RM Series |
||
|
MAC Address |
ProVisionaire Design > System Menu > Device Information |
||
|
Serial number |
ProVisionaire Design > System Menu > Device Information |
||
|
Dante Version Information |
|||
|
Firmware Version Information |
|||
|
Display |
Brightness |
ProVisionaire Design > Properties area |
|
|
Dimmer Ratio
|
ProVisionaire Design > Properties area |
||
|
Auto Dimmer Time
|
ProVisionaire Design > Properties area |
||
|
Language |
ProVisionaire Design > Properties area |
||
|
Dante Settings |
Sample Rate |
Dante Controller |
|
|
Preferred Leader |
Dante Controller |
||
|
Encoding |
Dante Controller |
||
|
Latency |
Dante Controller |
||
|
Network Mode
|
Dante Controller |
||
|
Basic settings |
Unit ID |
ProVisionaire Design > Properties area |
|
|
IP Settings |
DHCP/Static |
ProVisionaire Design > System Menu > IP Settings |
|
|
IP Address |
ProVisionaire Design > System Menu > IP Settings |
||
|
Subnet Mask |
ProVisionaire Design > System Menu > IP Settings |
||
|
Default Gateway |
ProVisionaire Design > System Menu > IP Settings |
||
|
Initialization |
Global Initialization |
Panel operation
|
|
|
Initialization of Each Setting |
ProVisionaire Design > System Menu > Device Information |
||
|
Reboot |
ProVisionaire Design > System Menu > Device Information |
||