Controls
Top surface
The controllers on the top surface of this product consist of two types: buttons for various functions and pads for your musical performance.
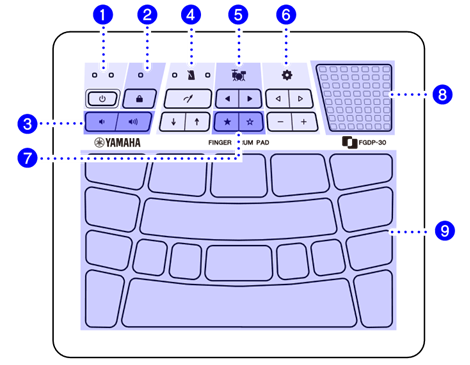
Buttons for functions a–b
a |
| Standby/On lamps (blue) (red) Standby/On button • This button lets you turn the product on/off, while the lamps let you confirm the charging status of this product. See this page for details about tuning the product on/off. See this page for details about charging the product. See this page for details about how to check the remaining Battery life. |
b |
| Lock lamp Lock button • To prevent unintended operation by accidentally touching a button during performance, use this button to temporarily disable all buttons other than the pads, the |


@
Buttons for functions c–g
• The volume of the confirmation sounds produced with button operations can be adjusted via “![]() Menu 4 Mixer Operation Sound Volume.”
Menu 4 Mixer Operation Sound Volume.”
• The volume of the Voice Guide can be adjusted via ![]() (Settings) ”5 Mixer Voice Guide Volume.”
(Settings) ”5 Mixer Voice Guide Volume.”
c |
| Volume Down button (left) and Volume Up button (right) • These buttons let you adjust the volume of the sound output from the internal speaker and the [PHONES/OUTPUT] jack. See this page for details. |
d |
| Click lamps (red) (blue) Click button Tempo Decrease button (left) and Tempo Increase button (right) • You can listen to the click sound to play at the accurate tempo. |
e |
| Kit Select buttons • These buttons let you select a Drum Kit, a collection of drum sounds (or voices) assigned to pads. See this page for details. |
f |
| Setting Item Select buttons Minus button and Plus buttons • These buttons let you change various settings. See this page for details. |
g |
| Registration Memory buttons • A batch of settings can be registered to one of these buttons, to be recalled anytime with a single touch. See this page for details. |


@
Built-in speaker h
h | Built-in speaker • This speaker outputs the audio signals from an external device connected to this product, as well as your performance sound. |
@
Pads for your performance i
i | Pads • By hitting these Pads (MIDI Note on), you can hear the various Voices that are assigned to these Pads. By pressing these Pads further or applying pressure to these Pads (MIDI Aftertouch), you can confirm that the sound of the Pads is naturally muted. See this page for details. • A number is assigned to each of the Pads. See this page for details. |
@
Rear surface
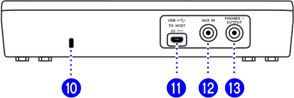
j |
| Security slot • Connect a commercially available security wire here to prevent theft of this product. |
k |
| [USB TO HOST] terminal • This micro-USB B terminal is used to charge the battery with a USB Power Adaptor, to input/output audio signals, and to transmit/receive MIDI messages from/to a computer or smart device. See this page for details about how to charge the battery. See this page for details about the other functions. |
l |
| [AUX IN] jack • This is a stereo mini jack. By connecting your device like a digital keyboard or mobile music player to this jack, you can input their sound to this product. See this page for details. |
m |
| [PHONES/OUTPUT] jack • This is a stereo mini jack. By connecting a device like headphones or a live streaming device (mixer), you can output the sound of this product, including your Pad performance, and the audio signal input via the [AUX IN] jack. See this page for details. |


@