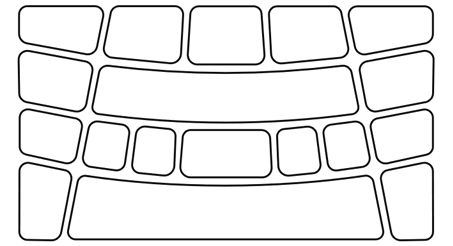
Playing the Pads
When you hit a Pad with your finger, you will hear the Voice assigned to that Pad. The intensity of the sound changes according to how hard you hit the Pad. By hitting these Pads with your finger, you can hear the various Voices that are assigned to these Pads.By pressing these Pads further or applying pressure to these Pads, you can confirm that the sound of the Pads is naturally muted.
@
NOTE
• The Drum Voices assigned to each Pad can be changed. See this page for details.
• Pad numbers can be inverted horizontally between left and right via "![]() 59 Utility Pad Layout."
59 Utility Pad Layout."
• If you want to play along with a constant tempo, use the Click sounds. For the tempo, see this page. For the Click, see this page.
• It is a good idea to play the Pads along with the song playback by connecting an audio device to this product. See this page for details.
Adjusting the Volume
You can set the volume of the sound from the built-in speaker and the [PHONES/OUTPUT] jack separately. Use the operations described below to adjust the volume of the built-in speaker when an external audio device is not connected to the [PHONES/OUTPUT] jack, or the volume output from the [PHONES/OUTPUT] jack when an external audio device is connected.
A short press of the A short press of the Press the NOTE Although the |
@
NOTE
• The initial value of the volume is adjusted so that the volume and sound quality are well-balanced.
Starting and Stopping the Click sound
You can play back the Click sound to check the correct tempo.
| Each press of the NOTE • The volume of the Click sound can be adjusted via “ • The rhythm pattern or resolution of the Click sound can be selected via “ • The number of Click beats per measure can be set via " • The type of Click sound can be selected via “ • The number of measures for which playback of the Click sound continues can be set via " |
@
Changing the tempo
You can change the tempo of the Click sound within the range of 30 - 300. With the following operations, the tempo value is audibly announced via the Voice Guide.
• A short press of the • A short press of the • Press the • Hit any Pad 3 times or more while holding down |
@
Selecting a Kit (Changing the sound of all Pads)
A Pad assignment of sounds (or Voices) is referred to as "Kit." This product features a variety of Kits for various music genres. Select your favorite kit and enjoy playing.
| • Use the • Hold down • Press the NOTE • You can edit various settings for the currently selected Kit, such as Volume and Effects, via • Edits to the settings of all Kits are maintained even when the power is turned off. You can initialize edits to the settings of the current Kit via “ |

@
Kit List
No. | Kit Name (Voice Guide) | Description |
1 | Maple | A kit recorded on a drum kit with maple shells, notable for its warm sound and enduring sustain. |
2 | EDM Red | A kit suitable for playing electronic music, focusing on carefully selected kicks and snares for immediate success. |
3 | Distortion Rock | A kit with distortion applied throughout, giving it a distorted tone with a memorable rock-style punch. |
4 | House Rose | A kit suitable for house performances, featuring a tight, machine-like sound. |
5 | R&B | The perfect kit for playing R&B, featuring samples from classic drum machines. |
6 | Dub Step Sun | This dubstep-oriented kit adds a distinctive bass to the toms. |
7 | Big Beat | An excellent kit for Big Beat music, making extensive use of distortion effects to give it an amazing sound. |
8 | Gate | A kit with the classic gated reverb sound so popular in the eighties. |
9 | Hip Hop Gold | Great for hip-hop performances, this kit features a dry snare sound with an old-school kick. |
10 | Modern Jazz | The perfect kit for playing jazz, with ride cymbal bows positioned at C1 and C2 for greater freedom when playing a swing beat. |
11 | Oak | Recorded from an oak shell drum kit, this kit boasts a powerful bass and rich mid-range. |
12 | Birch | Recorded using a birch shell drum kit, this kit has distinctive sustain in its mid- and low-range, and a tight top end. |
13 | Beech | Recorded using a beech shell drum kit, this kit has a clean attack and a hard sound with deep mids. |
14 | Garage Punk | The perfect punk kit, with a fat, driving sound. |
15 | Vintage 70s | A fat, warm, vintage sound reminiscent of rock's golden age in the 70s. |
16 | Funk | A great kit for playing funk, with a tight, dry sound. |
17 | Neo Soul | Intended for use when playing Neo Soul, this kit features high-pitched toms with long sustain, and a clap sound assigned to the snare (S1). |
18 | Metal | A strong attack and clear kick make this a great kit for heavy metal. |
19 | Phaser | Based on the Birch kit, this kit features a strong phaser effect. |
20 | Digi Rock | The perfect kit for playing rock, with a combination of electro sounds. Enjoy the deep flanging effect. |
21 | Reggae | A great reggae kit, with timbales and a high-pitched snare. |
22 | EDM Yellow | An EDM kit with reverb reminiscent of stadium performances. |
23 | EDM Green | The tight, machine-like sound makes EDM Green a good choice for EDM performances. |
24 | House Mint | The perfect kit for house music, featuring toms with powerful mids and lows. |
25 | Hip Hop Silver | Layered snares make this kit an excellent choice for playing hip-hop. |
26 | Beat Box Pine | Great for beatbox-style performances, this kit features an extra-powerful mid- and low-range. |
27 | RX | A kit recorded using sound from Yamaha's legendary RX Series digital drum machines. |
28 | T8 | Recorded using sounds from classic analog drum machines, this kit can be used for a wide range of genres from the 80s to modern music. |
29 | T9 | A kit recorded using sounds from classic analog drum machines, perfect for techno and house performances. |
30 | Analog | Recorded using sounds from classic analog drum machines, this kit is perfect for performing 80s dance music. |
31 | Percussion Master | A percussion kit featuring a range of percussion instruments from around the world that are sure to make sessions an immediate success. |
32 | Cuban | Perfect for playing Cuban music, this kit features timbales on the left and right pads. |
33 | Brazil | A percussion kit built around classic percussion instruments from Brazil, intended for playing batucada. |
34 | Africa | This percussion kit features a collection of classic percussion instruments from Africa, and is focused on djembe performance. |
35 | Arabic | This percussion kit features a collection of classic percussion instruments from Arabia, and is focused on darabuca performance. |
36 | Indian Pop | This kit combines classic Indian percussion instruments with electro-sounds, making it perfect for Bollywood music. |
37 | China | Featuring a collection of classic Chinese percussion instruments, the China kit has paigu assigned to the left and right pads. |
38 | Japan | With a collection of classic Japanese percussion instruments, the Japan kit has unique samples assigned to C1 and C2. |
39 | Orchestra | A percussion kit featuring a range of percussion instruments used in orchestral performance, with timpani assigned to the left and right pads. |
@
Trying the Choke setting
After selecting “Kit1 Maple,” try hitting the H1, H2, and H3 Pads.
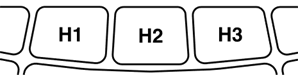
When “![]() Menu 59 Utility Pad Layout” is set to “Right”
Menu 59 Utility Pad Layout” is set to “Right”
If you hit the H2 Pad (hi-hat open cymbal) and then the H1 or H3 Pad (hi-hat closed cymbal), you will hear that the sound of H2 (hi-hat open cymbal) disappears. You can achieve this playing style with the following settings.
• ![]() Menu 19 Kit Pad Choke Group
Menu 19 Kit Pad Choke Group
• ![]() Menu 20 Kit Pad Choke Mode
Menu 20 Kit Pad Choke Mode
Changing the Voice of a specific Pad (Editing a Kit)
You can change the Voice of a specific Pad in the current Kit, such as kick (bass drum) and snare drum.
| 1. Use the 2. Hit the target Pad. 3. Use 4. Press 5. Use NOTE • Press the • “ • Edits to the settings of all Kits are maintained even when the power is turned off. You can initialize edits to the settings of the current Kit via “ |

@
Voice Category List
No. | Name (Voice Guide) |
1 | Kick Acoustic |
2 | Kick Electro |
3 | Snare Acoustic |
4 | Snare Electro |
5 | Tom Acoustic |
6 | Tom Electro |
7 | Hi-hat Acoustic |
8 | Hi-hat Electro |
9 | Cymbal Acoustic |
10 | Cymbal Electro |
11 | Percussion Acoustic |
12 | Percussion Electro |
13 | Clap |
14 | SE |
@
Voice List
See this page.
Changing the Pad sensitivity (Trigger)
From among the provided settings called "Trigger," you can select your favorite Pad sensitivity for the best playing feel.
To select a Trigger Select “ To edit the selected Trigger Each setting item of the current Trigger Setup can be edited for each Pad. 1. Hit the target Pad. 2. Select one of the related items such as “ NOTE • Edited Triggers are maintained even when the power is turned off. If you want to initialize the current Trigger, execute “ |
@
Playing the Pads along with music
You can listen to the playback sound of an external device through the built-in speaker or headphones connected to the [PHONES/OUTPUT] jack. Enjoy your Pad performance along with music playback.
Along with a mobile music player
1. Connect a mobile music player to the [AUX IN] jack via the audio cable.
2. Play back music on the mobile music player.
NOTE
• The sound volume input via the [AUX IN] jack can be adjusted via “![]() Menu 2 Mixer Aux In Audio Volume.”
Menu 2 Mixer Aux In Audio Volume.”
Along with a computer/smart device
1. Connect the music playback device to the [USB TO HOST] terminal via the supplied USB cable.
2. On the computer/smart device, start playback.
NOTE
• The sound volume input via the [USB TO HOST] terminal can be adjusted via “![]() Menu 3 Mixer USB Audio Volume.”
Menu 3 Mixer USB Audio Volume.”
• In addition to the USB connection, you can use the audio cable connection between the headphone jack of your computer/smartphone/tablet and the [AUX IN] jack.
• If this product is connected to a computer/smart device via USB and "![]() Menu 57 Utility USB Audio Loopback" is set to "On," an Audio Loopback will be configured. See this page for details.
Menu 57 Utility USB Audio Loopback" is set to "On," an Audio Loopback will be configured. See this page for details.
Disabling the Buttons (Panel Lock)
To prevent unintended operation by accidentally touching a button during performance, most of the buttons other than the Pads can be temporarily disabled (locked).
All Pads, ![]() , and
, and ![]() are available even when the Panel Lock function is enabled.
are available even when the Panel Lock function is enabled.
| Lock: Press and hold Unlock: Press and hold |

@
NOTE
• The product can be turned off via the ![]() button even if the Panel Lock function is enabled.
button even if the Panel Lock function is enabled.
Registering your favorite settings (Registration Memory)
You can register a batch of current settings—such as the Kit number, Effect, and Trigger—to a single button, and then recall them at anytime with a single touch. This convenient function is called Registration Memory. Two Registration Memory buttons are available on this product.
Registration: • Press and hold one of the • For items that can be registered in Registration Memory, see this page. Recall: • Briefly press one of the NOTICE • To recall registered settings, make sure to use a short button press. Holding the button too long will register the current settings, and the previously registered settings will be lost. NOTE • " |
@
Setting Items that can be registered in Registration Memory
• Kit number (See this page)
• Tempo value (See this page)
• ![]() Menu 1–5 Mixer related settings
Menu 1–5 Mixer related settings
• ![]() Menu 6–9 Click related settings
Menu 6–9 Click related settings
• ![]() Menu 10–34 Kit related settings
Menu 10–34 Kit related settings
• ![]() Menu 36–52 Trigger number (36) and Trigger related settings (37-52)
Menu 36–52 Trigger number (36) and Trigger related settings (37-52)
• ![]() Menu 55–62 Utility settings
Menu 55–62 Utility settings