Reverb Plug-ins
Reverb Plug-ins
REVelation
REVelation produces a high-quality algorithmic reverb with early reflections and reverb tail.
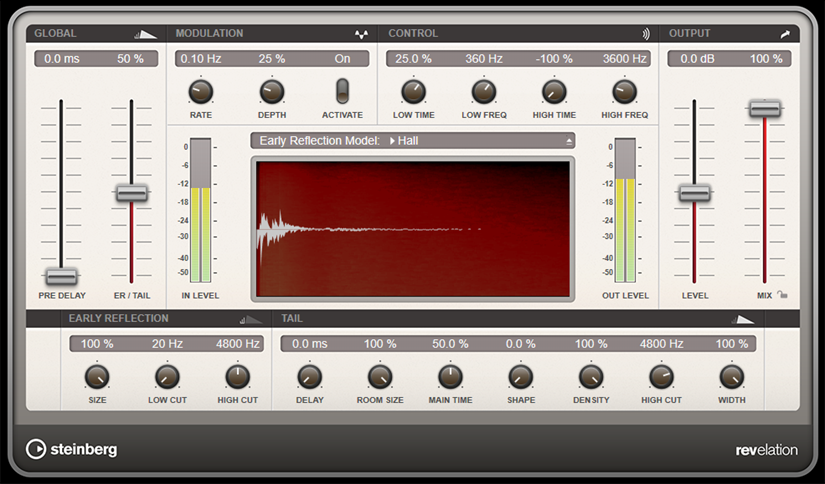
The early reflections are responsible for the spatial impression in the first milliseconds of the reverb. For emulating different rooms, you can choose between different early reflections patterns and adjust their size. The reverb tail, or late reverberation, offers parameters for controlling the room size and the reverb time. You can adjust the reverb time individually in 3 frequency bands.
- PRE DELAY
-
Determines how much time passes before the reverb is applied. This allows you to simulate larger rooms by increasing the time it takes for the first reflections to reach the listener.
- EARLY REFLECTION
-
Here, you select an early reflections pattern. The early reflections pattern contains the most important delays that deliver the key information for the spatial impression of the room.
- ER/TAIL
-
Sets the level balance between the early reflections and the reverb tail. At a setting of 50 %, early reflections and tail have the same volume. Settings below 50 % raise the early reflections and lower the tail, as a result the sound source moves towards the front of the room. Settings above 50 % raise the tail and lower the early reflections, as a result the sound source moves towards the back of the room.
- SIZE
-
Adjusts the length of the early reflections pattern. At a setting of 100 %, the pattern is applied with its original length and the room sounds the most natural. At settings below 100 %, the early reflections pattern is compressed and the room is perceived smaller.
- LOW CUT
-
Attenuates the low frequencies of the early reflections. The higher this value, the less low frequencies are present in the early reflections.
- HIGH CUT
-
Attenuates the high frequencies of the early reflections. The lower this value, the less high frequencies the early reflections will have.
- DELAY
-
Delays the onset of the reverb tail.
- ROOM SIZE
-
Controls the dimensions of the simulated room. At a setting of 100 %, the dimensions correspond to a cathedral or a large concert hall. At a setting of 50 %, the dimensions correspond to a medium-sized room or studio. Settings below 50 % simulate the dimensions of small rooms or a booth.
- MAIN TIME
-
Controls the overall reverb time of the tail. The higher this value, the longer the reverb tail will decay. At a setting of 100 %, the reverb time is infinitely long. The [Main Time] parameter also represents the mid band of the reverb tail.
- HIGH TIME
-
Controls the reverb time for the high frequencies of the reverb tail. With positive values, the decay time of the high frequencies is longer. With negative values, it is shorter. Frequencies are affected depending on the [High Freq] parameter.
- LOW TIME
-
Controls the reverb time for the low frequencies of the reverb tail. For positive values, low frequencies decay longer and vice versa. Frequencies will be affected depending on the [Low Freq] parameter.
- HIGH FREQ
-
Sets the cross-over frequency between the mid and the high band of the reverb tail. You can offset the reverb time for frequencies above this value from the main reverb time with the [High Time] parameter.
- LOW FREQ
-
Sets the cross-over frequency between the low and the mid band of the reverb tail. The reverb time for frequencies below this value can be offset from the main reverb time with the [Low Time] parameter.
- SHAPE
-
Controls the attack of the reverb tail. At a setting of 0 %, the attack is more immediate, which is a good setting for drums. The higher this value, the less immediate the attack.
- DENSITY
-
Adjusts the echo density of the reverb tail. At a setting of 100 %, single reflections from walls cannot be heard. The lower this value, the more single reflections can be heard.
- HIGH CUT
-
Attenuates the high frequencies of the reverb tail. The lower this value, the less high frequencies the reverb tail will have.
- WIDTH
-
Controls the width of the stereo image. At a setting of 0 %, the output of the reverb is mono, at 100 % it is stereo.
- MIX
-
Sets the level balance between the dry signal and the wet signal. If the effect is used as a send effect, set this parameter to the maximum value, as you can control the dry/effect balance with the send level.
- Lock Mix Value
-
Activate this button (padlock symbol) next to the [Mix] parameter to lock the dry/wet balance while browsing through the available presets.
Modulation
Modulation allows you to enrich the reverb tail through subtle pitch modulations.
- Modulation Rate
-
Specifies the frequency of the pitch modulation.
- Modulation Depth
-
Sets the intensity of the pitch modulation.
- Modulation Activate
-
Activates/Deactivates the chorusing effect.
REVerence
REVerence is a convolution tool that allows you to apply room characteristics (reverb) to the audio.
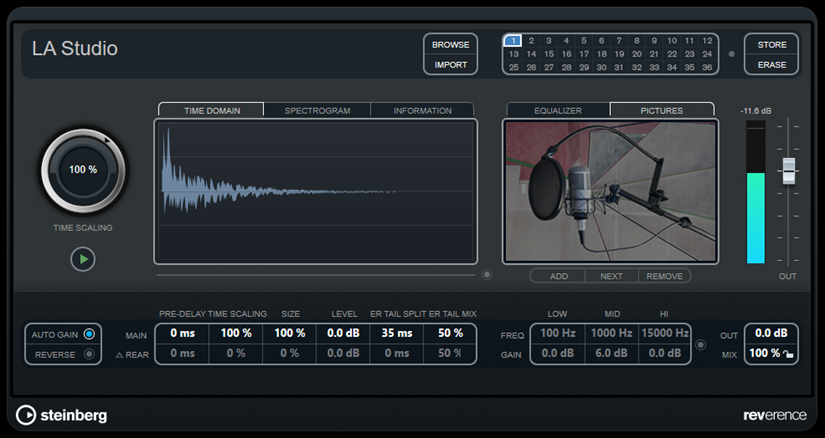
This is done by processing the audio signal according to an impulse response – a recording of an impulse in a room or another location that recreates the characteristics of the room. As a result, the processed audio sounds as if it were played in the same location. Included with the plug-in are top quality samples of real spaces to create reverberation.
NOTE
REVerence can be very demanding in terms of RAM. This is because the impulse responses that you load into the program slots are preloaded into RAM to guarantee artifact-free switching between programs. Therefore, you should always load only those programs that you need for a given task.
Program Matrix
A program is the combination of an impulse response and its settings. These include reverb settings, EQ settings, pictures, and output settings. The program matrix allows you to load programs or to view the name of the impulse response.

- Program Name
-
In the upper left corner of the plug-in panel, either the name of the loaded impulse response file or the name of the program is shown. After loading an impulse response, its number of channels and the length in seconds are displayed for a few seconds.
- BROWSE
-
This button opens a browser window showing the available programs. If you select a program in the browser, it is loaded into the active program slot. To filter the list of impulse responses by room type or the number of channels, for example, activate the [Filter] section (by clicking the [Set Up Window Layout] button at the top right of the browser window).
- IMPORT
-
Click this button to load impulse response files from an external source. The files should have a maximum length of 10 seconds. Longer files are automatically cut.
- Program Slots
-
Use these slots to load all the impulse responses that you want to work with in a session. The selected program slot is indicated by a white frame. Used slots are shown in blue. A red program slot indicates that the impulse response file is missing. Double-clicking an empty program slot opens a browser window, showing the available programs. Clicking a used program slot recalls the corresponding program and loads it into REVerence. If you move the mouse over a used slot, the corresponding program name is displayed below the active program name.
- Smooth Parameter Changes
-
This button is located between the program slots and the [Store]/[Erase] buttons. If it is activated, a crossfade is performed when switching programs. Leave this button deactivated while looking for a suitable program or an appropriate setting for an impulse response. Once you have set up the program matrix to your liking, activate the button to avoid hearing artifacts when switching between programs.
- STORE
-
Stores the active impulse response and its settings as a program.
- ERASE
-
Removes the selected program from the matrix.
Programs vs. Presets
You can save your REVerence settings as VST plug-in presets or programs. Both presets and programs use the file extension .vstpreset and appear in the same category in the MediaBay, but they are represented by different icons.
Preset
A REVerence preset contains all settings and parameters for the plug-in, that is, a link to all loaded impulse responses along with their parameter settings and positions in the program matrix. Presets are loaded via the presets pop-up menu at the top of the plug-in panel.
NOTE
Manually imported impulse responses themselves are not part of the program or preset. If you want to move your project to a different computer, you have to move the impulse responses as well.
Program
A REVerence program only contains the settings related to a single impulse response. Programs are loaded and managed via the program matrix.
Presets
Presets are useful in the following situations:
-
To save a complete setup with different impulse responses for later use (for example, different setups for explosion sounds that can be reused for other scenes or movies).
-
When you want to save different parameter sets for the same impulse response so that you can later choose the set that best suits your needs.
Programs
Programs offer the following advantages:
-
Up to 36 programs can be loaded into the program matrix for instant recall.
-
A program provides a quick and easy way to save and recall the settings for a single impulse response, allowing for short loading times.
-
When automating a project and loading a REVerence program, only one automation event is written.
If you load a plug-in preset instead (which contains a lot more settings than a program), a lot of unnecessary automation data (for the settings that you did not use) is written.
Setting up Programs
- Procedure
-
-
In the program matrix, click on a program slot to select it.
A blinking white frame indicates that this program slot is selected. -
Click the [Browse] button or click the empty slot again to load one of the included programs. You can also import a new impulse response file.
-
In the browser, select the program containing the impulse response that you want to use and click [OK].
The name of the loaded impulse response is shown in the upper left corner of the REVerence panel. -
Set up the REVerence parameters as and click the [Store] button to save the impulse response with the current settings as a new program.
-
Set up as many programs as you need by following the steps above.
NOTE
If you want to use your set of programs in other projects, save your settings as a plug-in preset.
-
Reverb Settings
The reverb settings allow you to change the characteristics of the room.

- MAIN
-
All values shown in the top row apply to all speakers or to the front channels if you are working with surround tracks.
- REAR
-
If you are working with surround tracks up to 5.1, you can use this row to set up an offset for the rear channels.
- AUTO GAIN
-
If this button is activated, the impulse response is automatically normalized.
- REVERSE
-
Reverses the impulse response.
- PRE-DELAY
-
Determines how much time passes before the reverb is applied. This allows you to simulate larger rooms by increasing the time it takes for the first reflections to reach the listener.
- TIME SCALING
-
Controls the reverb time.
- SIZE
-
Determines the size of the simulated room.
- LEVEL
-
A level control for the impulse response. This governs the volume of the reverb.
- ER TAIL SPLIT
-
Sets a split point between the early reflections and the tail, allowing you to determine where the reverb tail begins. A value of 60 means that the split point is set to 60 ms.
- ER TAIL MIX
-
Allows you to set up the relation of early reflections and tail. Values above 50 attenuate the early reflections and values below 50 attenuate the tail.
Impulse Response Display
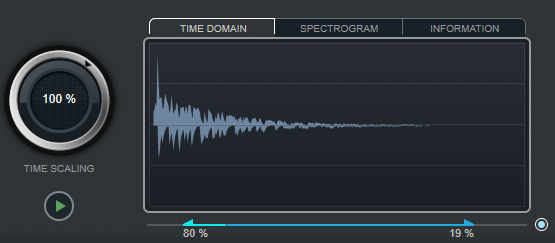
The display section allows you to view the impulse response details and to change the length of the response.
- TIME SCALING
-
This wheel lets you adjust the reverb time.
- Play
-

When clicking this button to apply the loaded impulse response, a short click is played. This provides a neutral test sound that makes it easier for you to know how different settings influence the reverb characteristics. - TIME DOMAIN
-
This display shows the waveform of the impulse response.
- SPECTROGRAM
-
This display shows the analyzed spectrum of the impulse response. Time is displayed along the horizontal axis, frequency along the vertical axis, and volume is represented by the color.
- INFORMATION
-
This display shows additional information, such as the name of the program and the loaded impulse response, the number of channels, the length, and Broadcast Wave File information.
- Activate Impulse Trimming
-
Use this button at the bottom right of the impulse display section to activate impulse trimming. The Trim slider is shown below the Impulse display.
- Trim
-
This slider allows you to trim the start and end of the impulse response. Drag the front handle to trim the start of the impulse response, and the end handle to trim the reverb tail.
NOTE
The impulse response is cut without any fading.
EQ Settings
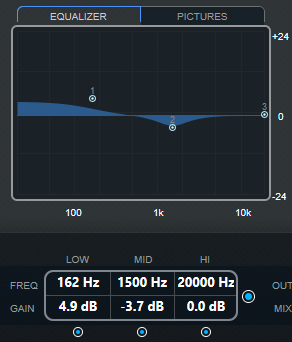
In the Equalizer section, you can tune the sound of the reverb.
- EQ Curve
-
Shows the EQ curve. You can use the EQ parameters below the display to change the EQ curve, or modify the curve manually by dragging the curve points.
- Activate EQ
-
This button to the right of the EQ parameters activates the EQ for the effect plug-in.
- Low Shelf On
-
Activates the low shelf filter that boosts or attenuates frequencies below the cutoff frequency by the specified amount.
- LOW FREQ (20 to 500)
-
Sets the frequency of the low band.
- LOW GAIN (-24 to +24)
-
Sets the amount of attenuation/boost for the low band.
- Mid Peak On
-
Activates the mid peak filter that creates a peak or notch in the frequency response.
- MID FREQ (100 to 10000)
-
Sets the center frequency of the mid band.
- MID GAIN (-12 to +12)
-
Sets the amount of attenuation/boost for the mid band.
- Hi Shelf On
-
Activates the high shelf filter that boosts or attenuates frequencies above the cutoff frequency by the specified amount.
- HI FREQ (5000 to 20000)
-
Sets the frequency of the high band.
- HI GAIN (-24 to +24)
-
Sets the amount of attenuation/boost for the high band.
Pictures Section
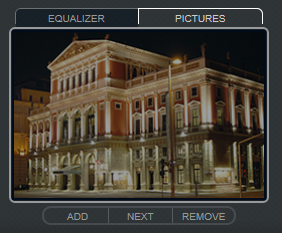
In the [Pictures] section, you can load graphics files to illustrate the setting, for example, the recording location or microphone arrangement of the loaded impulse response. Up to five pictures can be loaded.
NOTE
Pictures are only referenced by the plug-in and are not copied to the project folder.
- ADD
-
Opens a file dialog where you can navigate to the graphics file that you want to import. JPG, GIF, and PNG file formats are supported.
- NEXT
-
If several pictures are loaded, you can click this button to display the next image.
- REMOVE
-
Deletes the active picture.
NOTE
This does not remove the graphics file from the reference source.
Output Settings
In the output section, you can control the overall level and determine the dry/wet mix.

- Output Meter
-
Indicates the overall level of the impulse response and its settings.
- OUT
-
Adjusts the overall output level.
- MIX
-
Sets the level balance between the dry and the wet signal.
- Lock Mix Value
-
Activate this button (padlock symbol) next to the [Mix] parameter to lock the dry/wet balance while browsing through the available presets and programs.
Custom Impulse Responses
In addition to working with the impulse responses included with REVerence, you can import impulse responses from external sources and save them as programs or presets. WAVE and AIFF files with a mono, stereo, true-stereo, or multi-channel (up to 5.0) configuration are supported. If a multi-channel file contains an LFE channel, this channel is ignored.
REVerence uses the same channel width as the rack it is inserted on. When importing impulse response files with more channels than the corresponding rack, the plug-in only reads as many channels as needed. If the impulse response file contains fewer channels than the rack, REVerence generates the missing channels (for example, the center channel as a sum of the left and right channels). If the rear channels are missing (when importing a stereo response file onto a 4.0 channel rack, for example), the left and right channels are also used for the rear channels. In this case you can use the Rear offset parameter to create more spatiality.
Importing Impulse Responses
REVerence allows you to import impulse response files from external sources. Before importing these impulse response files, you can preview their effect.
- Procedure
-
-
In the program matrix, click [Import].
-
In the file dialog that opens, navigate to the location of your impulse response files.
-
Optional: Select an impulse response file to preview it.
-
Select the file that you want to import and click [Open].
The file is loaded into REVerence. The channels from an interleaved file are imported in the same order as in other areas of the program. -
Make the appropriate settings and add a picture, if available.
Pictures residing in the same folder as the impulse response file or in the parent folder are automatically found and displayed. -
Click the [Store] button to save the impulse response and its settings as a program.
That way you can recall the setup at any time.
-
- Result
-
The program slot turns blue, indicating that a program is loaded.
NOTE
When saving a program, the impulse response file itself is only referenced. It still resides in the same location as before and is not modified in any way. - After Completing This Task
-
Repeat these steps for any impulse response files that you want to work with.
True Stereo
Impulse responses recorded as true-stereo files allow you to create a very realistic impression of the corresponding room.
REVerence can only process true-stereo impulse response files with the following channel configuration (in exactly that order): LL, LR, RL, RR.
The channels are defined as follows:
| Channel | Signal from this source | Recorded with this microphone |
|---|---|---|
|
LL |
Left source |
Left microphone |
|
LR |
Left source |
Right microphone |
|
RL |
Right source |
Left microphone |
|
RR |
Right source |
Right microphone |
REVerence automatically works in true-stereo mode if the plug-in is inserted on a stereo rack and you load a 4-channel impulse response.
So how can you prevent REVerence from unintentionally processing surround files in true-stereo mode? The answer is a [Recording Method] attribute that can be written to the iXML chunk of the corresponding impulse response file. Whenever you load an impulse response with a 4-channel configuration on a stereo rack, REVerence searches the iXML chunk of the file. If the plug-in finds the [Recording Method] attribute, the following happens:
-
If the attribute is set to [TrueStereo], the plug-in works in true-stereo mode.
-
If the attribute is set to [A/B] or [Quadro], the plug-in works in normal stereo mode and processes only the L/R channels of the surround file.
Relocating Content
Once you have imported your own impulse responses to REVerence, you can comfortably work with them on your computer. But what if you need to transfer your content to another computer, for example, because you work sometimes with a PC and sometimes with a notebook, or you need to hand over a project to a colleague in the studio?
The factory content is not a problem because it is also present on the other computer. For these impulse responses, you just need to transfer your REVerence programs and presets to be able to access your setups.
User content is a different matter, though. If you have transferred your audio files to an external drive or a different hard disk location on the other computer, REVerence cannot access the impulse responses any more because the old file paths have become invalid.
Procedure
-
Transfer your audio files to a location that you can access from the second computer (for example, an external hard disk).
If you keep the files in the same folder structure as on the first computer, REVerence automatically finds all files contained in this structure. -
Transfer any REVerence presets or programs that you need to the second computer.
-
Open REVerence on the second computer and try to load the preset or program that you want to work with.
The [Open Impulse Response] dialog opens. -
Navigate to the folder that contains your impulse responses.
-
Click [Open].
Result
REVerence is now able to access all the impulse responses stored in this location.
Important
The new path to these audio files has not been saved yet. To make the files permanently available without having to use the locate dialog, you need to save your programs or presets under a different name.
Roomworks
RoomWorks is a highly adjustable reverb plug-in for creating realistic room ambience and reverb effects in stereo and surround formats. The CPU usage is adjustable to fit the needs of any system. From short room reflections to cavern-sized reverb, this plug-in delivers high quality reverberation.
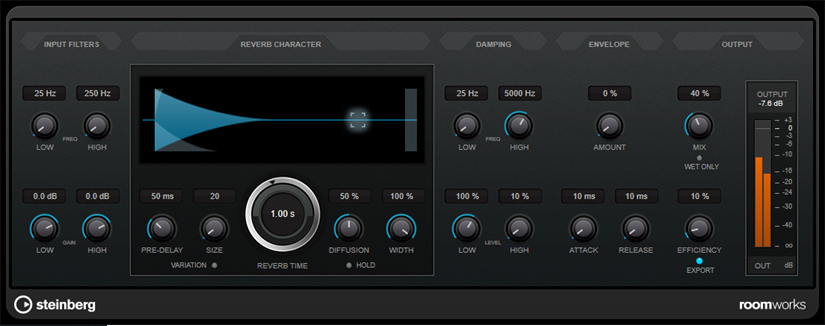
Input Filters
- LOW FREQ
-
Determines the frequency at which the low-shelving filter takes effect. Both the high and low settings filter the input signal prior to reverb processing.
- HIGH FREQ
-
Determines the frequency at which the high-shelving filter takes effect. Both the high and low settings filter the input signal prior to reverb processing.
- LOW GAIN
-
Sets the amount of boost or attenuation for the low-shelving filter.
- HIGH GAIN
-
Sets the amount of boost or attenuation for the high-shelving filter.
Reverb Character
- PRE-DELAY
-
Determines how much time passes before the reverb is applied. This allows you to simulate larger rooms by increasing the time it takes for the first reflections to reach the listener.
- SIZE
-
Alters the delay times of the early reflections to simulate larger or smaller spaces.
- REVERB TIME
-
Allows you to set the reverb time in seconds.
- DIFFUSION
-
Affects the character of the reverb tail. Higher values lead to more diffusion and a smoother sound, while lower values lead to a clearer sound.
- WIDTH
-
Controls the width of the stereo image. At a setting of 0 %, the output of the reverb is mono, at 100 % it is stereo.
- VARIATION
-
Clicking this button generates a new version of the same reverb program using altered reflection patterns. This is helpful if some sounds are causing odd ringing or undesirable results. Creating a new variation often solves these issues. There are 1000 possible variations.
- HOLD
-
Activating this button freezes the reverb buffer in an infinite loop. You can create some interesting pad sounds using this feature.
Damping
- LOW FREQ
-
Determines the frequency below which low-frequency damping occurs.
- HIGH FREQ
-
Determines the frequency above which high-frequency damping occurs.
- LOW LEVEL
-
Affects the decay time of the low frequencies. Normal room reverb decays quicker in the high- and low-frequency range than in the mid-range. Lowering the level percentage causes low frequencies to decay quicker. Values above 100 % cause low frequencies to decay more slowly than the mid-range frequencies.
- HIGH LEVEL
-
Affects the decay time of the high frequencies. Normal room reverb decays quicker in the high- and low-frequency range than in the mid-range. Lowering the level percentage causes high frequencies to decay quicker. Values above 100 % cause high frequencies to decay more slowly than the mid-range frequencies.
Envelope
- AMOUNT
-
Determines how much the envelope attack and release controls affect the reverb itself. Lower values have a more subtle effect while higher values lead to a more drastic sound.
- ATTACK
-
The envelope settings in RoomWorks control how the reverb follows the dynamics of the input signal in a fashion similar to a noise gate or downward expander. Attack determines how long it takes for the reverb to reach full volume after a signal peak (in milliseconds). This is similar to a pre-delay, but the reverb is ramping up instead of starting all at once.
- RELEASE
-
Determines how long after a signal peak the reverb can be heard before being cut off, similar to a release time of a gate.
OUTPUT
- MIX
-
Sets the level balance between the dry signal and the wet signal. If RoomWorks is used as an insert effect for an FX channel, you most likely want to set this to 100% or use the [Wet only] button.
- WET ONLY
-
This button deactivates the [Mix] parameter, setting the effect to 100% wet or affected signal.
- EFFICIENCY
-
Determines how much processing power is used for RoomWorks. The lower the value, the more CPU resources are used, and the higher the quality of the reverb. Impressive effects can be created with very high [Efficiency] settings (above 90 %).
- EXPORT
-
Determines if during audio export RoomWorks uses the maximum CPU power for the highest quality reverb. During export, you may want to keep a higher efficiency setting to achieve a specific effect. If you want the highest quality reverb during export, make sure this button is activated.
- Output Meter
-
Shows the level of the output signal.
Roomworks SE
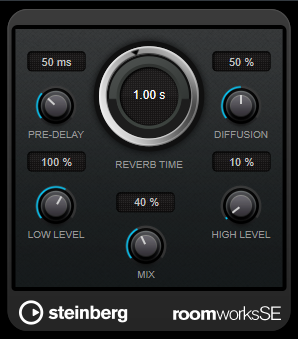
RoomWorks SE is a smaller version of the RoomWorks plug-in. RoomWorks SE delivers high quality reverberation, but has fewer parameters and is less CPU demanding than the full version.
- PRE-DELAY
-
Determines how much time passes before the reverb is applied. This allows you to simulate larger rooms by increasing the time it takes for the first reflections to reach the listener.
- REVERB TIME
-
Allows you to set the reverb time in seconds.
- DIFFUSION
-
Affects the character of the reverb tail. Higher values lead to more diffusion and a smoother sound, while lower values lead to a clearer sound.
- LOW LEVEL
-
Affects the decay time of the low frequencies. Normal room reverb decays quicker in the high- and low-frequency range than in the mid-range. Lowering the level percentage causes low frequencies to decay quicker. Values above 100 % cause low frequencies to decay more slowly than the mid-range frequencies.
- HIGH LEVEL
-
Affects the decay time of the high frequencies. Normal room reverb decays quicker in the high- and low-frequency range than in the mid-range. Lowering the level percentage causes high frequencies to decay quicker. Values above 100 % cause high frequencies to decay more slowly than the mid-range frequencies.
- MIX
-
Sets the level balance between the dry signal and the wet signal.
