Installation
5. Installation
5.1. Rack Mount Kit Installation (RUio1608SB-D)
You can attach the separately-sold Rack Mount Kit (RK-RUio1608SB) to the RUio1608SB-D and mount the unit in a rack or in an installed system.
The following items are included with the RK-RUio1608SB:
• Rack mount bracket L x 1
• Rack mount bracket R x 1
• Screws x 8
1. Check that the power to this product is turned off.
 CAUTION
When installing the rack mount kit, always unplug the power cord from the outlet before starting work. Failing to do so can cause electric shock or malfunctions.
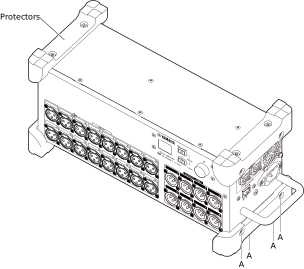
2. Remove the screws (A) on each protector and remove the protector.
 NOTE
NOTE
Keep the screws of the protector together with the protector after removing them.
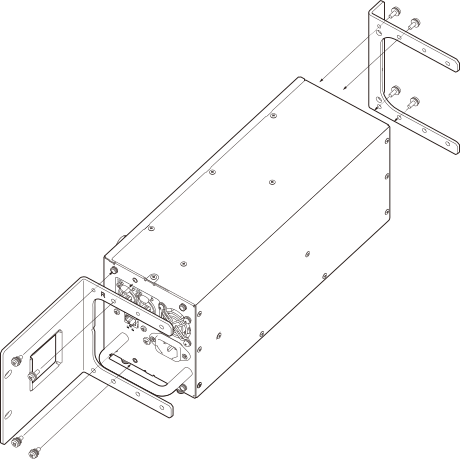
3. Attach the brackets using the screws included in the rack mount kit.
 NOTICE
When installing the rack mount kit, use the screws included with the rack mount kit. Using other screws may cause malfunctions.
Secure it with screws at the position shown in the figure below.
Precautions for Rack Mounting
Operation of this unit is guaranteed within a temperature range of 0 to 40°C. If you mount this unit along with other RUio unit(s) or other device(s) in an EIA standard rack, the heat from each device will raise the temperature inside the rack, which may prevent the unit from achieving full performance. When rack mounting the unit, always observe the following requirements to avoid heat buildup:
-
If you are mounting three or more RUio1608SB-D, RUio0804-D, and RUio16FLX-D units in any combination without leaving any gaps between them, set the fan speed to HIGH.
-
If multiple units are mounted in the same rack with their fan speeds set to LOW, leave 1U space between every two units. In addition, ensure sufficient ventilation by installing a ventilation panel in these spaces, or simply leave the open spaces uncovered.
-
When mounting this unit in a rack with devices such as power amplifiers that tend to generate a significant amount of heat, leave space between this unit and other devices. In addition, ensure sufficient ventilation by installing a ventilation panel in these spaces, or simply leave the open spaces uncovered.
-
To ensure sufficient airflow, leave the rear of the rack open and position it at least 10 cm from walls, ceilings or other surfaces. If the rear of the rack cannot be left open, install a commercially-available fan kit or similar forced ventilation system to secure sufficient airflow. If you have installed a fan kit, there may be cases in which closing the rear of the rack will produce a greater cooling effect. For more information, see the instruction manual for the fan kit.
5.2. Regarding Recesses (RUio1608SB-D, RUio0804-D)
If you want to recess the front panel surface of this unit from the front edge of the rack, you can adjust the position of the rack mount brackets to recess the unit, as shown in the illustration below. You can recess the RUio1608SB-D unit by 50 mm, and the RUio0804-D unit by 50 mm or 100 mm.
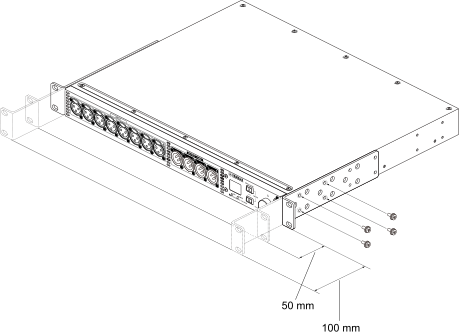
In the same way, rack mount brackets can also be attached to the rear panel surface (RUio0804-D only).
NOTE
When you install the brackets, use the same screws that you just removed.
5.3. Installing Euroblock Plugs (RUio16FLX-D)
For connection to the [FLEXIBLE I/O] connector, use the included Euroblock plug.
Preparation (Cable preparation)
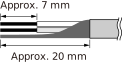
When connecting a cable to a Euroblock plug, strip the cable as shown in the illustration before wiring it. Furthermore, wiring in Euroblocks can lead to metal fatigue due to the weight and vibration of the cables, making them prone to breakage. Secure the cable to the tab on the Euroblock plug using the included cable ties. When rack-mounting, use cable ties or similar devices to bundle and secure the cables whenever possible.
CAUTION
If using stranded wire, do not solder it.
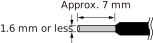
For portable equipment where the cable is frequently connected and disconnected, we recommend using insulated ferrules. Use the following for the conductor portion of the ferrules.
Installation method
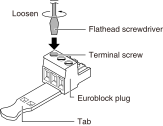
1. Loosen the screws on the terminals.
NOTE
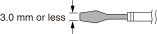
Use a flathead screwdriver with a diameter of 3 mm or less.
2. Plug in the cable.
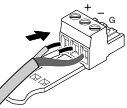
3. Tighten the terminal screws securely.
Pull the cable to make sure it does not come loose.
4. Secure the cable to the tab using the included cable ties.
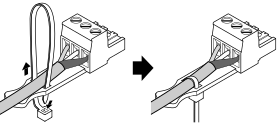
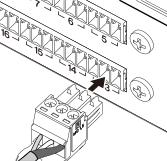
5. Attach the Euroblock plug into the [FLEXIBLE I/O] connector on the unit.