
Operations
8. Operations
8.1. Adjusting the Contrast and Brightness
You can adjust the display contrast (CONTRAST) and the brightness (BRIGHTNESS) of the display, [MENU/HOME] key, and [
 ] (Back) / [PEAK] key by following one of two methods as described below.
8.1.1. How to press and hold the [MENU/HOME] key
1. Press and hold the [MENU/HOME] key. (You can do so on any screen.)
The Contrast/Brightness adjustment popup screen is displayed, and an editable parameter is highlighted. Additionally, CONTRAST and BRIGHTNESS will be reset to their initial values. (CONTRAST: 10, BRIGHTNESS: 20)
2. While continuing to press and hold the [MENU/HOME] (Back) key, press the encoder with switch to select the CONTRAST or BRIGHTNESS parameter.
Pressing the encoder with switch repeatedly will change the parameter selection.

3. While continuing to press and hold the [MENU/HOME] key, turn the encoder with switch to modify the parameter value.
Turn the encoder with switch to the left to reduce the value, and turn it to the right to increase the value. The parameter value is immediately modified.
8.1.2. Using BRIGHTNESS and CONTRAST in the SETUP menu
1. While the MENU TOP screen is displayed, turn the encoder with switch to select SETUP, and then press it to confirm.
2. In the SETUP menu, turn the encoder with switch to select BRIGHTNESS or CONTRAST, and then press it to confirm.

3. Turn the encoder with switch to select a value, and then press it to confirm.
Related link(s)
“
SETUP menu
”
8.2. Clearing the PEAK HOLD
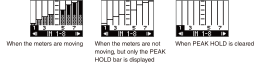
The PEAK HOLD setting is always on.
While a METER screen is displayed, press and hold the [
] (Back) / [PEAK] key to clear the peak indication being held for all ports.
8.3. Locking the Panel
You can lock the panel to prevent parameter changes due to accidental operation. Even when panel lock is enabled, you can still control parameters from supported devices.
While the unit is operating, press and hold the [MENU/HOME] key and [
] (Back) / [PEAK] key simultaneously for more than 3 seconds.
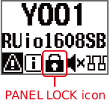
The message “FRONT PANEL LOCKED” appears. In addition, the PANEL LOCK icon appears on the status bar of the home screen.
 NOTE
NOTE
-
This state will be maintained even if the power is turned off and then turned back on.
-
If you turn the power off while the panel is locked to perform a forced initialization*, the panel lock will be disabled.
* This is one of the methods by which to initialize the unit.
To initialize the unit, while pressing and holding the [MENU/HOME] key and [
] (Back) / [PEAK] key simultaneously, turn the power on. See “
Performing a forced initialization
”.
8.4. Unlocking the Panel
While the panel is locked, press and hold the [MENU/HOME] and [
] (Back) / [PEAK] keys simultaneously for 3 seconds or more.
The message “FRONT PANEL UNLOCKED” appears, and the panel is unlocked. In addition, the PANEL LOCK icon disappears from the home screen.
Related link(s)
“
Home Screen
”
8.5. Changing the [MENU/HOME] Key Setting for Normal Status
You can modify the light on/off and color settings for the color bar indicator that indicates a normal status.
For details on each setting, see [MENU/HOME] in “
Names and Functions
”.
1. While the MENU TOP screen is displayed, turn the encoder with switch to select SETUP, and then press it to confirm.
2. In the SETUP menu, turn the encoder with switch to select LED COLOR, and then press it to confirm.

3. Turn the encoder with switch to select OFF (not lit), GREEN (lit), or BLUE (lit), and then press it to confirm.
Related link(s)
“
SETUP menu
”
8.6. Changing the [MENU/HOME] Key Setting for Error Status
You can modify the light on/flash/off settings for the color bar indicator that indicates an error or warning.
For details on each setting, see [MENU/HOME] in “
Names and Functions
”.
1. While the MENU TOP screen is displayed, turn the encoder with switch to select SETUP, and then press it to confirm.
2. In the SETUP menu, turn the encoder with switch to select LED ACTION, and then press it to confirm.

3. Turn the encoder with switch to select OFF (not lit), BLINK, or ON (lit), and then press it to confirm.
Related link(s)
“
SETUP menu
”
8.7. Setting the INPUT Channel Parameters
You can set the HA gain value (0 dB to +64 dB), +48V (phantom power) ON/OFF, HPF ON/OFF, HPF cutoff frequency (20.0 Hz to 600 Hz), and GC (Gain Compensation) ON/OFF.
1. While the METER IN screen is displayed, turn the encoder with switch to select a channel number.

2. Press the encoder with switch to display the parameter edit screen.
An editable parameter is highlighted.

NOTE
Press the [
] (Back) / [PEAK] key on the parameter edit screen to return to the METER IN screen.
3. Press the encoder with switch repeatedly to highlight the parameter you want to edit, and then turn the encoder to modify the parameter value.
The parameter value is immediately modified.
NOTE
-
Press the [
] (Back) / [PEAK] key to return to the METER IN screen.
-
If you confirm the change to the GC setting from OFF to ON, the HA gain value for the corresponding channel will be used as the compensation gain value. On the other hand, if you confirm the change to the GC setting from ON to OFF, the compensation gain value will be used as the HA gain value.
4. When you finish setting the parameters, press the [
] (Back) / [PEAK] key to return to the METER IN screen.
Related link(s)
“
METER IN
”