
Operations from the External Device
11. Operations from the External Device
11.1. Specifying the Device Label
The device label can be specified from Dante Controller.
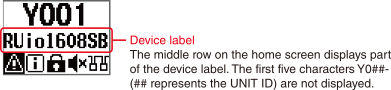
Assign the device label as follows.
-
Do not modify the first five characters, which are Y0##- (Y0## represents the UNIT ID). Even if you try to change these characters, they will automatically be corrected to Y0##-.
-
You can use up to 31 characters total.
11.2. Identifying This Product among the Devices in the Network
To identify this product among multiple devices in the network, issue a Device Identify command from a supported device or Dante Controller.
Issuing the command from a supported device
If the Device Identify command is issued from a supported device, the front panel display and [+48V] key of the unit will flash only while you are touching the mixer or pressing the mouse in R Remote. At the same time, the [MENU/HOME] key and the [
 ] (Back) / [PEAK] key will flash green.
Issuing the command from Dante Controller
If the Device Identify command is issued from Dante Controller, the front panel display and [+48V] key of the unit will flash green for ten seconds. At the same time, the [MENU/HOME] key and the [
] (Back) / [PEAK] key will flash green.
11.3. Turning Remote Only On/Off
The Remote Only function disables parameter editing from the front panel of this product to prevent unintentional changes to parameter values.
This function is always off when this product starts up.
 NOTE
NOTE
-
You can still edit the SETUP menu items (SETUP and CONTROL) even when Remote Only is On.
-
You can still adjust parameters from a supported device even when Remote Only is On.
To turn it On
Set it to On from the supported device when this product and the device are synchronized. Even if the connection to the supported device is lost while the Remote Only function is On, the function will remain turned On.
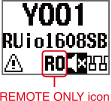
When Remote Only is On, the REMOTE ONLY icon appears on the home screen of this product.
To turn it Off
Disable the function from the supported device, or turn the power to this product off and then on again.
When Remote Only is turned Off, the REMOTE ONLY icon disappears.
11.4. Control from an External Device
Connecting this product to a supported device enables you to control this product remotely. The display of the supported device that is connected to this product indicates the model name and UNIT ID of this product.
For information on connecting a supported device to this product, and monitoring and controlling the unit from the device, please refer to the owner’s manual for the corresponding supported device.
11.4.1. Parameters that you can monitor and control
“*” (asterisk) indicates a parameter that applies to With Recall. The With Recall function applies the HA parameters stored in the mixing console to this product when a scene is recalled on the console.
| Parameter | Description |
|---|---|
|
HA Gain* |
Adjusts the gain in the range of 0 dB to +64 dB in 1 dB units. |
|
+48V ON/OFF* |
Turns +48V phantom power ON or OFF for each channel. |
|
HPF ON/OFF* |
Turns the high pass filter ON or OFF. |
|
HPF Cutoff Frequency* |
Adjusts the cutoff frequency of the high pass filter (12 dB/Oct.) in the range of 20 Hz to 600 Hz in 60 steps. |
|
GC ON/OFF* |
Turns the Gain Compensation ON or OFF. |
|
REMOTE ONLY ON/OFF |
Turns Remote Only on/off. |
|
Analog input level meter |
Indicates a level meter for each analog input channel. |
|
Analog output level meter |
Indicates a level meter for each analog output channel. |
|
Digital output level meter (RUio16FLX-D only) |
Indicates a level meter for each digital output channel. |
|
Firmware version |
Indicates the firmware version. |
|
Device Identify command |
Identifies the target unit among multiple devices in a Network. |
|
[SYSTEM] / [SYNC] status indication and messages |
Provides notifications via [SYSTEM] / [SYNC] status indication and messages. |
11.4.2. Communication method
Three communication methods are available to control the parameters of this product.
| Communication method | Connector used to control the parameters | Details |
|---|---|---|
|
(1) Superimposing a control signal onto a Dante audio signal
|
Dante [PRIMARY] connector, Dante [SECONDARY] connector |
|
|
(2) Using the Dante [PRIMARY] connector via network communications
|
Dante [PRIMARY] connector |
If the Dante PRIMARY address is not used, make sure that the NETWORK MODE, and the IP ADDRESS subnet for the DANTE PORT, match the address settings for external device control on the controllers. |
|
(3) Using the network connector via network communications
|
Network connector |
|