
Details on Screens
This section provides details about each screen. Refer to this as needed.
Room condition specification screen/procedure guide
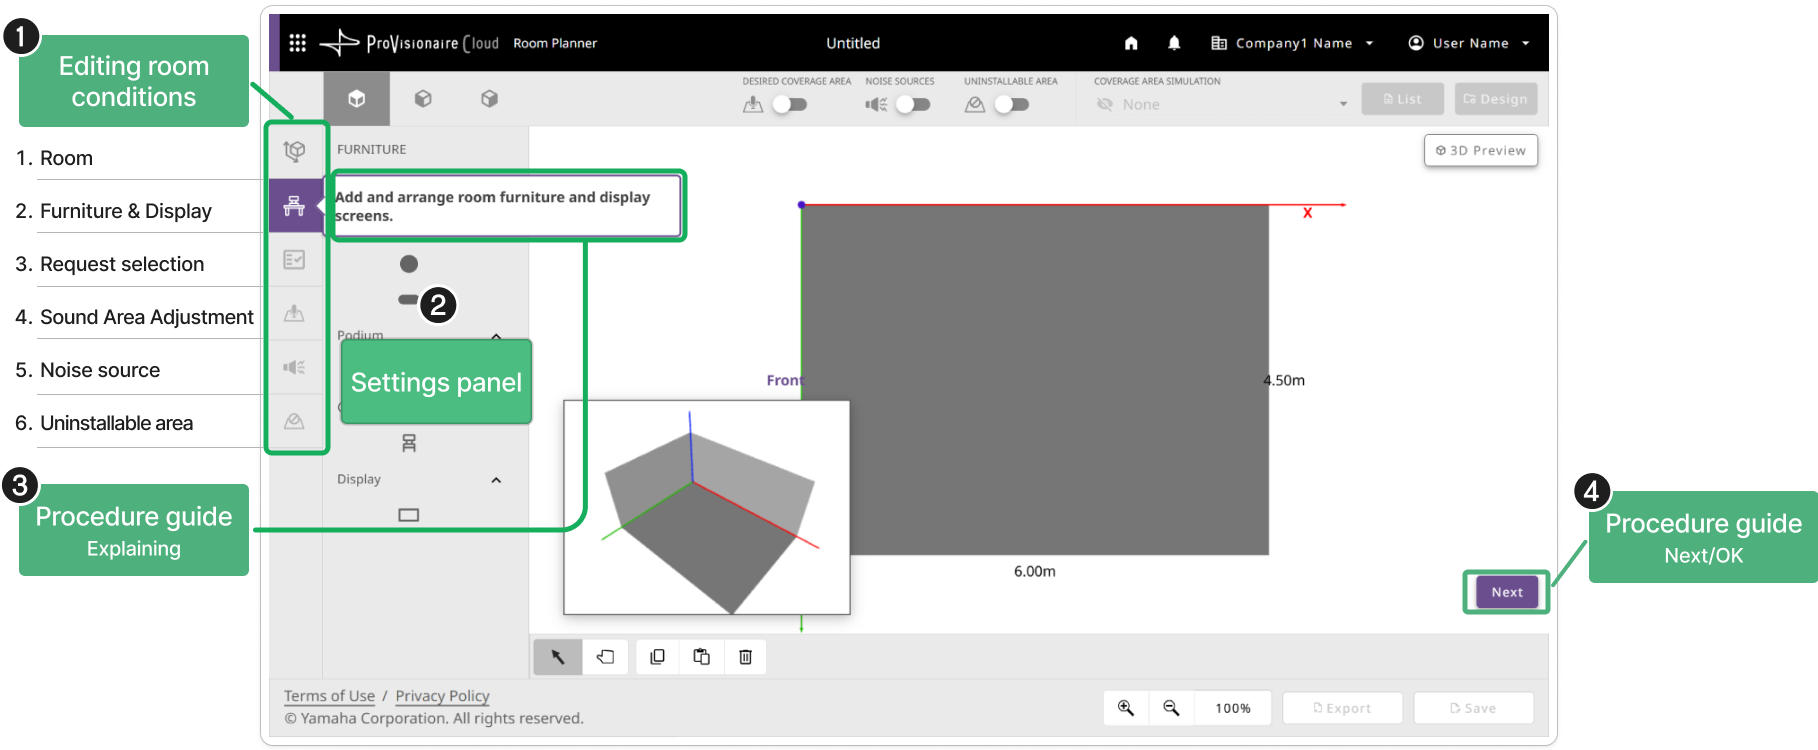
- 1 Room conditions


- 2 Settings panel
-
Displays items that can be specified for the selected room condition.
- 3 Procedure guide
-
Details appear, explaining what to do in this screen.
- 4 Procedure guide button (displayed only in the Create New step)
-
Clicking the [Next] button continues to the next screen. The procedure guide is finished when the information for all room conditions has been specified in the given order.
|
If there is no need to display the procedure guide button, click [Settings] on the user menu in the header, and then switch off [Show instructions on how to use]. |
Arrangement Views/Editing Tools
|
Related information
|
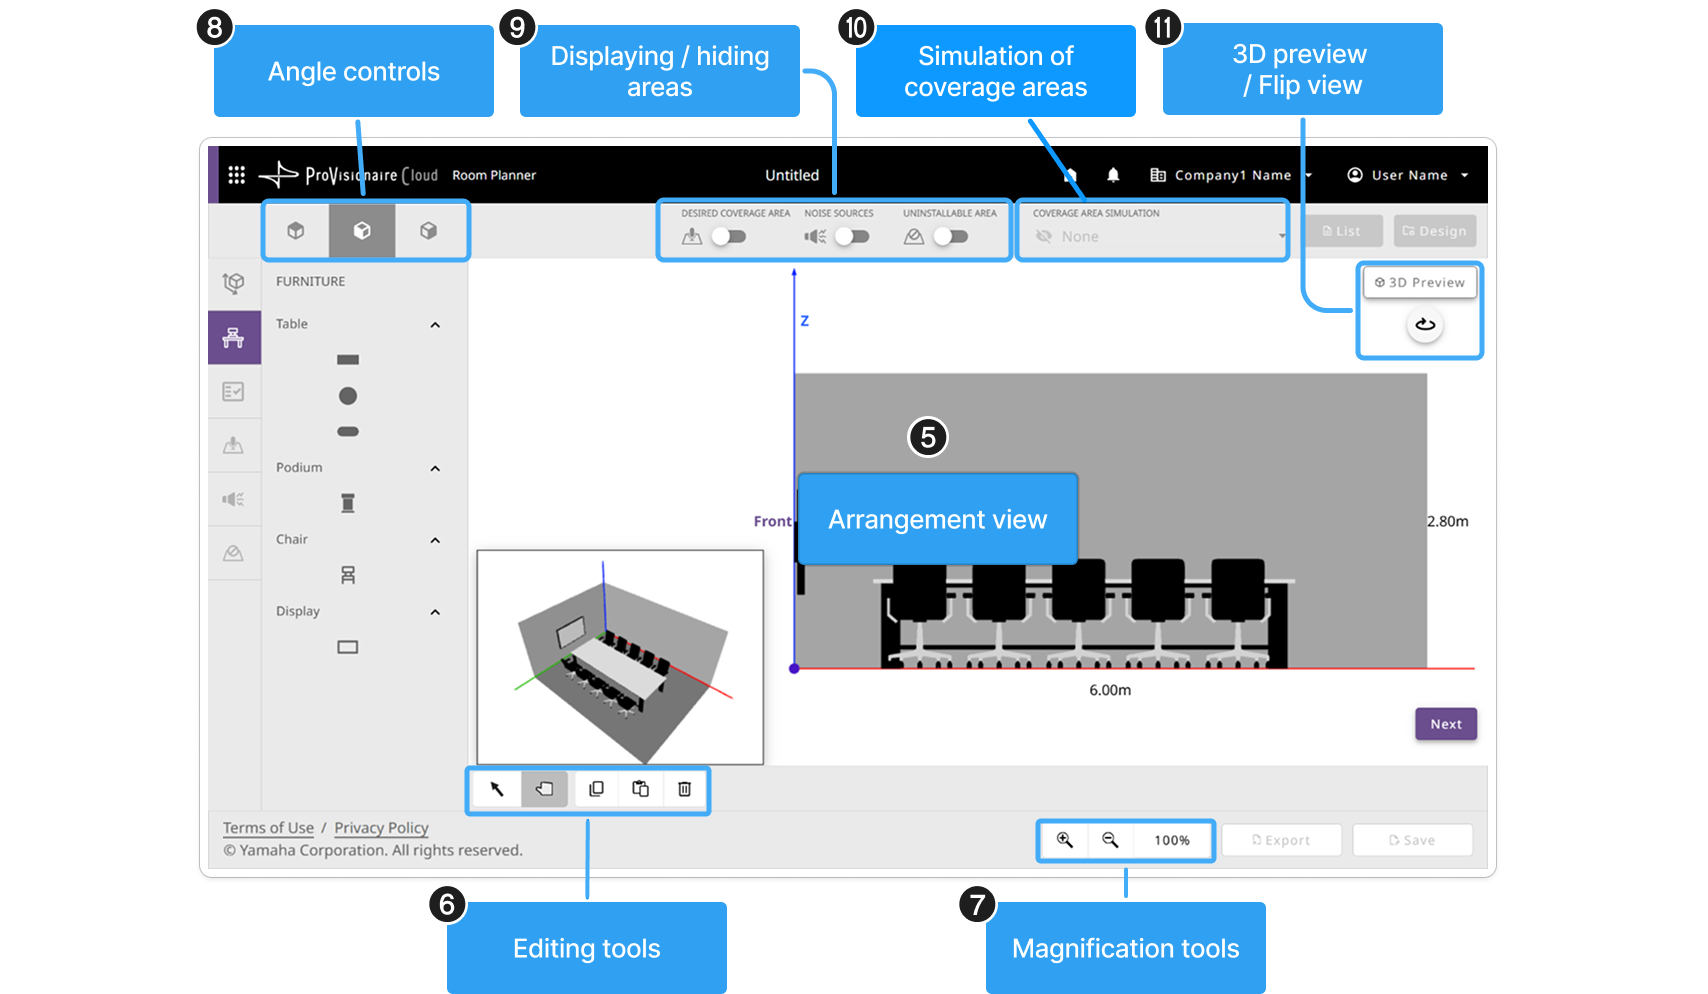
- 5 Arrangement view
-
Displays the room arrangement and coverage areas.
A 3D preview appears in the lower left. Drag the 3D preview to move it anywhere within the arrangement view.
- 6 Editing tools
-
Use to move and edit objects in the arrangement view (5).
| Button | Function | Description |
|---|---|---|
|
Selection tool |
Selects objects in the arrangement view.
|
|
Hand tool |
Navigates the canvas.
|


| Button | Function | Description |
|---|---|---|
|
Rotate |
Drag the 3D preview to rotate it up to 360 degrees. |
|
Move |
Navigates (up, down, left or right) the 3D preview of the room. |


| Button | Function | Description |
|---|---|---|
|
Copy |
Clicking this tool while an object is selected copies the object. Copied objects are deleted when a different room condition is selected. |
|
Paste |
Pastes the copied object. |
|
Delete |
Deletes the selected object. |


- 7 Magnification tools
Use to zoom in on or out of the arrangement view (5).
| Button | Function | Description |
|---|---|---|
|
Zoom in/out |
Zooms in on or out of the displayed room. Each press of the button changes the magnification by 10%. |
|
Magnification ratio |
Displays the magnification ratio. |

- 8 Angle controls
Use to change the angle at which the room is displayed in the arrangement view (6).
| Top view angle | Side view angle | Back view angle |
|---|---|---|
|
|
|


- 9 Displaying / hiding areas
Use these toggles to display/hide the following areas.
| Coverage areas | Noise sources | Non-installable areas |
|---|---|---|
|
|
|



- 10 Simulation of coverage areas
Use these toggles to display/hide the simulation of the coverage areas for the microphones and speakers. Only the coverage area for either the microphones or the speakers can be displayed.
None: |
Displays no coverage area. |
|---|---|
Microphone: |
Displays the microphone coverage area. |
Loudspeaker: |
Displays the speaker coverage area. |
Speech with Voice Lift: |
Displays the coverage area of a speaker’s voice amplified by Voice Lift. |
|---|---|
Speech without Voice Lift: |
Displays the audible area of a speaker’s natural voice (human voice). |
- 11 3D preview / Flip view
| Button | Function | Description |
|---|---|---|
|
Enlarge/reduce 3D preview |
Displays the 3D preview within the entire arrangement view.
|
|
Flip view |
Flips the view to display the opposite side of the room.
|

Design Execution / Result Review and Adjustment Buttons
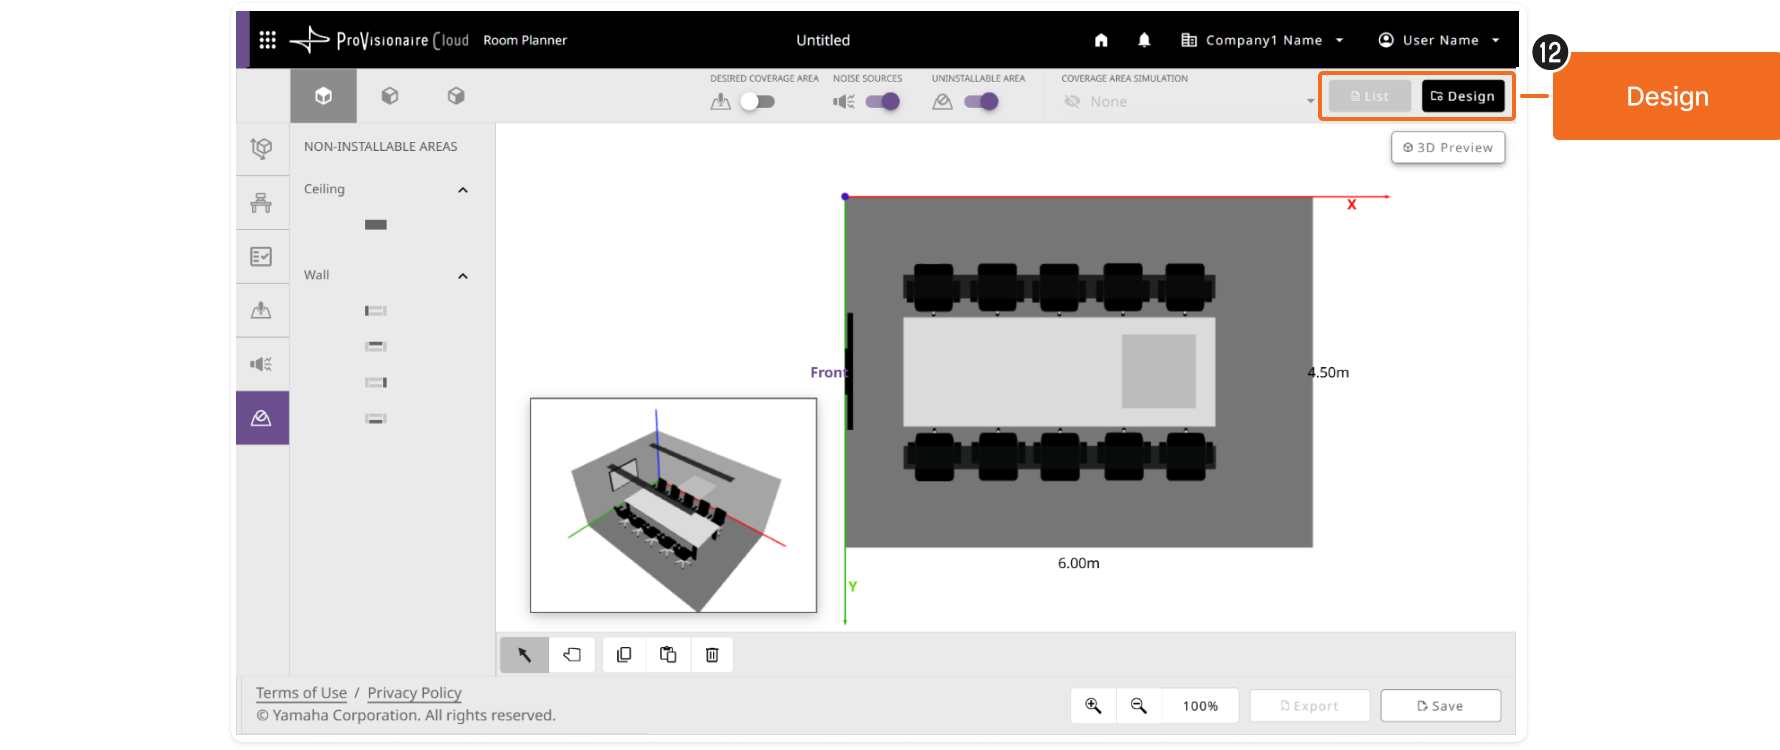

- 12 [Design] button / [List] button / [Edit] button
| Button | Function | Description |
|---|---|---|
|
Automatically generates a plan from the specified room conditions. |

| Button | Function | Description |
|---|---|---|
|
Displays a list of the devices selected in the design results. |
|
|
Edit |
Edits the devices selected and placed in the design results.
|

- 13 [Result] button
Once the plan has been generated, the [Result] button appears. Clicking the [Result] button opens the results screen that appeared after the plan was generated.
|
Displays a list of the proposed devices from the generated plan. |
|
Due to the given conditions, some areas cannot be covered by microphones and speakers. |
|
The function for automatic setup with Voice Lift is not available because some areas cannot be covered by microphones or speakers. |

Application elements
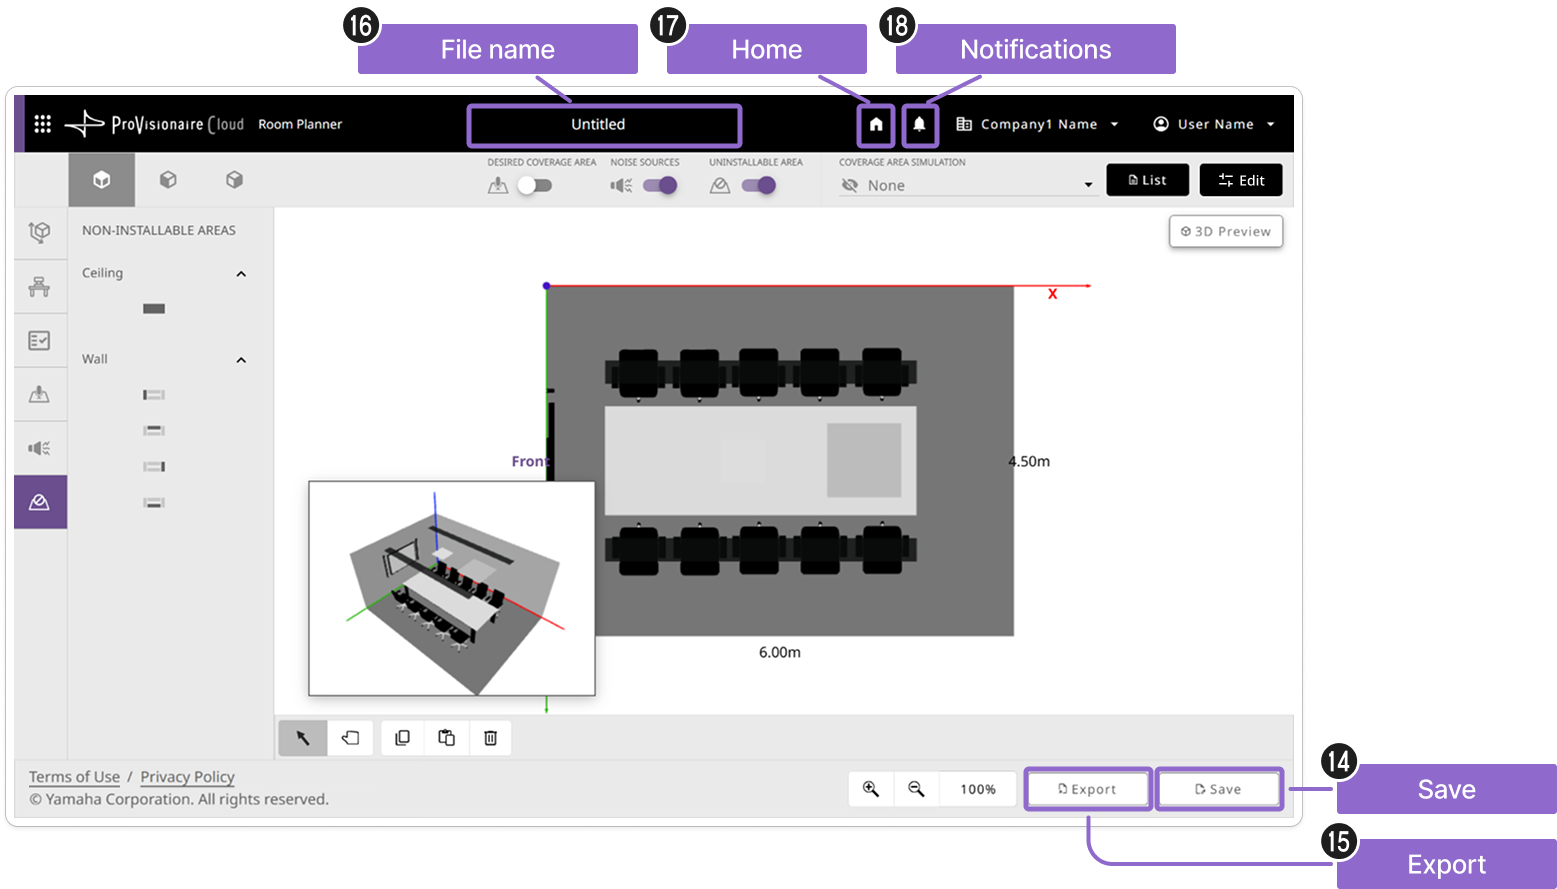
- 14 [Save] button
Saves the plan. The saved plan file can be opened from the top screen.
|
A plan in the new plan screen cannot be saved. Specify all room conditions, and then close the new plan screen. |
- 15 [Export] button
-
Exports the room conditions and plan results in the PDF format.
- 16 File name
-
Displays the file name of the plan.
- 17 Home button
-
Returns to the top screen.
- 18 Notifications
-
Displays ProVisionaire Cloud notifications.
Service elements

- 19 Feature selection menu
-
Switches between ProVisionaire Cloud service features.
- 20 Organization menu
-
Displays the organization name and allows you to view and perform organization-related operations when clicked.
- 21 User menu
-
Displays your name and allows you to perform account-related operations when clicked.