
Creating a plan that supports Voice Lift
Room Planner can design sound systems that support Voice Lift. The plan is automatically designed with the optimal arrangement of microphones and speakers for Voice Lift.
The generated Voice Lift plan can be used for automatic Voice Lift-compatible setup of the RM-CR processor.
About Voice Lift
Voice Lift amplifies and adjusts the speaker’s voice picked up by a microphone, then uses multiple ceiling speakers to ensure that the voice is heard naturally and clearly by all participants in the room, even within large spaces.
Voice Lift Support Conditions
Models that support Voice Lift
Processor |
RM-CR (Signal Processor) |
|---|---|
Microphone |
RM-CG (Ceiling Microphone) |
Speaker |
VXC2P (Ceiling Speaker) |
-
Use firmware version 3.0.0 or later. Versions 2.8.0 or earlier do not support auto setup of Voice Lift.
Supported Room Conditions
-
Acoustically absorbent materials must be used on at least two of the following surfaces: ceiling, floor and walls.
Walls/Ceilings |
Rock wool acoustic panels / Glass wool / Acoustic curtains / Perforated panels |
|---|---|
Floor |
Carpet / Rug |
|
Voice Lift Feasible Range Guidelines
The following conditions are recommended for successful Voice Lift.
Total audio coverage area |
225 m² or less |
|---|---|
Maximum distance between furthest edges of any two audio coverage areas |
20 m or less |
Exceeding these limits may result in insufficient Voice Lift performance.
Creating a Voice Lift plan
Specify all room conditions.
Select “Voice Lift” in the request selection screen. Specify other conditions in the same way as for a standard plan.
- Specify all room conditions.
-
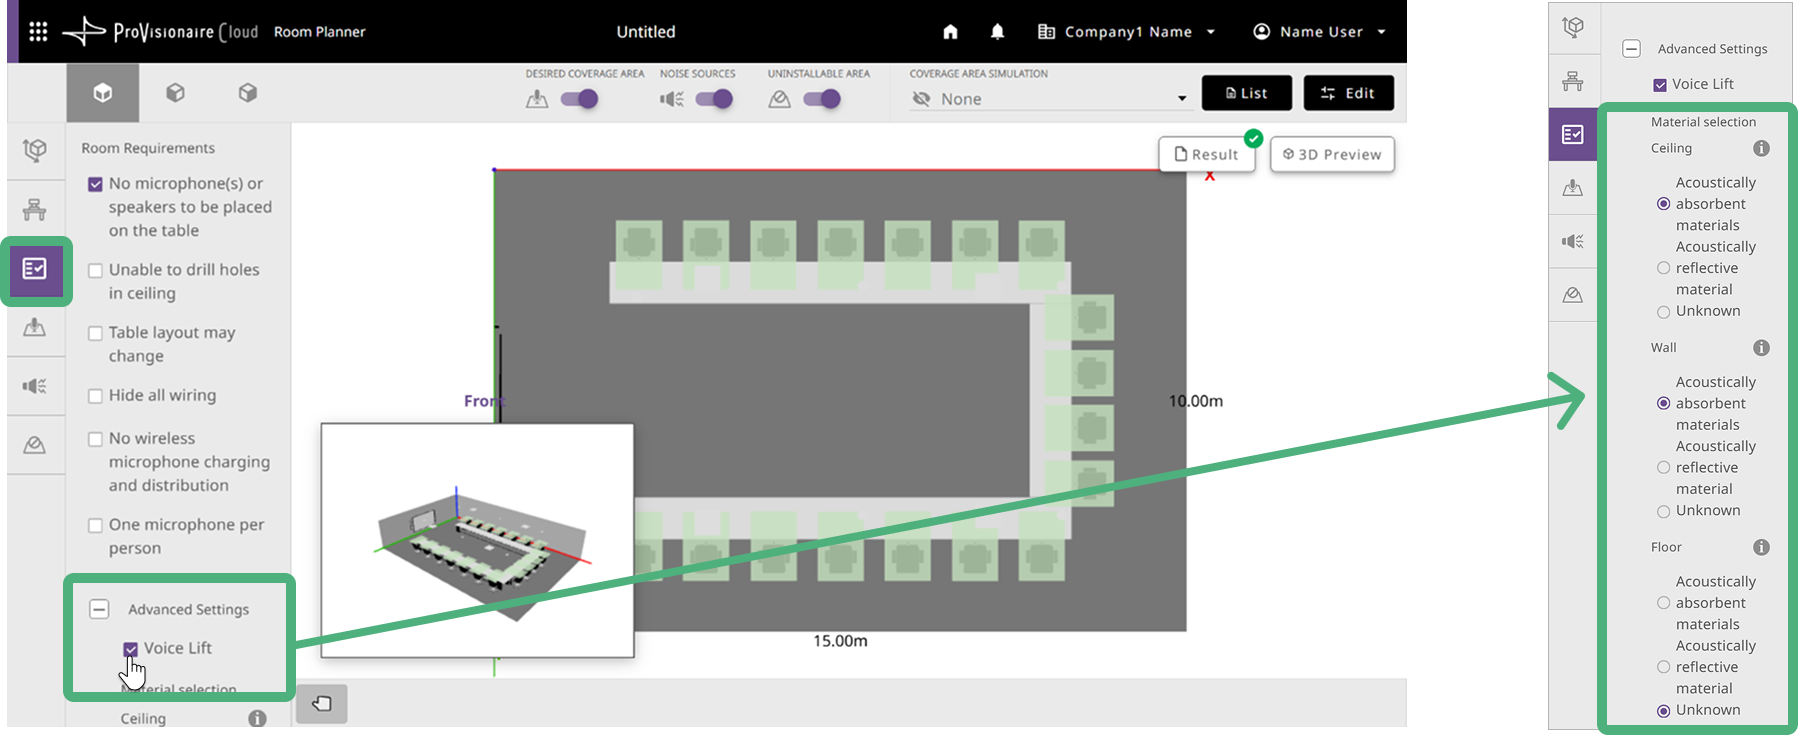
In order to create a plan that supports Voice Lift, the “Voice Lift” check box under “Advanced Settings” of the request selection screen must be selected. In addition, select whether the ceiling, walls and floors are made of sound-absorbing materials.
Generate the plan
After specifying all of the room conditions, click the [Design] button to automatically generate the plan.
Review the results screen.
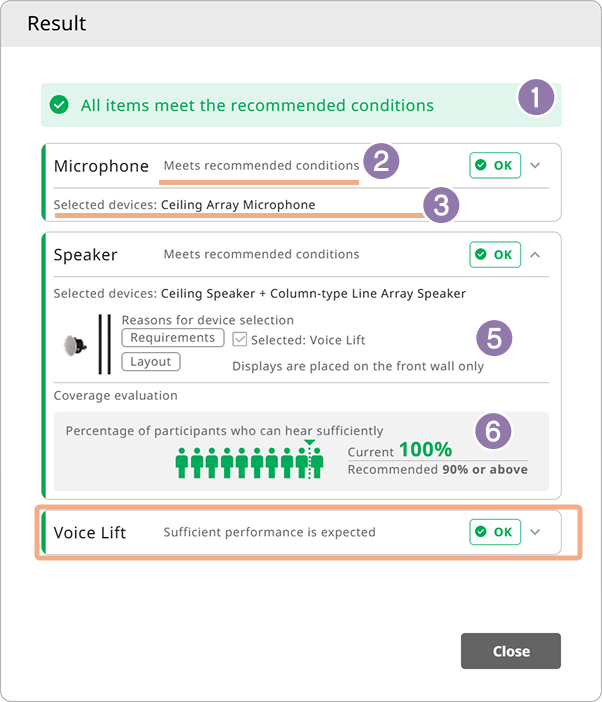
When the plan has been generated, a results screen appears. In the results screen, check if the devices that have been selected and positioned in the automatically generated plan (based on the specified room conditions) meet the recommended conditions.
With a Voice Lift plan, “Voice Lift” appears in the results screen.
- 1 Result
-
Displays an overall evaluation, indicating whether the generated plan or results meet the recommended conditions.
- 2 Item results
-
Displays whether the corresponding item meets the recommended conditions.
- 3 Selected devices
-
Displays the specific devices selected for “Microphone” and “Speaker”.
-
To check the quantities of the selected devices, click the [Close] button to close the results screen, and then review the device list screen.
-
- 4 Reasons for device selection
-
Displays the room requirements (from those that were selected) that were reasons for the device selection.
- 5 Coverage evaluation
-
Displays the coverage ratio (percentage of the specified coverage area that is actually covered by the microphones, speakers and Voice Lift). Check whether the coverage ratio meets the recommended standards.
- If any item does not meet the recommended conditions
-
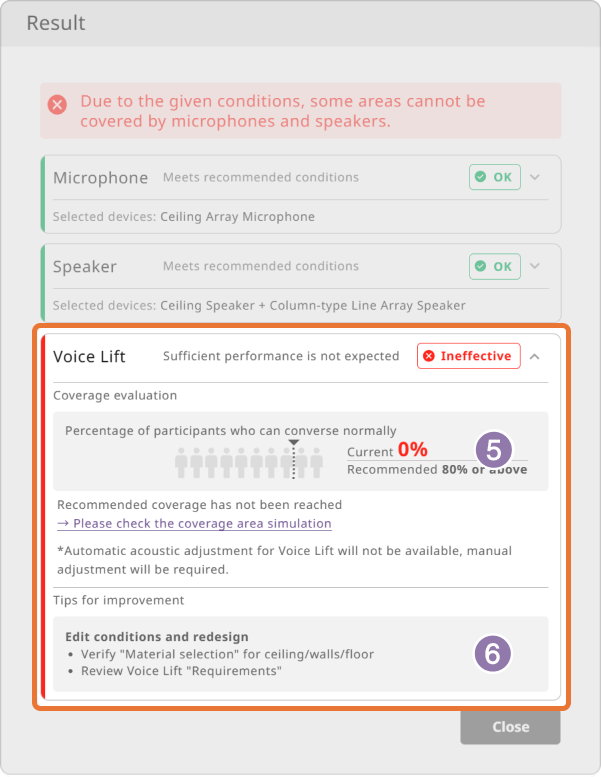
If Voice Lift does not meet the recommended conditions,
 appears. In this case, the function for automatic setup with Voice Lift will not be available.
Expand “Voice Lift” to review the details, and then adjust the conditions and regenerate the plan. If “Speaker” or “Microphone” is marked  , adjust the conditions accordingly.
-
For illustrative purposes, the examples show the entire screen. In reality, after expanding an item, you may need to use the scroll bar to view all of the content.
-
Expand the item “Voice Lift”.
-
In this example, (5) shows that the actual coverage area does not meet the recommended coverage ratio for the target area.
Using the link to the simulation, display the sound coverage simulation screen, and review the coverage areas. -
Open the results screen again.
-
Under “TIPS FOR IMPROVEMENT” (6), review what can be done to meet the recommended conditions.
-
Based on the details reviewed in step 4, adjust the room conditions.
-
Regenerate the plan.