2. Panel Sections and Main Functions
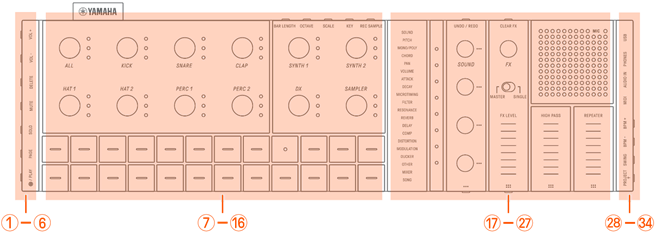
a–f Left side
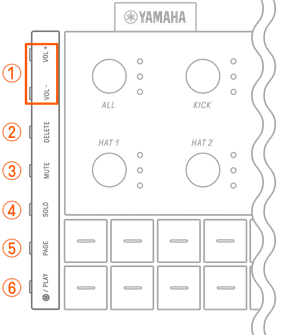
a [VOL+]/[VOL−] buttons
Used to adjust the volume of sound coming from the built-in speaker or headphones connected to the [PHONES] jack.
b [DELETE] button
Used to delete a pattern or project.
c [MUTE] button
Used to mute a specific track.
d [SOLO] button
Used to solo a specific track.
e [PAGE] button
Used to switch the range of patterns (pages) displayed on the Drum keys and to change the length of the patterns on the Drum tracks.
f [![]() /PLAY] button
/PLAY] button
Used to turn the power on/off and to play/stop a project.
g–p Top Left (Drum section, Synth section)
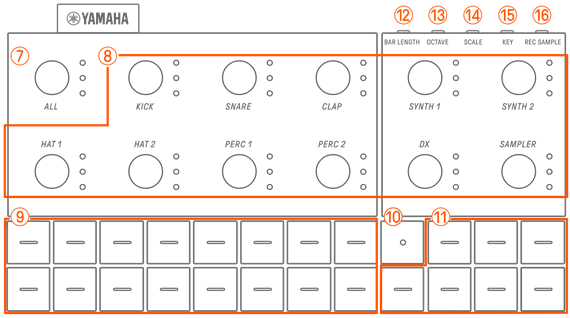
g [ALL] knob
Turn this knob to change the patterns for all 11 tracks simultaneously.
h Track knobs
Turn these knobs to change the pattern for each individual track. Press to select a track. Press a knob while playback is stopped to audition the sound for that track.
i Drum keys
Press these keys to turn each step on/off. Hold down a Drum key and turn a Sound Design knob to lock a parameter.
j Record key
Used to execute real-time recording. You can record a performance with the Synth keys or record MIDI input from an external source. You can also execute Motion Recording of parameters.
k Synth keys
Press to play the selected Synth track (SYNTH 1, SYNTH 2, or DX) or SAMPLER track.
l [BAR LENGTH] button
Used to change the length of the pattern in the currently selected Synth track (SYNTH 1, SYNTH 2, DX) and SAMPLER track.
m [OCTAVE] button
Used to change the pitch of the currently selected Synth key by one octave.
n [SCALE] button
Used to change the scale that is used when the Synth keys are pressed.
o [KEY] button
Used to change the key that is used when the Synth keys are pressed, in half steps.
p [REC SAMPLE] button
Used for sampling on the SAMPLER track.
q–A Top Right (Sound Design & FX section)
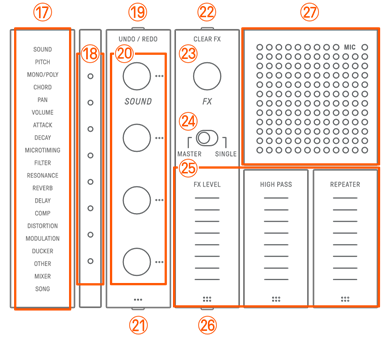
q Index
Displays the selected parameter or mode.
r Global Meter
Displays the value of the parameter being operated or the operating status while saving/loading data.
s [UNDO/REDO] button
Used to UNDO/REDO sound and effect parameter changes.
t Sound Design knobs 1–4
Turn these knobs to change the sound of a track or adjust parameters.
u Sound Design Page button
Press to switch between the sound parameters controlled by the Sound Design knobs.
v [CLEAR FX] button
Press to reduce an effect to the minimum level.
w [FX] knob
Turn this knob to change the type of effect.
x [MASTER/SINGLE] switch
Switches between the effects to be controlled.
MASTER: Effects applied to all tracks
SINGLE: Effects applied only to the target track
y [FX LEVEL] [HIGH PASS] [REPEATER] touch sliders
Slide to adjust the effect parameters.
When the effect page is set to Page 1, [HIGH PASS] and [REPEATER] are applied to all tracks regardless of how the [MASTER/SINGLE] switch is set.
z FX Page button
Press to change the parameters controlled by the touch sliders.
A Speaker and microphone
Built-in speaker and microphone.
B–H Right side
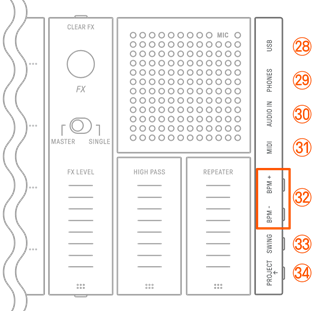
B [USB] terminal (USB Type-C™)
USB Type-C terminal. The included USB-C to USB-C cable can be used to charge the unit and to connect to computers and MIDI devices.
NOTICE
・ After disconnecting the USB cable, wait at least 6 seconds before connecting it again. Quickly disconnecting and connecting the cable could cause the unit to malfunction.
C [PHONES] jack
Used for connecting headphones (stereo mini jack). When headphones are connected, no sound is output from the built-in speaker.
D [AUDIO IN] jack
Used for audio input (stereo mini jack), by connecting to the audio output terminal of an audio device.
E [MIDI] terminal
Used for connecting an external MIDI device via the included MIDI conversion cable.
F [BPM+]/[BPM−] buttons
Used to adjust the project playback tempo between 5 and 300 BPM. Press both buttons at the same time to set the tempo to the starting value for the recently opened project. The number of lights on the Global Meter gives a rough indication of the current tempo.
G [SWING] button
Press this button to apply a swing feeling to the entire project.
H [PROJECT↑] button
Used to switch between projects.