5. Tracks and Patterns
A track is a component of a project, and is a performance part to which a single sound is assigned. There are three types of tracks: Drum tracks, Synth tracks (SYNTH 1, SYNTH 2, and DX), and SAMPLER track. For details on each type of track, see “6. Drum Tracks,” “7. Synth Tracks (SYNTH 1, SYNTH 2, DX),” and “8. SAMPLER Track.”
A pattern is a phrase that is played in a loop. You can play the same phrase repeatedly or switch between them at any time you like. The patterns on the 11 tracks will continue to play along with each other until the project is stopped.
5.1 Switching Patterns
You can switch patterns by turning a Track knob or pressing a Drum key. The timing can be set so that the pattern switches immediately or at a fixed cycle (Launch Quantize) from the start of playback (reserved switching). The default setting for Launch Quantize for reserved switching is a 16-step cycle from the start of playback.
5.1.1 Using a Track knob to switch patterns
Turn a Track knob to instantly switch between the patterns on that track.

Press and turn a Track knob for reserved switching.
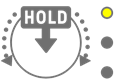
The LED lamp will flash in yellow for patterns 1–3, and in cyan blue for patterns 4–6.
Turn the [ALL] knob to instantly switch between the patterns on all 11 tracks. Press and turn the [ALL] knob to enable reserved switching on all 11 tracks.
5.1.2 Using a Drum key to switch patterns
Hold down a Track knob and press the Drum key that is lit for reserved switching. Drum keys 1–6 correspond to patterns 1–6.

Hold down a Track knob and double-tap a Drum key to instantly switch between the patterns on that track.

Hold down the [ALL] knob and double-tap a Drum key to instantly switch between the patterns on all 11 tracks. Hold down the [ALL] knob and press a Drum key to enable reserved switching on all 11 tracks.
5.1.3 Changing Launch Quantize
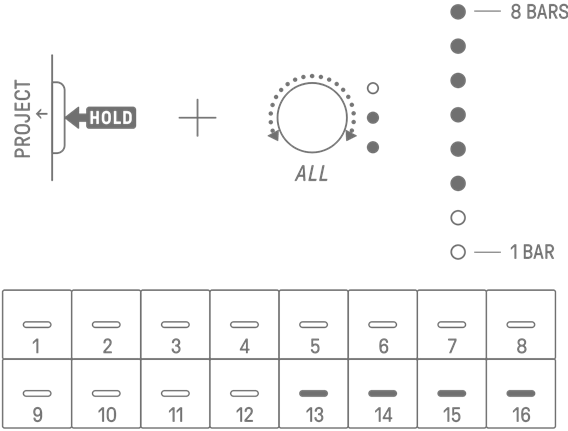
Hold down the [PROJECT↑] button and turn the [ALL] knob to change the number of Launch Quantize steps. Press and turn the [ALL] knob to change the value in increments of one measure (16 steps). The number of measures is displayed on the Global Meter, and the number of steps is displayed on the Drum keys.
5.2 Changing the Length of a Pattern
5.2.1 Drum tracks
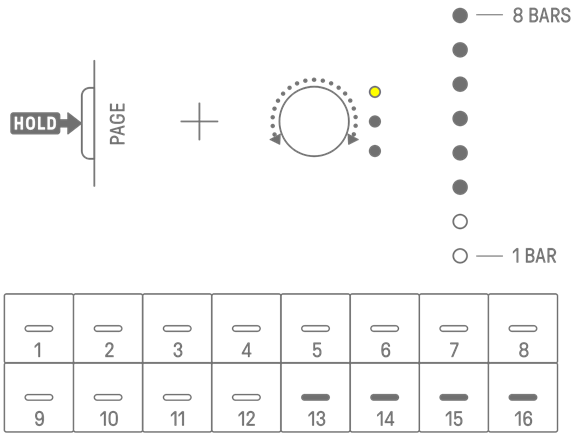
Hold down the [PAGE] button and turn a Drum Track knob to change the length of a pattern on a Drum track. The length can be set between 1 and 128 steps. Press and turn a Drum Track knob to change the value in increments of one measure (16 steps). The number of measures is displayed on the Global Meter, and the number of steps is displayed on the Drum keys.
5.2.2 Synth tracks (SYNTH 1, SYNTH 2, DX), SAMPLER track
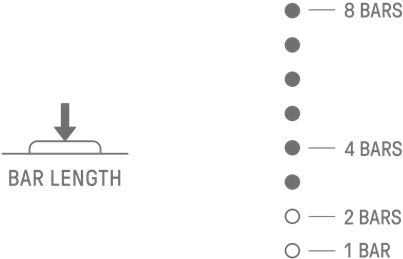
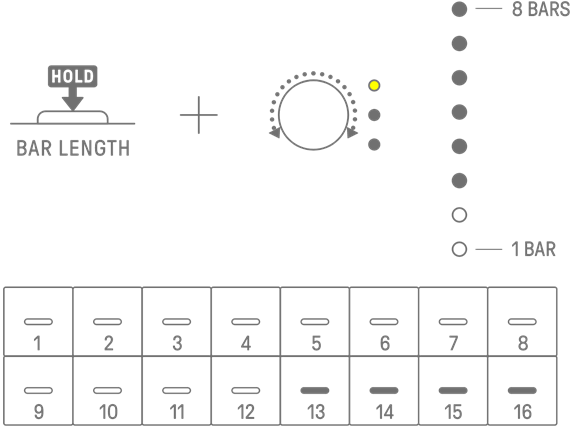
Press the [BAR LENGTH] button to change the length of a pattern on a Synth or SAMPLER track. The pattern length can be set to 1, 2, 4, or 8 bars.
Hold down the [BAR LENGTH] button and turn a Synth Track knob or the [SAMPLER] knob to set the length of the pattern in steps of 1–128. Press and turn a Synth Track knob or the [SAMPLER] knob to change the value in increments of one measure (16 steps). The number of measures is displayed on the Global Meter, and the number of steps is displayed on the Drum keys.
5.3 Changing the Number of Patterns (3 Patterns ⇔ 6 Patterns)
To increase the number of track patterns from three to six, hold down a Track knob and press Drum keys 4–6 lit in blue. When the number of patterns reaches six, Drum keys 4–6 light in white.

To reduce the number of track patterns from six to three, hold down a Track knob and press Drum keys 4–6 simultaneously. When the number of patterns reaches three, Drum keys 4–6 light in blue.

NOTE
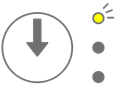
・ Press a Track knob and watch the LED lamps to check which pattern 1–6 is selected for that track. If patterns 1–3 are selected, the LED lamp flashes in yellow; if patterns 4–6 are selected, it flashes in cyan blue.
5.4 Deleting a Pattern
Hold down the [DELETE] button and press a Track knob to delete the currently selected pattern on that track. When the pattern has been deleted, the LED lamp of the target track flashes in red.
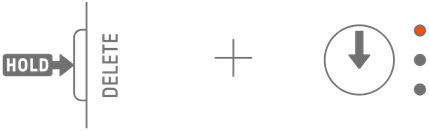
Hold down the [DELETE] button and press the [ALL] knob to delete the currently selected pattern on all tracks.
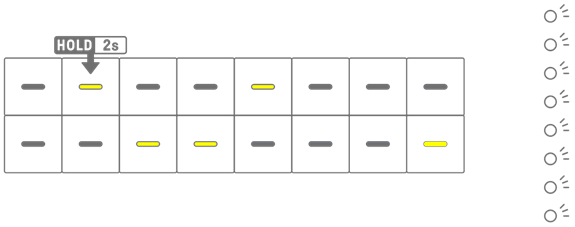
5.5 Copying and Pasting Patterns [OS V1.10]
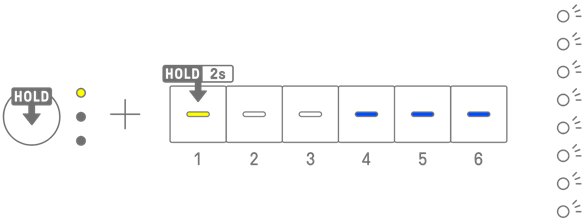
To copy the currently selected pattern, press and hold the Track knob or the [ALL] knob while pressing a Drum key for at least 2 seconds. If copying is successful, the Global Meter flash in white.
To paste a copied pattern, hold down the Track knob or [ALL] knob together with the [Page] button and press a Drum key. If pasting is successful, the Drum key that is the paste destination will flash for 1 second.

You can copy and paste to different tracks, as long as it is between Drum tracks or Synth tracks (SYNTH1, SYNTH2, and DX).
NOTE
・ All parameters, including Parameter Locks and Motion Recording, can be copied and pasted as is. However, if the effect type differs between tracks, the effect parameters will not be pasted.
5.6 Selecting and Auditioning Tracks
Press a Track knob to select that track. Press a Track knob while playback is stopped to audition the sound of the selected track.
5.7 Changing the Sound of a Track
To change the sound of a Drum track or a Synth track (SYNTH 1, SYNTH 2, and DX), press a Track knob to select that track, then turn Sound Design knob 1 on Sound Design Page 1.
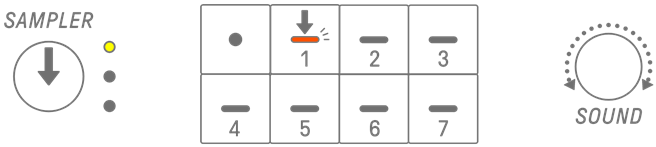
The SAMPLER track has samples assigned to each of the seven Synth keys. To change the sound of a sample, press the [SAMPLER] knob to select the SAMPLER track. Next, press a Synth key to select a sample, and then turn Sound Design knob 1 on Sound Design Page 1.
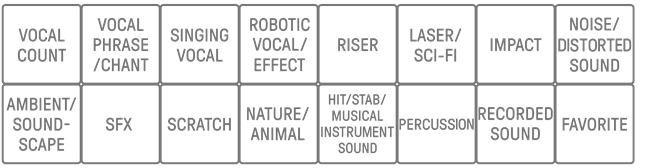
5.7.1 Selecting a sound category (category jump)
Hold down Sound Design knob 1 on Sound Design Page 1 and press a Drum key to go directly to the first sound in the sound category set for that track. This is called a category jump.

NOTE
・ A category jump to FAVORITE allows you to select the sounds you have registered as your favorites. To register a sound as a favorite, see “9.5 Saving a Sound.”
・ If a sound registered as a favorite does not exist, FAVORITE will not light up.
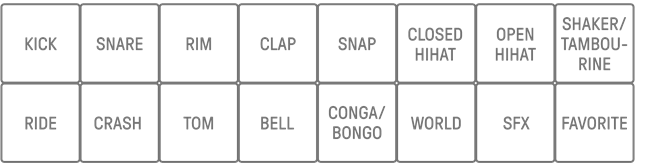
5.7.2 Drum track sound categories
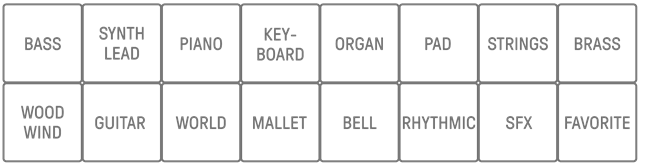
5.7.3 Synth track (SYNTH 1, SYNTH 2, and DX) sound categories
5.7.4 SAMPLER track sound categories
5.8 Muting and Soloing a Track
5.8.1 Mute
Hold down the [MUTE] button and press a Track knob to mute the currently selected track. The LED lamp of the muted track will light in green. Press the knob again to unmute the track.

NOTE
・ When any track is muted, hold down the [MUTE] button and press the [ALL] knob to instantly unmute all tracks.
5.8.2 Solo
Hold down the [SOLO] button and press a Track knob to solo that track and mute all other tracks. At this time, the LED lamp of the soloed track will light in cyan blue. Press the knob again to un-solo the track.

NOTE
・ Mute and Solo can also be used in Mixer mode and Song mode.
・ If a track is soloed while it is muted, solo takes precedence. When the track is un-soloed, the mute status is restored.
5.9 Copying and Pasting Track Steps [OS V1.10]
To copy the steps of the currently selected track, press and hold a Drum key for at least 2 seconds. If copying is successful, the Global Meter flash inwhite.
To paste the copied steps, hold down the [Page] button and press a Drum key.

You can copy and paste to different tracks, as long as it is between Drum tracks or Synth tracks (SYNTH1, SYNTH2, and DX).
NOTE
・ All parameters, including Parameter Locks and Motion Recording, can be copied and pasted as is. However, if the effect type differs between tracks, the effect parameters will not be pasted.