Panel operations
5. Panel operations
5.1. Basic operations

①
Main knob
Use this to move the position of the cursor, or to modify the value of a parameter.
For parameter values that have a wide range, the change accelerates according to the speed of rotation.
②
[
![]() ](back) key
](back) key
Each time you press this, you move from the current level back to the level above or back to the previous screen.
-
Turn the main knob to select an item. The selected item is highlighted.
If a ▶ is shown at the right, the item has a further level below.
-
Press the main knob to confirm the selection.

-
Repeat steps 1 and 2 to proceed to the desired parameter edit screen.
Editing a selection-type parameter
Turn the main knob to make a selection. When you press the main knob to confirm, the value is updated and also applied to the sound.
-
For a selection-type parameter, press the main knob to confirm the edit.
[ ]Press the (back) key to move to the previous screen.
Editing a continuous-type parameter
Turn the main knob to edit the value of the parameter. The change is applied in real time.
5.2. HOME screen
When you turn on the power switch, the home screen appears.
The center of the home screen (the area enclosed by a red frame) shows the important parameters for each basic function.
A highlighted channel indicates that it is selected as the target of operation.

① Channel
②
Meter
This shows the signal level of the channels (input or output) selected in the HOME SCREEN of UTILITY.
③
Mute indicator
This indicates when a channel is muted. The displayed content and status are as follows.
| Indication | Status |
|---|---|
|
MUTE |
Channel mute is ON |
|
SOLO |
The corresponding channel is muted by the SOLO function |
|
PROT |
The corresponding channel is muted by the protect function |
|
SLP |
Sleeping due to AUTO SLEEP or CHANNEL SLEEP |
④
Clip indicator
This indicates when the signal has clipped.
⑤
Panel lock symbol
This indicates that panel lock is enabled.
⑥
E symbol
When you recall a preset and then edit a parameter, an E symbol is shown.
⑦
Channel name
This shows the name assigned by CHANNEL NAME.
⑧
UNIT ID
This shows the UNIT ID assigned in the DEVICE screen.
⑨
Volume
This shows the output level.
When in BRIDGE mode, this shows the combined status of the paired channels.
5.2.1. Operations
The HOME screen contains the following pages.
● To switch pages
Use the [∧][∨] keys to switch pages.
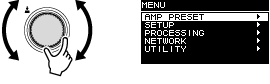
● To access the MENU screen
In the HOME screen, press the [HOME/MENU] key.
5.3. MATRIX/ROUTER page
This page shows a list of the input signals being routed via the MATRIX and ROUTER to each channel.

①
Input source list
Analog inputs are shown as A1–A4, and Dante inputs are shown as D1–D16.
Use the channel select keys to select the channel that you want to operate, and then press the main knob to access the
AMP PRESET screen
.
5.4. DEVICE MUTE page
In this page you can set and view the mute status of the entire amp.

①
ON/OFF
If this is on, the entire amp is muted. You can press the main knob to specify the mute status in the screen that appears.
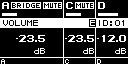
5.5. VOLUME page
In this page you can set and view volume-related information.

①
Volume
This sets and shows the volume.
Use the channel select keys to select the channel that you want to operate, and then turn the main knob to change the volume.
If you select multiple channels, the channels will be linked, and you can change the volume while maintaining the difference between the channels.
5.6. USER EQ page
This page shows the EQ on/off status.

①
EQ
This shows the EQ on/off status.
Use the channel select keys to select the channel that you want to operate, and then press the main knob to access the
USER EQ screen
.
If you select multiple channels, the channels will be linked for you to specify the EQ.
-
Use the channel select keys to select the channels that you want to link, and then press the main knob.
A screen for selecting the EQ copy-source appears.
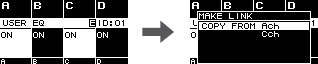
-
Turn the main knob to select the copy-source channel, and then press the main knob.
The EQ setting screen appears in the channel-linked state.en

①
Channel
This shows the linked channel names. If all four channels are linked this indicates "ALL."
![]() NOTE
NOTE
-
Link is defeated when you leave the EQ screen.
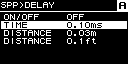
5.7. USER DELAY page
In this page you can view delay-related information. The delay time can also be set.

①
DELAY
This shows the DELAY on/off status.
②
DELAY TIME
This sets and shows the delay time.
Use the channel select keys to select the channel that you want to operate, and then turn the main knob to change the delay time.
Use the channel select keys to select the channel that you want to operate, and then press the main knob to access the
USER DELAY screen
.
If you select multiple channels, the channels will be linked, and you can change the delay time while maintaining the difference between the channels.
5.8. SPEAKER PROCESSOR page
This shows the SPEAKER PROCESSOR settings.

①
XOV
This shows the crossover on/off status. This indicates OFF if both HPF and LPF are set to THRU, and otherwise indicates ON.
②
EQ
This shows the EQ on/off status.
③
LIM
This shows the limiter on/off status. This indicates OFF if both Peak Limiter and RMS Limiter are set to OFF, and otherwise indicates ON.
Use the channel select keys to select the channel that you want to operate, and then press the main knob to access the
SPEAKER PROCESSOR screen
.
5.9. SPEAKER PRESET page
This shows the status of the speaker settings selected by SPEAKER PROCESSOR.

①
Speaker preset
This shows the name of the speaker preset for the recalled speaker.
Use the channel select keys to select the channel that you want to operate, and then press the main knob to access the
SP LIBRARY screen
.
5.10. AMP SETTINGS page
This shows information for the basic amp-related settings.

①
SENS./GAIN
This shows the input sensitivity or gain specified by SENS./GAIN.
②
MODE (PC-DI series only)
This shows the MODE (Lo-z, 70V, 100V) of the speaker to be connected.
③
HPF (Hi-Z) (PC-DI series only)
If MODE (②) is 70V or 100V, this shows the cutoff frequency (40 Hz, 80 Hz) of the HPF (high pass filter) that is compulsorily applied.
Use the channel select keys to select the channel that you want to operate, and then press the main knob to access the
AMP SETTINGS screen
.
5.11. LOAD MONITORING page
This shows the impedance that is detected by LOAD MONITORING (Lo-z only).

①
ON/OFF
This indicates whether speaker impedance is monitored (ON) or not (OFF).
②
Impedance
This shows the measured impedance.
Use the channel select keys to select the channel that you want to operate, and then press the main knob to access the
LOAD MONITORING screen
.
5.12. MENU screen
Here you can specify the basic status of the unit.
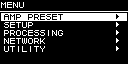
5.12.1. Operations
The MENU screen contains the following screens.
● To move to an upper level of the MENU screen
[
![]() ]Press the (back) key.
]Press the (back) key.
![]() NOTE
NOTE
-
The level of the displayed screen is indicated in the upper part of the screen.
● To return to the HOME screen
In the MENU screen, press the [HOME/MENU] key, or press the [
![]() ](back) key several times or long-press it.
](back) key several times or long-press it.
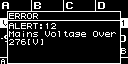
5.13. Alert screen
If an abnormality occurs in the PC-D/DI series unit, the display shows an alert message.
For details on each alert, refer to "Message List."