UTILITY screen
10. UTILITY screen
Here you can make various settings for the unit.
10.1. PANEL SETUP
Here you can make display settings.

①
BRIGHTNESS
This specifies the brightness of the display backlight.
It can be specified in ten steps 1–10.
②
CONTRAST
This specifies the display contrast.
It can be specified in 16 steps 1–16. As appropriate for the surrounding conditions, set this so that the display can be viewed easily. If the value is too large, the display will be difficult to read directly from the front.
③
AUTO DIMMER (AUTO PANEL DIMMER)
This specifies the time after which the panel is dimmed.
④
DIMMER (DIMMER BRIGHTNESS)
This specifies the brightness of the display backlight as a percentage (%) when it is dimmed.
⑤
AUTO LOCK (AUTO PANEL LOCK)
This specifies the time after which the panel is locked.
⑥
LOCK MODE (PANEL LOCK MODE)
This specifies the panel lock setting.
・PARTIAL: Operations related to the display are locked. Volume and mute settings are possible.
・ALL: No operation is possible other than unlocking the panel.
⑦
ENABLE PIN (ENABLE PANEL UNLOCK PIN)
This enables/disables a PIN code used for panel lock.
⑧
UNLOCK PIN (PANEL UNLOCK PIN)
This specifies a panel lock PIN code (any four-digit number).
If you specify a PIN code, the PIN code must be entered in order to unlock the panel.
![]() NOTE
NOTE
-
If you forget the PIN code, you can clear it by initializing the unit. Refer to " Initialization if you have forgotten the PIN code, etc. "
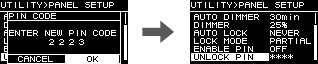
10.2. Specifying the PIN code
-
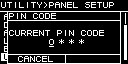
Access the PIN code entry screen.
Choose MENU screen → UTILITY → PANEL SETUP → UNLOCK PIN.
The cursor is at the highest digit of the PIN code.
-
Input the current PIN code.
Turn the main knob to select a numeral, and press the main knob to confirm.
When you confirm, the cursor moves to the right.
![]() NOTE
NOTE
-
The factory-set PIN code is 0000.
-
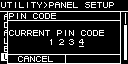
Using the same operation, confirm the four-digit code.
![]() NOTE
NOTE
-
If you want to correct the PIN code during this entry process, press the [
 ] (back) key and use the main knob to select the digit that you want to correct.
-
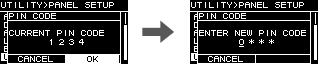
Press the main knob to select OK.
A screen for entering the new PIN code appears.
-
Enter the new PIN code, and press the main knob to select OK.
The PIN code is confirmed.
10.3. To defeat panel lock
If you operate the panel while the panel is locked, the following message appears in the screen.

Turn the main knob to select OK, and press the main knob to confirm.
10.4. HOME SCREEN

①
METER
This specifies the position of the meter that is shown in the HOME screen.
INPUT: Immediately before the volume. This allows you to monitor the input signal even if the volume is turned down.
OUTPUT: Immediately before the speaker output jack. This allows you to monitor the signal that is actually being output from the speaker output jack.
10.5. DEVICE INFORMATION
This screen shows the state of this unit and information specific to it.

①
THERMAL PSU
This shows the temperature of the power supply section in three levels. If the maximum indication is reached, a limiter is applied.
②
THERMAL AMP
This shows the temperature of the amp section in five levels. A limiter is applied according to the temperature.
③
BATTERY
This shows the state of the internal battery in three levels.
![]() NOTE
NOTE
-
When the battery runs down, this indicates LOW or NO. If this occurs, immediately contact your dealer listed at the end of the quick guide (separate document) to have the backup battery replaced.
④
RUN TIME
This indicates the total operating time of this unit.
⑤
VERSION
• FIRMWARE: Indicates the firmware version.
• Dante: Indicates three Dante-related versions.
• SERIAL: Indicates the serial number of this unit.
10.6. CLOCK

①
DATE
This shows and sets the date of the internal clock.
②
TIME
This shows and sets the time of the internal clock.
![]() NOTE
NOTE
-
You can use ProVisionaire Design to apply the computer’s time to this unit. For details, refer to the ProVisionaire Design user guide.
10.7. INITIALIZE
This shows in the display how to initialize data within the amp.

![]() NOTE
NOTE
-
For details on the initialization method, refer to " Returning to the factory settings (Initialization) ".
10.8. REBOOT
If you have modified multiple settings that require a reboot, use this to reboot once for all of these changes.
A message like the following appears in the screen.
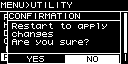
・To reboot: Turn the main knob to select YES, and then press to confirm.
・To cancel: Turn the main knob to select NO, and then press to confirm.
10.9. LOG
Here you can view alerts and information generated by this unit. System log data is helpful in identifying the cause of a problem or malfunction.
![]() NOTE
NOTE
-
Approximately 800 items of log data can be saved in internal memory. If this number is exceeded, the oldest log items are successively deleted as new log items are saved.

①
LOG LIST
This shows the entire operating log that is stored internally.
Log events are shown in the order in which they occurred.
Time information is shown in the format "YYMMDD HH:MM:SS►N." This means that in the year YY, month MM, and day DD, at HH hours MM minutes and SS seconds, NN events occurred.
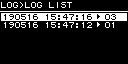
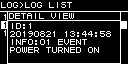
Turn the main knob to select an event, and then press the main knob to access the DETAIL VIEW screen.
For details on the messages, refer to "
Message list
."
![]() NOTE
NOTE
-
When this screen is shown, turning the main knob moves to the previous or next log data.
②
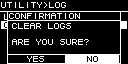
LOG CLEAR
When you want to clear the log data display, such as during maintenance, select YES in the following confirmation screen to clear the log.
The log data saved in internal memory is preserved.