
PROCESSING screen
8. PROCESSING screen
8.1. INPUT ALIGNMENT
You can compensate for level and delay differences between input channels.
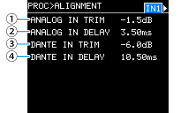
The channel number is displayed in the top right corner of the screen. Use the main knob to switch and set the channel number.
①
ANALOG IN TRIM
Fine-tune the gain of the specified analog input channel.
②
ANALOG IN DELAY
Fine-tune the delay of the specified analog input channel.
③
Dante IN TRIM
Fine-tune the gain of the specified Dante input channel.
④
Dante IN DELAY
Fine-tune the delay of the specified Dante input channel.
8.2. INPUT LEVEL
Set the input levels from Dante input 1-4 (1-8 on 8-channel models) and the analog input connector.
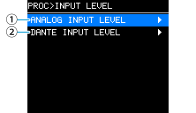

①
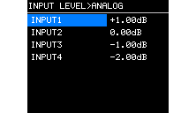
ANALOG INPUT LEVEL
Set the input level from the analog input connector.
②
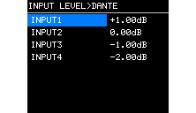
Dante INPUT LEVEL
Set the input level from the Dante connector.
8.3. ROUTER
Set the audio signal routing. You can sum multiple input signals.
For information on the routing signal flow, refer to
Appendix > "Block Diagram"
in this manual.
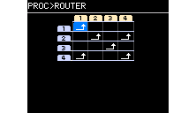
Check the input source (IN1-8 or IN1-4) and output destination (OUTPUT), and set [
 ] at the intersection point. By default, signals from all input connectors are output from the speaker.

8.4. USER EQ
Turn on or off EQ and configure User EQ.
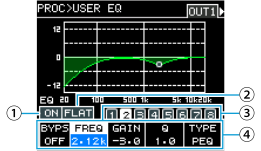

The channel number is displayed in the top right corner of the screen. Use the main knob to switch and set the channel number.
①
ON/OFF
Turns on or off the 8-band EQ. When this item is set to off, the EQ characteristics are displayed only as an outline. When it is on, the characteristics are filled with green.
②
FLAT
Sets the gain of all bands to 0 dB.
③
Band 1 to 8
Select the band for which to display parameters. When you press the main knob on the selected band, the cursor moves to the parameter display.
④
Parameter display
Displays the parameters for each band. Move the cursor to the parameter name and press the main knob to set the parameter value. To return the cursor to the parameter name, press the [
 ] (Back) button. To return to band selection, press the [
] (Back) button again.
] (Back) button. To return to band selection, press the [
] (Back) button again.
8.5. USER DELAY
Set the delay time to compensate for the distance between speakers and turn on or off the delay.
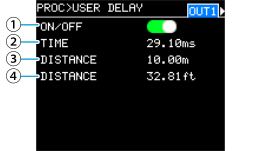

The channel number is displayed in the top right corner of the screen. Use the main knob to switch and set the channel number.
①
ON/OFF
Turns on or off the delay.
②
TIME [ms]
Set the delay time in milliseconds.
③
DISTANCE(m)
Displays the delay time in meters.
④
DISTANCE(f)
Displays the delay time in feet.
 NOTE
NOTE
The three delay time displays change in tandem.
8.6. SPEAKER PROCESSOR
8.6.1. SP LIBRARY (V1.1 or later)
You can recall the optimal settings for the connected speakers.
Recalling a speaker preset
Information about the selected speaker preset (speaker model name and preset name) is displayed.
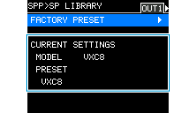
-
To change the speaker preset, move the cursor to “FACTORY PRESET” and press the main knob.
-
Select the speaker series.
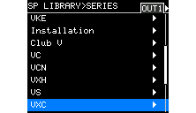
The channel number is displayed in the top right corner of the screen. Use the main knob to switch and set the channel number.
NOTE
When you select a speaker, the filter, speaker impedance and limiter threshold values are automatically set. If the speaker you want to connect is not available in the selection, select “GENERIC.”
-
Select the speaker model you want to connect.
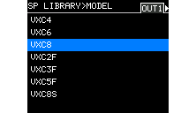
-
Select a preset that suits the purpose of using the speaker.
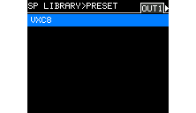
A screen for confirming the recall will be displayed.
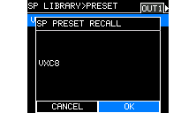
-
To recall : Turn the main knob to select OK, and press it to confirm.
-
To cancel : Turn the main knob to select CANCEL, and press it to confirm.
-
8.6.2. X-OVER
High-pass and low-pass filters are applied to the signals, allowing only specific frequency bands to pass through.
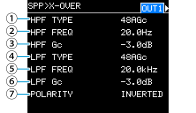

The channel number is displayed in the top right corner of the screen. Use the main knob to switch and set the channel number.
①
HPF TYPE
Select the attenuation width per octave and the filter type of the high-pass filter. If you select “THRU,” no filter is applied.
②
HPF FREQ
Set the cutoff frequency of the high-pass filter.
③
HPF Gc
Set the gain of the cutoff frequency when you select AdjGc as Type.
④
LPF TYPE
Select the attenuation width per octave and the filter type of the low-pass filter. If you select “THRU,” no filter is applied.
⑤
LPF FREQ
Set the cutoff frequency of the low-pass filter.
⑥
LPF Gc
Set the gain of the cutoff frequency when you select AdjGc as TYPE.
-
AdjGc (Adjustable Gain Control)
Adjust Gc (gain at the cutoff frequency) from -6 to +6 dB. Also, setting -3 dB applies the Butterworth filter, and setting -6 dB applies the Linkwitz-Riley filter. When this item is selected, the Gc knob will appear. -
But (Butterworth)
The most common characteristics. The passband is flat and the gain at the cutoff frequency is −3 dB. -
Bessl (Bessel)
The curve emphasizes phase characteristics, and the attenuation is gentler than that of Butterworth, but there is no waveform distortion when a square wave passes through. -
L-R (Linkwitz-Riley)
The characteristics are defined by a power-of-two filter order and a 0 dB gain across the entire frequency band when the LPF and HPF outputs are voltage-combined. The passband is flat, but the gain at the cutoff frequency is −6 dB.
⑦
POLARITY
Select the polarity.
8.6.3. DELAY
Set the delay time for the speaker delay in the speaker processor.
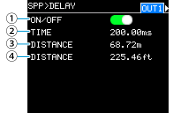

The channel number is displayed in the top right corner of the screen. Use the main knob to switch and set the channel number.
①
ON/OFF
Turns on or off the delay.
②
TIME [ms]
Set the delay time in milliseconds.
③
DISTANCE(m)
Displays the delay time in meters, linked to TIME.
④
DISTANCE(f)
Displays the delay time in feet, linked to TIME.
8.6.4. EQ
Select a channel and press the main knob to display the EQ screen.
Edit each parameter of the 16 Band PEQ in the speaker processor.
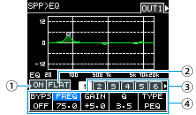

The channel number is displayed in the top right corner of the screen. Use the main knob to switch and set the channel number.
①
ON/OFF
Turns on or off the 16 Band PEQ. When this item is set to off, the EQ characteristics are displayed only as an outline. When it is on, the characteristics are filled with green.
②
FLAT
Sets the gain of all bands to 0 dB.
③
Band 1 to 16
Select the band for which to display parameters. When you press the main knob on the selected band, the cursor moves to the parameter display.
④
Parameter display
Displays the parameters for each band. Move the cursor to the parameter name and press the main knob to set the parameter value. To return the cursor to the parameter name, press the [
] (Back) button. To return the cursor to the band, press the [
] (Back) button once more.
8.6.5. LEVEL
Adjust the level difference between speakers.
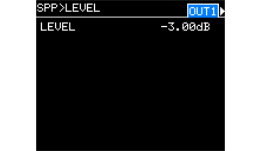
The channel number is displayed in the top right corner of the screen. Use the main knob to switch and set the channel number.

8.6.6. PEAK LIMITER
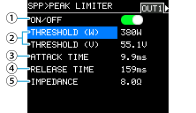
The channel number is displayed in the top right corner of the screen. Use the main knob to switch and set the channel number.

①
ON/OFF
Tuns on or off the peak limiter.
②
THRESHOLD
Set the threshold value at which to apply the peak limiter in units of output power (W). The voltage (V) is also displayed in conjunction with this value.
③
ATTACK
Set the activation speed of the peak limiter in milliseconds.
④
RELEASE
Set the release speed of the peak limiter in milliseconds.
⑤
IMPEDANCE (Ω/UNIT)
Set the impedance of the connected speaker from 4.0 Ω to 36.0 Ω. The voltage (V) is also automatically set in conjunction with this value.
Even when connecting multiple speakers in parallel, set the impedance for each speaker.
8.6.7. RMS LIMITER
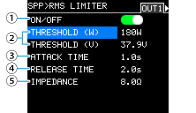
The channel number is displayed in the top right corner of the screen. Use the main knob to switch and set the channel number.

①
ON/OFF
Turns on or off the RMS limiter.
②
THRESHOLD
Set the threshold value at which to apply the RMS limiter in units of output power (W). The voltage (V) is also displayed in conjunction with this value.
③
ATTACK TIME
Set the activation speed of the RMS limiter in seconds.
④
RELEASE TIME
Set the release speed of the RMS limiter in seconds.
⑤
IMPEDANCE (Ω/UNIT)
Set the impedance of the connected speaker from 4.0 Ω to 36.0 Ω. The voltage (V) is also automatically set in conjunction with this value.
Even when connecting multiple speakers in parallel, set the impedance for each speaker.