UTILITY screen
10. UTILITY screen
Configure various settings for the main unit.
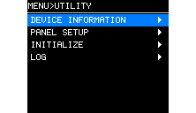
10.1. DEVICE INFORMATION
This screen displays the status of this product and product-specific information.
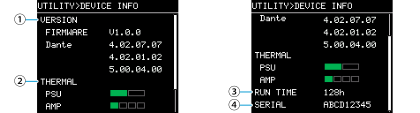
① VERSION
-
FIRMWARE : Displays the firmware version.
-
Dante : Displays three Dante-related versions.
② THERMAL
-
PSU
Displays whether the temperature of the power supply unit is normal or abnormal. If the temperature becomes abnormal, the fan will rotate at maximum speed. If the temperature continues to rise, the device will automatically go into sleep mode. -
AMP
Displays the temperature of the amplifier unit in five levels. The limiter is applied depending on the temperature.
③
RUN TIME
Displays the total operation time of the device.
④
SERIAL
Displays the product serial number.
10.2. PANEL SETUP
Set the display format.
①
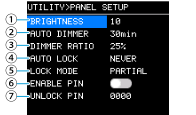
BRIGHTNESS
Set the brightness of the display backlight.
You can set it on a scale of 1 to 10.
②
AUTO DIMMER (AUTO PANEL DIMMER)
Set the time until the panel becomes dark. “NEVER” does not apply the AUTO DIMMER effect.
③
DIMMER RATIO
Specify the luminance of the display backlight when it gets dark in %.
④
AUTO LOCK (AUTO PANEL LOCK)
Set the time until the panel is locked.
⑤
LOCK MODE (PANEL LOCK MODE)
Configure the panel lock setting.
-
PARTIAL : Locks the display-related operations. Volume and mute settings are available.
-
ALL : Prohibits all operations except for releasing the panel lock.
⑥
ENABLE PIN (ENABLE PANEL UNLOCK PIN)
Set whether to enable or disable the PIN code used for panel lock.
⑦
UNLOCK PIN (PANEL UNLOCK PIN)
Set the panel lock PIN code (any 4-digit number).
If you set a PIN code, you will need to enter the PIN code to unlock the panel.
 NOTE
NOTE
If you forget your PIN code, you can unlock the panel after initialization. Refer to “Restoring to factory default settings (Initialization)” - “ Initializing from the MAINTENANCE screen .”
10.2.1. How to set a PIN code
-
Open the PIN code entry screen.
From the MENU screen, select UTILITY, PANEL SETUP, and then UNLOCK PIN.
The cursor is on the first digit of the PIN code.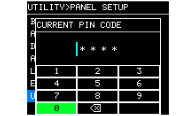
-
Enter your current PIN code.
Turn the main knob to select a number and press the main knob to confirm.
Once confirmed, the cursor will move to the right.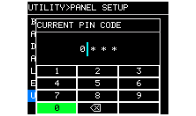 NOTE
NOTE
The factory default PIN code is 0000.
-
Repeat the same process to confirm the four-digit number.
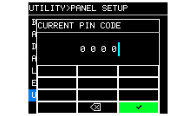 NOTE
NOTE
To correct the PIN code you entered during setup, select [
 ] (backspace) and press the main knob to delete the character.
-
Select [✓] (checkmark) and press the main knob.
A screen will appear where you can enter a new PIN code.
-
Enter a new PIN code, press the main knob, and select OK.
The PIN code is confirmed.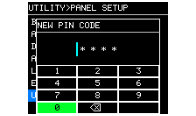
10.2.2. How to unlock the panel
If you try to operate the panel while it is locked, the following message will appear on the screen.
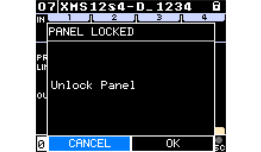
Turn the main knob to select OK, and press it to confirm.
10.3. INITIALIZE
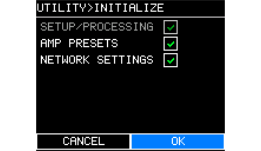
The display shows how to initialize the data inside the amplifier.
NOTE
For the initialization method, refer to Restoring to factory default settings (Initialization) .
10.4. LOG
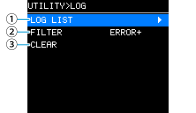
You can check the alerts and information that have occurred in this product. System log data is useful for analyzing problems and malfunctions.
NOTE
Approximately 800 log data items can be stored in the internal memory. If this limit has exceeded, the logs will be deleted from the oldest ones and new log data will be saved.
①
LOG LIST
Displays all the operation logs internally recorded.
The logs are displayed in the order in which the events occurred.
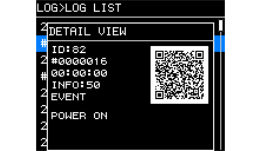
The display format is “#NNNNNNN HH:MM:SS▶NN.”
#NNNNNNN: Total number of times this product has been started since production
HH:MM:SS: Elapsed time since this product was started
NN: Alert number
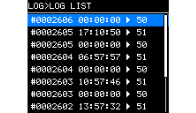
When you turn the main knob to select an event and press the main knob to confirm, the DETAIL VIEW screen will appear.
For details on messages, refer to
Appendix>"Message List"
.
Scan the QR code with your mobile device to view the message details.
NOTE
-
When you turn the main knob while this screen is displayed, the screen will switch to the previous or next log information.
②
FILTER
Filters the logs by severity.
WARNING or higher
ERROR or higher
FAULT
③
LOG CLEAR
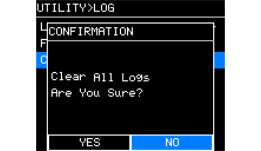
If you want to clear the log data display during maintenance or such a situation, select OK on the confirmation screen shown below to clear the log.
Log data saved in the internal memory will be retained.