Settings for controlling devices across subnets
17. Settings for controlling devices across subnets
If you are controlling devices on a subnet that is different than that of ProVisionaire Amp Editor, all devices are distinguished by their IP address.
For this reason, it is necessary to make settings so that the IP settings of devices placed in ProVisionaire Amp Editor (these are called virtual devices) match the IP settings of devices on the network (these are called real devices).
The IP settings of virtual devices are made in the "Match Device by IP Address" dialog box, and the IP settings of real devices are made in the "IP Address" dialog box.
Set the IP addresses so that they are unique for the entire communication path. If devices of the same IP address exist on the communication path, they might not be distinguishable.
First, use the "Match Device by IP Address" dialog box to specify IP addresses for the virtual devices.
-
Place a device in the "Project" sheet.
-
In ProVisionaire Amp Editor’s [System] menu, click [Match Device by IP Address].
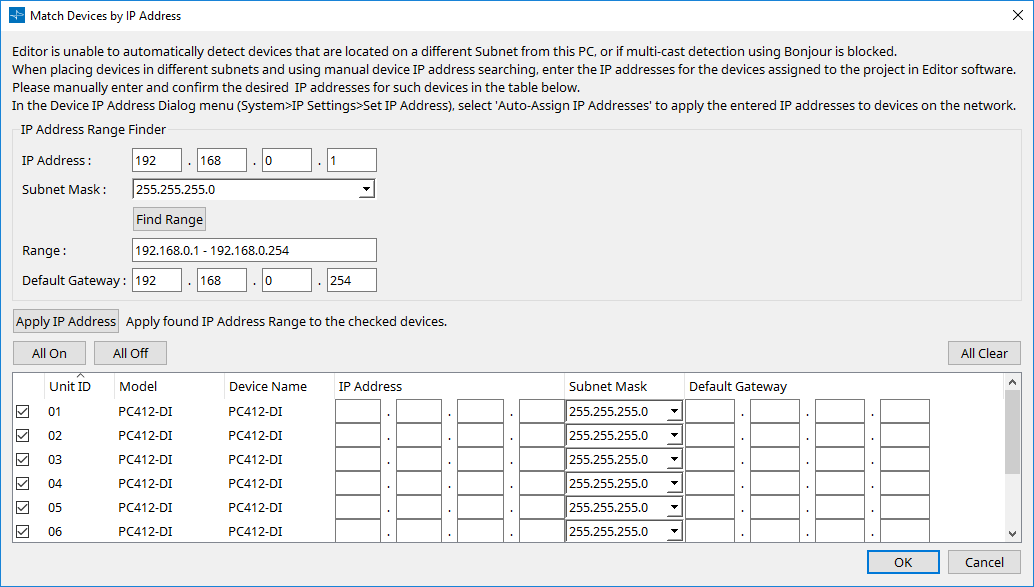
The "Match Device by IP Address" dialog box opens.
-
In "IP Address Range Finder," use the [IP Address] text box to enter a representative IP address of the other subnet.
-
In "IP Address Range Finder," use the [Subnet Mask] list box to select the subnet mask of the other subnet.
-
In "IP Address Range Finder," click the [Find Range] button.
The IP address range for the other subnet is shown in the "Range" field, and an IP address candidate for the default gateway is shown in the [Default Gateway] text box.
If the default gateway IP address is wrong, edit it. -
In the device list, place a check mark in the □ of devices that belong to the other subnet.
-
Click the [Apply IP Address] button.
-
Click the [OK] button.
To assign an IP address to a real device, you can either make settings by operating the real device, or you can use the "IP Address" dialog box to specify an IP address for the real device.
Here we explain the method of using the "IP Address" dialog box to specify the IP address.
The same IP address setting as the virtual device is applied to the real device whose Model and Unit ID match the virtual device.
Set the computer’s IP address and subnet mask to values that are within the subnet range specified in "IP Address Range Finder" of the "Match Device by IP Address" dialog box.
-
Set the real device’s IP Setting to [Static IP] for a PC-series unit, or to [PC] for an XMV-series unit.
-
Connect the computer to the network of the real device.
-
While still offline, click ProVisionaire Amp Editor’s [System] menu item [IP Settings].
If the "Network Setup" dialog box appears, select the network that will be connected with the real device. -
When all real devices are shown in the "IP Settings" dialog box, click the [Set IP Address] button.
The "IP Address" dialog box opens. -
For the XMV series, select the [Static IP] option button.
-
Click the [Auto-Assign IP Addresses] button.
The "Auto-Assign IP Addresses" dialog box opens. -
Click the [Assign IP Addresses] button.
-
In the "IP Address" dialog box, click the [Apply to all the devices] button.
Preparations are made for assigning the IP address, subnet mask, and default gateway to real devices that match the Unit ID and Model of the virtual devices. -
Click the [OK] button.
The IP address, subnet mask, and default gateway settings are sent to the real devices.
This completes the settings.
|
Manual Development Group
|