Internal Structure of this product
Pad operations
The Pads on this product support Aftertouch as well as Note On/Off. In other words, this product is designed so that in addition to producing a Voice sound when a Pad is hit, various expressions can also be produced by pressing the Pad further. Functions other than Voices can be assigned to Note On, and the default setting for Aftertouch can be changed to a different function.
Pad operation = Generated MIDI event
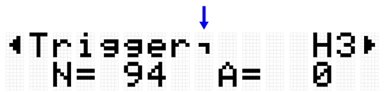
The velocity value for Note On and value for Aftertouch can be viewed at the N and A values in [MENU]→Trigger.

Settings for Pad operations
There are two ways to set Pad operations: setting the Kit data in Kit Mode (for all Pads) or configuring the settings in Session Creator Mode (for A1 and A8 only). “NoteFunc” (function for Note On) and “ATFunc” (function for Aftertouch) are set in both modes.
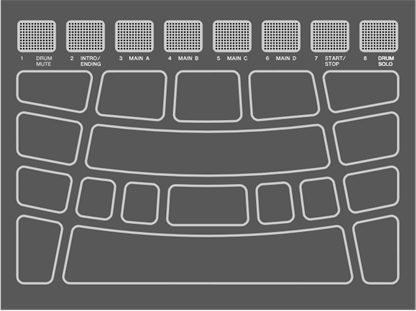
Pad numbers
Specific numbers are assigned to each individual Pad. These numbers are used in this User Guide to identify each Pad as necessary. The Pad layout can be flipped, so that these number assignments and their settings (including their Voice assignments) are moved to Pads on the opposite side.
NOTE
The RGB Square Pads (A1–A8) function as buttons to control Session playback in Session Creator Mode (when the [SESS] button is lit). They are not affected by the settings in [MENU]→Utility→PadLayout.
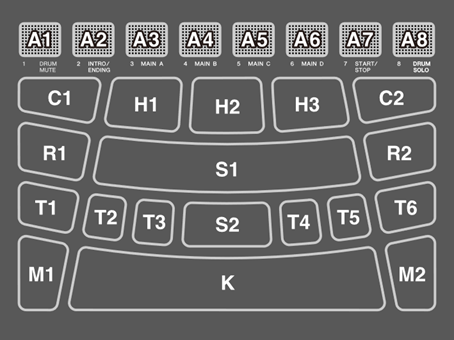
When playing primarily with your right hand
When [MENU]→Utility→PadLayout is set to “Right” (Default setting), the Pad numbers are assigned as illustrated below. This setting is easiest when playing the Pads primarily with your right hand.
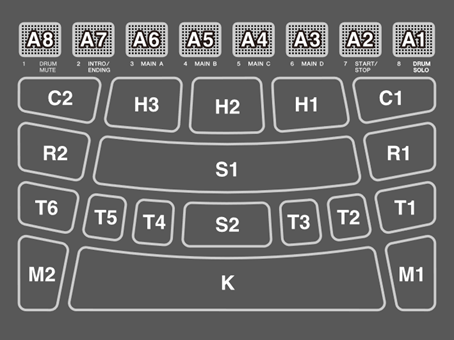
When playing primarily with your left hand
When [MENU]→Utility→PadLayout is set to “Left,” the Pad numbers are assigned as illustrated below. This setting is easiest when playing the Pads primarily with your left hand.
Basic operations on the LCD screen
Selecting a mode (top menu level)
This product has five modes. One of the five buttons just below the LCD screen is always lit.
![]()
| Menu Mode When the [MENU] button is lit, you can use the item selection buttons ([<][>] buttons) to make the following settings. • Mixer • Click • Trigger • Utility • File • Version |
| Kit Mode When the [KIT] button is lit, you can select one of the Kits included with this product on the LCD screen. You can use the item selection buttons ([<][>] buttons) to make the following settings for the currently selected Kit and save it as a User Kit (U01–U50). • KitEdit • PadEdit |
| Audio Mode When the [AUDIO] button is lit, you can record audio, such as your Pad performance, to the root directory of a USB flash drive connected to the [USB TO DEVICE] terminal, or play a WAV file in the root directory of the USB flash drive. You can use the item selection buttons ([<][>] buttons) to make the following settings. • Repeat |
| Session Creator Mode When the [SESS] button is lit, the RGB Square Pads are used for Session Creator Mode, allowing the phrases built into this product to be played as accompaniment. See this page for details. You can use the item selection buttons ([<][>] buttons) to make the following settings. |
| When the [REG] button is lit, the Registration Memory Bank can be selected and the settings stored in the Registration Memory can be saved in the User Registration Memory Bank (U01–U50). See this page for details. You can use the item selection buttons ([<][>] buttons) to make the following settings. |
@
NOTE
• Regardless of which menu level you are on in any mode, you can always press the button for the appropriate mode to return to the top screen.
• If you are at the highest menu level of any mode, press the [EXIT] button to return to the top screen.
Switching screens
When you select a mode and the highest menu level is displayed on the LCD screen, the following operations are possible.
Moving horizontally through the current menu level
If triangles appear at the left and/or right ends of the top line on the LCD screen, use the [<][>] buttons to select an item on the same menu level.

![]()
Moving vertically through menu levels
You can move down one menu level or use the [EXIT] button to move up one menu level. These operations are possible when the item name displayed on the LCD screen begins or ends with the marks shown below.
![]()

![]()
Executing a function
Use the [ENTER] button to execute (or advance) a function, and the [EXIT] button to cancel a function (or return to the previous state). For example, if a confirmation message is displayed as shown in the following figure, press the [ENTER] button to execute the operation or the [EXIT] button to cancel it.

Saving data
An “E” might appear between the number and name for Kit, Trigger, and Registration Memory Bank.


This indicates that the currently selected data has been edited but not yet saved as user data (not saved with a number beginning with “U”). If you want to use the current settings at a later time, press the [ENTER] button on the above screen to save them as user data. See this page for details about how to save a Kit, this page for details about how to save a trigger, and this page for details about how to save a Registration Memory Bank.
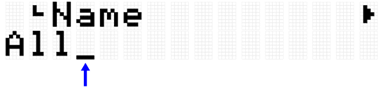
Editing names
When “Name” appears on the LCD screen, you can edit the name of data that has been edited on this product or files in the root directory of the USB flash drive. Edit a name by using the [<][>] buttons to move the cursor and then using the [+][-] buttons to select a character at the cursor position.
Characters that can be used when editing names
• Upper-case letters of the alphabet

• Lower-case letters of the alphabet

• Spaces and numbers
![]()
• Symbols

NOTE
Note that the following characters cannot be used in file names.
![]()
Editing user data names and file names
For user data (Kits, Triggers, Registration Memory Banks), you can edit the name when saving the data. Files in the root directory of a USB flash drive can be renamed either when the data is initially saved or after the data has already been saved. See the following links for details.
• Editing the name of a Kit
See this page when saving user data. See this page when saving data to a USB flash drive.
• Editing the name of a Trigger
• Editing the name of a Registration Memory Bank
See this page when saving user data. See this page when saving data to a USB flash drive.
Sequencer functions
This product has a “Sequencer” function that operates according to tempo values. The following four functions operate according to the Sequencer.
• Click
• Note Repeat for Pads
• [MENU]→Utility→LEDPatAutoBar (LED Pattern Auto Bar)
Data handled by this product
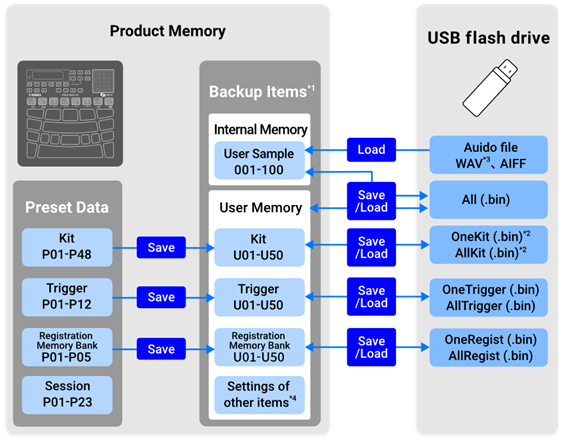
*1 Items whose settings are maintained even when the power is turned off
*2 Includes Save/Load for User Samples that are used in the Kit
*3 WAV files can be played back with the USB Audio Player function. In addition, WAV files can be recorded with the USB Audio Recorder function. See this page for details about the USB audio player. See this page for details about the USB audio recorder.
*4 The applicable items are as follows.
• Settings in Kit Mode
• Settings in Audio Mode (excluding file selection numbers)
• Settings in Session Creator Mode
• Settings in Registration Memory Bank Mode
• Tempo
• Volume of sound output from the built-in speakers (See this page for details.)
• Volume of sound output from the [PHONES/OUTPUT] jack (See this page for details.)
• Settings in [MENU]→Mixer
• Settings in [MENU]→Click
• Settings in [MENU]→Trigger
• Settings in [MENU]→Utility