[AUDIO] Using Audio in Your Performance
If you connect a USB flash drive to the [USB TO DEVICE] terminal, you can record your performance as an audio file (WAV) to the root directory and play back audio files (WAV). Audio files (WAV or AIFF) can also be loaded as User Samples into the User Sample Memory on the product and assigned to the Pads.
NOTE
• WAV files can be used for playback/recording functions, and WAV or AIFF files can be used as User Samples to assign to Pads.
• The product will only recognize files in the root directory of a USB flash drive. Therefore, recorded data is also stored in the root directory.
• Be sure to read the Precautions before using the [USB TO DEVICE] terminal.
Playback and recording settings
Press the [>] button on the top screen of Audio Mode ([AUDIO] button on) to display the setting screens for playback and recording.
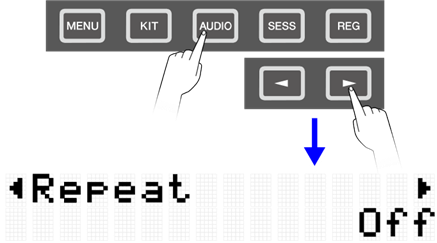
Playback settings
Item (Display) | Description | Setting Range | Default Setting |
This sets the playback method for audio files. Off Playback will automatically stop after the currently selected file has been played once. Single Repeat playback of the currently selected file continues until the Stop button is pressed. List All recognizable audio files in the root directory of the USB flash drive are played back sequentially and continuously. Playback continues until the Stop button is pressed. | Off, Single, List | Off |
RecSetting
Item (Display) | Description | Setting Range | Default Setting |
RecGain | This sets the gain (volume level) for the audio to be recorded. | -18, -12, -6, 0, +6, +12, +18 dB | 0 dB |
RecSource | This is for settings related to the recording source. Press the [ENTER] button to select the following two settings. They can each be set to "ON" (record) or "OFF" (do not record). Click If this is set to "On," the click and operation sounds are recorded. If this is set to "On," the Session playback sound, audio input from the [USB TO HOST] terminal, and playback of audio files in the root directory of a USB flash drive are recorded. Audio input from the [AUX IN] jack will always be recorded regardless of this setting. When set to “On,” an Audio Loopback is configured. | Off, On | On |
Audio Loopback
If RecSetting→RecSource→Session&Audio is set to “On,” an Audio Loopback (audio sent from an external device to this product is returned to the external device) is configured by connecting the [USB TO HOST] terminal to an external device such as a computer or smart device via USB. This allows you to mix music from an external device with your performance on this product and record that mix to a DAW.
Loop connection
Noise might be generated when a single computer or smart device is connected to both the [AUX IN] jack and the [USB TO HOST] terminal (loop connection). If this occurs, try the following troubleshooting steps.
• Disconnect the cable from the [AUX IN] jack and use only the USB cable for audio communication.
• If you are using a USB cable to charge this product, be sure to connect it to a USB adapter or other power source instead of a computer or smart device.
Recording (USB audio recorder)
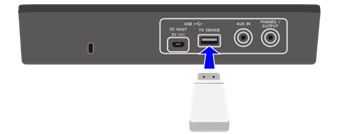
1. Connect a USB flash drive to the [USB TO DEVICE] terminal.
2. If necessary, connect an external device as the recording source.
• Pad performance
• Click sound*
• Session performance*
• Playback of WAV files in the root directory of a USB flash drive*
• Audio input via the [USB TO HOST] terminal*
• Audio input via [AUX IN] jack
3. Configure the settings for recording.

4. If necessary, use the [+] and [-] buttons to select an audio file in the root directory of the USB flash drive.


5. Press the Record button to put the unit into recording standby.


6. To start recording, press the Record button again.

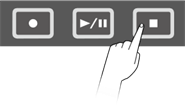
7. To end recording, press the Stop button.
Playing an audio file (USB audio player)
You can play audio files (WAV) stored in the root directory of a USB flash drive, including files that were recorded with this product.
NOTE
• Only audio files that are recognized by the product will be displayed on the LCD screen.
• Due to limitations in the product specifications, some characters cannot be used in the file names that are displayed by this product. For example, Japanese Kanji characters and German umlauts cannot be displayed. Therefore, the file names for some audio files might appear garbled.
• The selection status of audio files can be registered in the Registration Memory. To recall settings related to Audio Mode in the Registration Memory, set [REG]→LoadSetting→Audio to “On” and save the same file to the root directory of the USB flash drive.
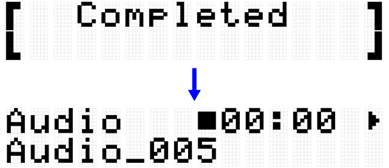
1. Use the [+] and [-] buttons on the top screen of Audio Mode to select a file to play back.

2. To start playback, press the Playback/Pause button.

3. To stop playback, press the Stop button.
NOTE
• You can press the Playback/Pause button during playback of an audio file to pause the file at the playback position.
Loading audio files as User Samples
Audio files (WAV or AIFF) in the root directory of a USB flash drive can be loaded into the User Sample Memory as User Samples (Voices in Voice Category 017).
Requirements for loading audio files
• Sample format: WAV, AIFF (44.1 kHz, 16-bit, mono/stereo)
• Max. time: Up to approx. 20 seconds per file, approx. 300 seconds (stereo)/600 seconds (mono) in total
Loading a single audio file
1. Press the [MENU] button to enter Menu Mode, and then press the [>] button a few times to move to “File.”

2. Press the [ENTER] button, and then press the [>] button a few times to move to “OneSample.”

3. Press the [ENTER] button to display the load screen, and then use the [+] and [-] buttons to select the file you want to load.

4. Press the [ENTER] button to display the load destination selection screen, and then use the [+] and [-] buttons to select a number (001–100).

5. Press the [ENTER] button. When the “Load?” confirmation message is displayed, press the [ENTER] button again to load the file.

Loading multiple audio files in one operation
All files in the root directory of a USB flash drive can be loaded together in one operation.
1. Press the [MENU] button to enter Menu Mode, and then press the [>] button a few times to move to “File.”

2. Press the [ENTER] button, and then press the [>] button a few times to move to “AllSample.”

3. Press the [ENTER] button to display the load screen.

4. Press the [ENTER] button again. When the “Load?” confirmation message is displayed, press the [ENTER] button again to load the file.
Assigning User Samples to Pads
You can assign User Samples (Voice Category 017) that have been loaded into the User Sample Memory to Pads to use during performance.
1. After selecting the Kit in which you want to use a User Sample, move to the VoiceEdit screen.

2. Hit the Pad to which you want to assign the User Sample.
3. Press the [ENTER] button to move to the Voice Category selection screen and then use the [+] and [-] buttons to select “017.”

4. Press the [>] button to go to the Voice selection screen and then select the User Sample number (001–100) you want to assign.

5. Save the Kit as a User Kit (U01–U50), if necessary.