[KIT] Editing a Kit
In Kit Mode, you can edit settings such as the effects for an entire Kit and the Voices for each Pad, and save those settings as a User Kit.

Basic procedure (from editing to saving a Kit)
The steps for editing settings in Kit Mode and saving them as a User Kit (U01–U50) are shown below.
1. Press the [+] or [-] button on the top screen of Kit Mode to select a Kit.

2. Use the [<] and [>] buttons to select a setting and the [+] and [-] buttons to edit that setting.
3. After editing the settings, return to the top screen of Kit Mode and press the [ENTER] button to go to the User Kit save screen.
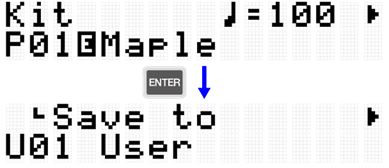
4. Use the [+] and [-] buttons to select the User Kit number (U01–U50) that is the save destination.

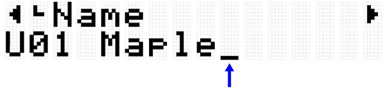
5. Press the [ENTER] button to display the Kit Name edit screen. The cursor will appear at the left end of the Kit Name.

6. Edit the Kit Name.
7. After editing the Kit Name, press the [ENTER] button to display the confirmation screen before saving.

8. Press the [ENTER] button again to save the User Kit.
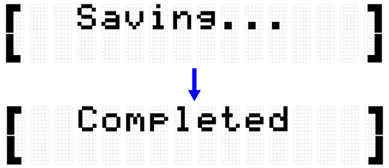
“Saving...” is displayed, and then after a few moments “Completed” is displayed to indicate that the User Kit has been saved.
NOTE
• User Kits (U01–U50) can be saved in the root directory of a USB flash drive. See the section on [MENU]→File for details.
• The edited state of the currently selected Kit is maintained when the power is turned off, even if it has not been saved as a User Kit. See this page for details about which items have their settings maintained even when the power is turned off.
Kit Edit
This detailed explanation corresponds with Step 2 of the “Basic procedure.”

You can configure the settings for the currently selected Kit (all Pads). Press the [ENTER] button to move to the KitEdit menu level. Use the [<] and [>] buttons to select a item and the [+] and [-] buttons to set the value for that item. Default values are unique to each Kit.
Item (Display) | Description | Setting Range |
Adjust the volume of the Kit. | 0–127 | |
Select the type of reverb to be applied to the Kit. | See the Reverb Type List for details. | |
Adjust the amount of reverb applied to the Kit (send amount). The amount applied to each Pad Voice is multiplied by the value set for VoiceEdit→ReverbSend. | 0–127 | |
Select the type of chorus to be applied to the Kit. | See the Chorus Type List for details. | |
Adjust the amount of chorus applied to the Kit (send amount). The amount applied to each Pad Voice is multiplied by the value set for VoiceEdit→ChorusSend. | 0–127 | |
Select the type of variation to be applied to the Kit. | See the Variation Type List for details. | |
Adjust the amount of variation applied to the Kit (send amount). The amount applied to each Pad Voice is multiplied by the value set for VoiceEdit→VarSend. | 0–127 |
Reverb Type List
No. | Reverb Type (Display) | Full Name |
01 | NoEffect | No Effect |
02 | Room1 | Room 1 |
03 | Room2 | Room 2 |
04 | Room3 | Room 3 |
05 | Room4 | Room 4 |
06 | Hall | Hall |
07 | Stage | Stage |
08 | Plate | Plate |
09 | EarlyRef | Early Reflection |
10 | GateReverb1 | Gate Reverb 1 |
11 | GateReverb2 | Gate Reverb 2 |
12 | ReverseGate | Reverse Gate |
@
Chorus Type List
No. | Chorus Type (Display) | Full Name |
01 | NoEffect | No Effect |
02 | Distortion | Distortion |
03 | Overdrive | Overdrive |
04 | AmpSim | Amp Simulator |
05 | Chorus 1 | Chorus 1 |
06 | Chorus 2 | Chorus 2 |
07 | Flanger | Flanger |
08 | Phaser | Phaser |
09 | AutoWah | Auto Wah |
10 | RingModulator | Ring Modulator |
11 | DelayDoubling | Delay Doubling |
Variation Type List
No. | Variation Type (Display) | Full Name |
01 | NoEffect | No Effect |
02 | Compressor | Compressor |
03 | V DistHard | V Distortion Hard |
04 | V DistHardDly | V Distortion Hard + Delay |
05 | TempoDelay 1 8 | Tempo Delay 1 8th |
06 | TempoDelay 1 T | Tempo Delay 1 Triplet |
07 | TempoDelay 1 D | Tempo Delay 1 Dotted |
08 | TempoDelay 2 8 | Tempo Delay 2 8th |
09 | TempoDelay 2 T | Tempo Delay 2 Triplet |
10 | TempoDelay 2 D | Tempo Delay 2 Dotted |
11 | DelayLCR | Delay LCR |
12 | CrossDelay 1 | Cross Delay 1 |
13 | CrossDelay 2 | Cross Delay 2 |
14 | Echo | Echo |
15 | DeepChorus | Deep Chorus |
16 | Phaser | Phaser |
17 | DynPhaser | Dynamic Phaser |
18 | GM Flanger | GM Flanger |
19 | DynFlanger | Dynamic Flanger |
20 | RingModulator | Ring Modulator |
21 | DynRingMod | Dynamic Ring Modulator |
22 | AutoWah | Auto Wah |
23 | TouchWah | Touch Wah |
24 | DynFilter | Dynamic Filter |
Pad Edit
This detailed explanation corresponds with Step 2 of the “Basic procedure.”

You can set the operation for each Pad in the currently selected Kit. Press the [ENTER] button to move to the PadEdit menu level. Use the [<] and [>] buttons to select one of the items in the following list, and hit the Pad whose settings you want to change. The number of the designated Pad appears in the upper right corner of the LCD screen. Use the [+] and [-] buttons to set the value for that item.

Default values are unique to each Kit.
Note Repeat when operating Pads
Item (Display) | Description | Setting Range |
Abbreviation for "Note Repeat Rate." When this is set to anything other than Off, the Voice assigned to a Pad will be generated repeatedly at the set interval according to the current tempo while that Pad is pressed further (while Aftertouch is enabled). When Note Repeat Type = Down (down beat) If the time signature is 4/4, a Note Repeat setting of 1 repeats the Voice only on the first beat of the measure, 1/2 repeats only on the first and third beats, 1/4 repeats on all beats, 1/8 repeats at eighth-note intervals, 1/16 repeats at sixteenth-note intervals, and 1/32 repeats at thirty-second-note intervals. If the value ends with a T (Triplet), the Voice will repeat on triplets of each of these settings. When Note Repeat Type = Up (up beat) If the time signature is 4/4, a Note Repeat setting of 1 repeats the Voice only on the third beat of the measure, 1/2 repeats only on the second and fourth beats, 1/4 repeats on the “and” of all beats, 1/8 repeats on the “and” of each eighth-note, 1/16 repeats on the “and” of each sixteenth-note, and 1/32 repeats on the “and” of each thirty-second-note. If the value ends with a T (Triplet), the Voice will repeat on triplets of each of these settings. NOTE To add swing to Note Repeat, configure the [MENU]→Utility→Swing. | Off, 1, 1/2, 1/2T, 1/4, 1/4T, 1/8, 1/8T, 1/16, 1/16T, 1/32 | |
NoteRepTyp | Abbreviation for "Note Repeat Type." This sets whether a Pad Voice is repeated on the down beat or the up beat when using Note Repeat Rate. | Down, Up |
Note On/Off when operating Pads (Hold Mode)
Item (Display) | Description | Setting Range |
This switches the behavior of the Note On/Off output when the designated Pad is hit. When set to “Off,” Note On is output when the Pad is hit, and Note Off is output if Aftertouch is not used. When set to “On,” Note On and Note Off are output alternately each time the Pad is hit. If Note Repeat Rate for the designated Pad is set to anything other than Off, setting this item to “On” will toggle start/stop for Note Repeat each time the Pad is hit. If a User Sample is assigned to a Voice on the designated Pad, setting this item to “On” will toggle start/stop for repeat of the User Sample each time the Pad is hit. | Off, On |
Mute when operating Pads
Item (Display) | Description | Setting Range |
NoteOnMut | Abbreviation for "Note On Mute." This is used to mute "On" or not mute "Off" the Voice when a Pad that is being played back is sending Note On. (If "HoldMode"="Off," hit the Pad one more time. If "HoldMode"="On," hit the Pad two more times.) | Off, On |
NoteOffMut | Abbreviation for “Note Off Mute.” This is used to mute "On" or not mute "Off" the Voice when a Pad that is being played back is sending Note Off. (If "HoldMode"="Off," do not press the Pad further. If "HoldMode"="On," hit the Pad one more time.) | Off, On |
Mute/Playback of Pad Groups when operating Pads (Choke/Link)
Item (Display) | Description | Setting Range |
By hitting a Pad, you can naturally mute the Voice of all Pads that are being played back. The group of Pads to be muted can be grouped together as a Choke Group. You can save up to 16 Choke Groups. Here, the designated Pad is registered to one of the Choke Groups. | Off, 1–16 | |
This sets whether the specified Pad sends ("Send") or receives ("Receive") a mute command within the Choke Group. | Send, Receive, Send&Receive | |
LinkGroup | By hitting a Pad, you can play back the Voices that are assigned to other Pads simultaneously. The group of Pads to be played back simultaneously can be grouped together as a Link Group. You can save up to 16 Link Groups. Here, the designated Pad is registered to one of the Link Groups. | Off, 1–16 |
This sets whether the designated Pad is playing back other Pads ("Send") in the Link Group or being played back ("Receive.") | Send, Receive, Send&Receive |
Effective velocity range for Voices when operating Pads (Velocity Limit)
Item (Display) | Description | Setting Range |
Abbreviation for "Velocity Limit Low." This sets the lower limit of velocity required for playback. Voices that are assigned to Pads will play back at velocities higher than the value set here. If this item is set to a value greater than that for Velocity Limit High, playback will occur when the velocity is between 1 and the value set for Velocity Limit High and between the value set for Velocity Limit Low and 127. | 1–127 | |
Abbreviation for "Velocity Limit High." This sets the upper limit of velocity required for playback. Voices that are assigned to Pads will play back at velocities lower than the value set here. If this item is set to a value less than that for Velocity Limit Low, playback will occur when the velocity is between 1 and the value set for Velocity Limit High and between the value set for Velocity Limit Low and 127. | 1–127 |
@
Effect of hitting the same Pad repeatedly
Item (Display) | Description | Setting Range |
Humanize | When this is turned on (1–4), a natural variation is applied so that the Voice is not too uniform when the same Pad is hit repeatedly. The effect becomes greater as the value increases. | Off, 1–4 |
Functions when a Pad is hit
See this page for details.
Functions when a Pad is pressed further (Aftertouch)
See this page for details.
Voice Edit
This detailed explanation corresponds with Step 2 of the “Basic procedure.”

You can configure the settings for the Voices assigned to each Pad in the currently selected Kit. Press the [ENTER] button to move to the VoiceEdit menu level. Use the [<] and [>] buttons to select one of the items in the following list, and hit the Pad whose settings you want to change. The number of the designated Pad appears in the upper right corner of the LCD screen. Use the [+] and [-] buttons to set the value for that item.

Default values are unique to each Kit.
Selecting a Voice
Item (Display) | Description | Setting Range |
Select the category of the Voice for the designated Pad. Each time you use the [+] and [-] buttons to switch between categories, the first Voice of the category is selected and an audition sound is played. | See the Voice Category List for details. | |
Select the Voice for the designated Pad. Each time you use the [+] and [-] buttons to switch between Voices, an audition sound is played. | See the Voice List for details. |
1. Press the [ENTER] and then move to “Category.”

2. Hit the Pad for which you want to change the Voice.

3. If necessary, use the [+] and [-] buttons to select a Voice category.

4. Press the [>] button to move to “Number.”

5. Press the [+] and [-] buttons to select a Voice.

To change to another Pad Voice, repeat the above steps.
NOTE
• To return a changed sound (voice) to its default setting, press the [+] and [-] buttons at the same time.
• You can change the volume (velocity) of a Pad Voice that is generated (auditioned) in [MENU] →Utility→AuditionVel.
• The operation of selecting a Voice sets all Voice-related settings (Volume-VarSend) to the default values for the selected Voice.
Voice Category List
No. | Display | Full Name |
001 | KickAco | Acoustic Kick |
002 | KickElect | Electro Kick |
003 | SnareAco | Acoustic Snare |
004 | SnareElect | Electro Snare |
005 | TomAco | Acoustic Tom |
006 | TomElect | Electro Tom |
007 | HHAco | Acoustic Hi-hat |
008 | HHElect | Electro Hi-hat |
009 | CymbalAco | Acoustic Cymbal |
010 | CymbalElect | Electro Cymbal |
011 | PercAco | Acoustic Percussion |
012 | PercElect | Electro Percussion |
013 | Clap | Clap |
014 | SE | SE |
015 | VocalFemale | Vocal Female |
016 | VocalMale | Vocal Male |
Voice-related settings
Item (Display) | Description | Setting Range |
Volume | Adjusts the volume of the designated Pad Voice. | 0–127 |
Pan | Sets the pan (stereo orientation) of the designated Pad Voice. | L63–C–R63 |
Sets the pitch of the designated Pad Voice (1.0 = 100cent = semitone). For example, a larger value for a snare drum results in a higher pitched tuning, and a smaller value for a cymbal results in a larger diameter. | -24.0–0.0–+24.0 | |
Sets the decay (the time it takes a sound to fade) of the designated Pad Voice. For example, a smaller value for a snare drum produces the effect of a muted head, while a smaller value for a cymbal produces a shorter sustain. For open hi-hats, the smaller the value, the more the effect is like closing a half-open hi-hat. | -64–0 | |
Cutoff | Sets the cutoff frequency of the filter applied to the designated Pad Voice. | -64–0–+63 |
Resonance | Sets the Q of the filter applied to the designated Pad Voice. | -64–0–+63 |
Adjusts the amount of reverb applied to the designated Pad Voice (send amount). The amount applied to each Pad Voice is multiplied by the value set for KitEdit→ReverbSend. | 0–127 | |
Adjusts the amount of chorus applied to the designated Pad Voice (send amount). The amount applied to each Pad Voice is multiplied by the value set for KitEdit→ChorusSend. | 0–127 | |
Abbreviation for "Variation Send." This adjusts the amount of variation applied to the designated Pad Voice (send amount). The amount applied to each Pad Voice is multiplied by the value set for KitEdit→VariationSend. | 0–127 |
Interlock Edit
This detailed explanation corresponds with Step 2 of the “Basic procedure.”

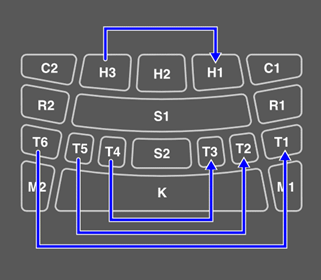
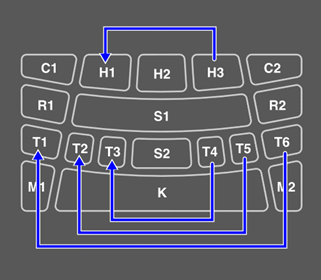
If this item is set to On, when you change the settings in [KIT]→PadEdit and [KIT]→VoiceEdit, the settings of symmetrically opposite Pads (H1 and H3, T1 and T6, T2 and T5, T3 and T4) are flipped. If you switch this item from Off to On, these symmetrical Pad pairs will have the same settings, as shown in the figure below.
• If [MENU]→Utility→PadLayout is set to “Right,” the settings for the Pads on the right are applied to the Pads on the left.
• If [MENU]→Utility→PadLayout is set to “Left,” the settings for the Pads on the left are applied to the Pads on the right.