

Rear panel
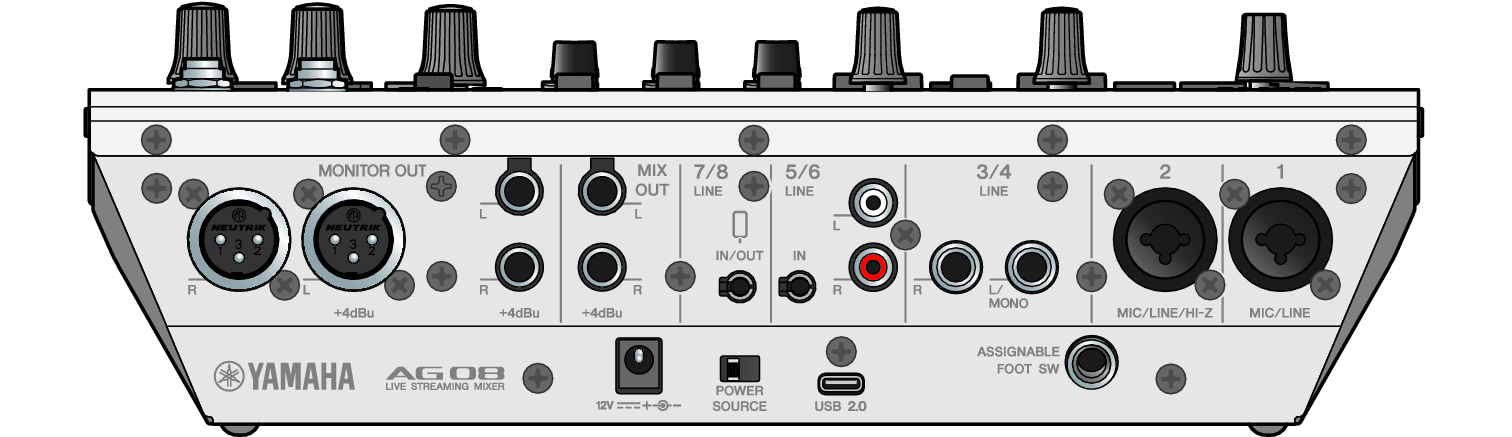
Bottom part of rear panel

a | [12V] DC port Connect the included AC adapter here. |
b | [POWER SOURCE] selector switch Selects which port is used to power this product. Set this to the [USB 2.0] side when powering this product via the [USB 2.0] port, and set this to the [12V] DC port side when powering this product via the [12V] DC port. |
c | [USB 2.0] port (Type C) Connect your computer or iPad/iPhone. When connecting a computer, power will be supplied from the computer to this unit. When connecting an iPad/iPhone, connect the included AC adapter separately to the [12V] DC port. |
- A dedicated driver is required to use this product with a computer. Download and install the driver from the following website.
- Do not connect any other devices to the USB 2.0 port except for a computer, iPad or iPhone.
- A 5 V and 1.5 A power supply is required to operate this product on bus power. If a sufficient amount of power is not available for a stable power supply, supply power separately via the [12V] DC port.
- Observe the following points to prevent loss of data when connecting the USB port to other devices.
- Observe the following before inserting or unplugging the USB cable.
- Quit all applications.
- Make sure that no data is being transmitted from this product.
- After you unplug the cable, make sure to wait for at least six seconds before plugging the cable in again. Rapidly plugging in and unplugging the cable may cause a malfunction.
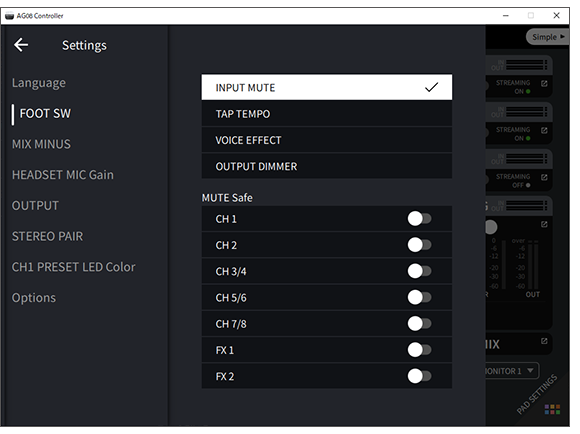
d | [ASSIGNABLE FOOT SW] connector Connect a footswitch (such as a Yamaha FC5, sold separately) here. You can set the INPUT MUTE, TAP TEMPO, VOICE EFFECT and OUTPUT DIMMER functions to be used with the foot switch. Use the AG08 Controller app to assign these functions. Press the menu [
|
Top part of rear panel

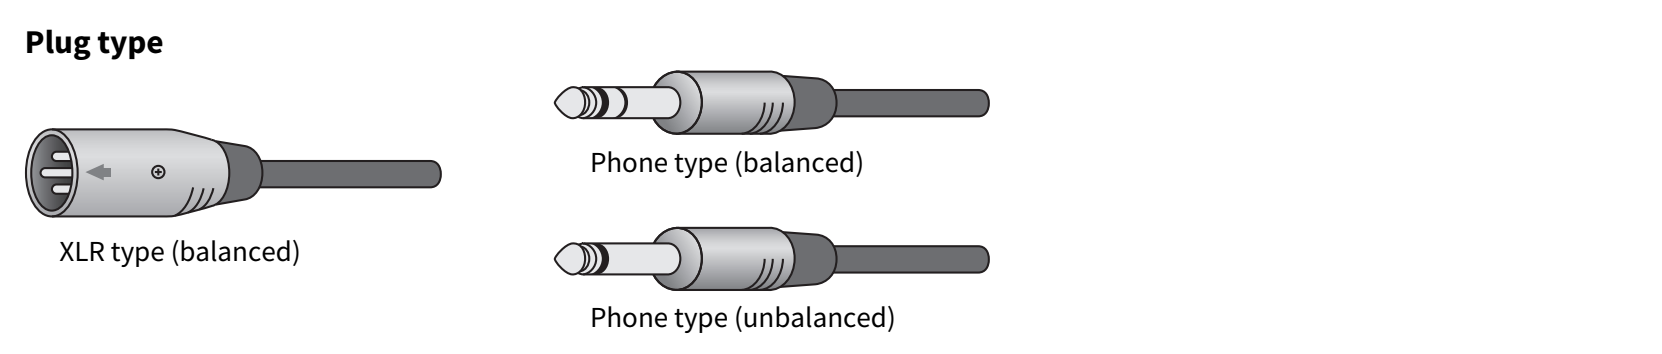
a | [MONITOR OUT] chassis connectors (XLR) Connect your powered monitor speaker or similar equipment here. These are compatible with XLR connectors. |
b | [MONITOR OUT] connectors (phone) Connect your powered monitor speaker or similar equipment here. These are compatible with phone plugs (balanced/unbalanced). |
c | [MIX OUT] connectors (phone) These are electronically-balanced phone type output connectors for outputting the mixed signal in stereo. |
d | [CH7/8 (P) LINE IN/OUT] smartphone input/output connector (compatible with four-conductor (TRRS) 3.5 mm stereo mini-plugs) This input/output connector can be used in many different situations. Compatible with four-conductor stereo mini-plugs (CTIA-compliant). You can connect your smartphone or tablet such as an Android device here, and use an application to add sound effects such as audio cues or background music. Adjust the output volume on the connected device. You can send the audio signal from this product to a connected device. |
e | [CH5/6 LINE IN] connector (compatible with three-conductor (TRS) 3.5 mm stereo mini-plugs) Connect an electronic musical instrument, audio device or other line-level equipment here. Compatible with stereo mini-plug cables. |
f | [CH5/6 LINE IN] connectors (RCA pin type) Connect an electronic musical instrument, audio device or other line-level equipment here. Compatible with RCA pin type plugs. Three-conductor (TRS) 3.5 mm stereo mini plugs are given priority over RCA pin type plugs. You cannot use both types at the same time. |
g | [CH3/4 LINE] connectors (phone type) Connect an electronic musical instrument, audio device or other line-level equipment here. Compatible with phone plugs. |
h | [CH2 MIC/LINE/HI-Z] connector Connect your mic, electronic musical instrument or other device here. Compatible with both XLR and phone plugs. You can also connect a device with high output impedance like an electric guitar or bass guitar here. |
i | [CH1 MIC/LINE] connector Connect your mic, electronic musical instrument or other device here. Compatible with both XLR and phone plugs.
|
Assigning output signals to the outputs
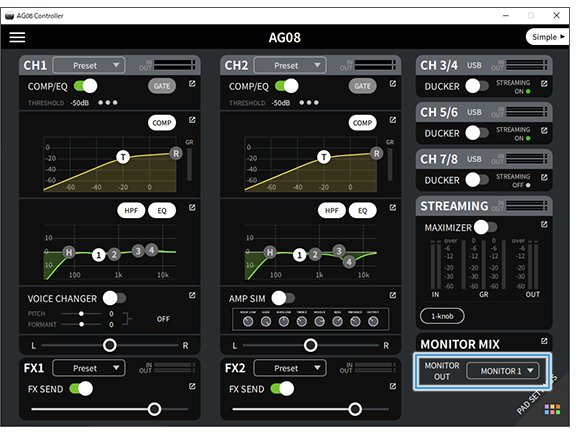
- You can use the AG08 Controller app to change which signal outputs to the [MONITOR OUT] chassis connectors/connectors, the [MIX OUT] connectors and the [CH7/8 LINE IN/OUT] connector.
- Output for the [MONITOR OUT] connectors
- In the AG08 Controller app, use the MONITOR OUT settings shown at the bottom right corner of the Detail mode screen to select the output.
- Output for [MIX OUT] connectors and [CH7/8 LINE IN/OUT] connector
- Press the menu [
 ] button on the AG08 Controller, and select Settings → OUTPUT to make the settings.
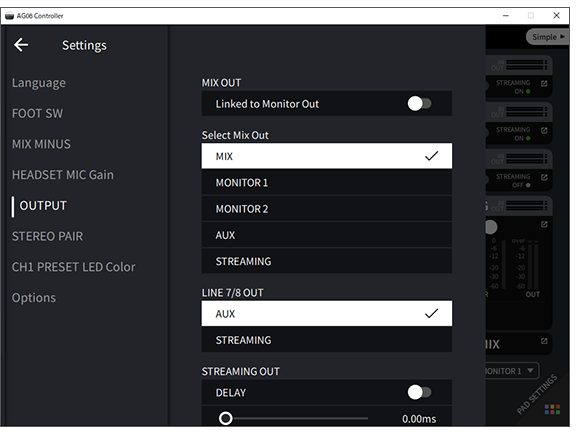
- For the signals for MIX, MONITOR1, MONITOR2, AUX and STREAMING, refer to the block diagram.