Split allows you to divide the keyboard into sections to play each section with a different sound, while Layer allows you to combine multiple sounds on top of each other on a Split section or across the entire keyboard.
To set up splits and layers on the MONTAGE M, use the Split Points to make the groups of keyboard sections and assign a Part to each group.
To open the Split setting screen, press the [SPLIT] button.
The Split Job screen for the Performance appears, allowing you to change the Split settings.
By tapping the items on the screen to specify the number and position for the Split Point, you can set the key range and select a sound for each Part.
By tapping the group button (A, B, C, D) on the screen while holding down the [SHIFT] button, you can set the Part for more than one group.
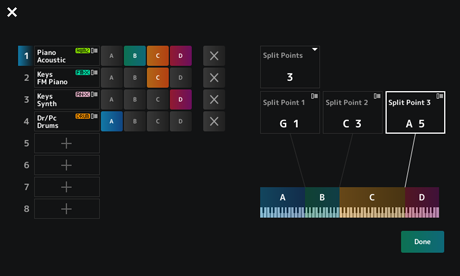
When the setup is finished, press the [EXIT] button on the top panel or tap Done on the screen.
Tapping on the upper left cancels the setup and closes the screen.
To change the note range, simultaneously hold down the [SHIFT] button and press the [SPLIT] button.
This calls up the Part—Note view of the Performance screen, allowing you to change the note range of each Part.
Set the value by using the built-in keyboard or Data dial.
Editing refers to the Full Edit functions using the Main display and Quick Edit functions using the Sub display.
You can use Full Edit to access all editing functions and use Quick Edit to instantly access some frequently used parameters.
By using the [PAGE JUMP] button, you can edit the same parameter from Full Edit and the Quick Edit.
Also, you can use different screens for the Main display and the Sub display to monitor multiple parameters at once while switching between Full Edit and Quick Edit.

The Common Edit screen will appear when the cursor is on the Performance Name.
The Part Edit screen for the sound engine will appear when the cursor is on the Part.
For selecting a tab, you can simultaneously hold down the [SHIFT] button and use the appropriate Slot number and Category name selection buttons, or simply tap the tab on the screen. (Refer to the Quick Guide.)

Changing the settings in each tab from the top to the bottom is recommended.
The target for editing will be shown on the navigation bar.
Select Common for editing the settings for the entire Performance.
Select Part Common for editing the settings for the entire Part.
If you wish to go into detailed settings, select one of the following: Element 1 to 128, Operator 1 to 8, Oscillator 1 to 3, Noise, and C0 to C6 keys of the Part.
You can change the parameter to be edited by opening the Edit screen from: [PERFORMANCE] → [EDIT/] and selecting the desired item from the Navigation bar.
The Navigation screen appears.
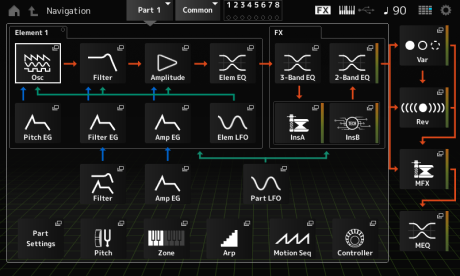
When you press the [NAVIGATION] button during editing, you can easily find where you are on the map.
Select Part Common for editing the settings for the entire Part.
If you wish to go into detailed settings, select one of the following: Element 1 to 128, Operator 1 to 8, Oscillator 1 to 3, Noise, and C0 to C6 keys of the Part.
Use the Cursor buttons to move the cursor and then press the [ENTER] button. Or, tap the icon on the screen.

If you have changed to a different tab on the Main display, you can call up the corresponding parameter on the Sub display by simultaneously holding down the [SHIFT] button and pressing the [PAGE JUMP] button.
(The parameter may not appear in some cases.)
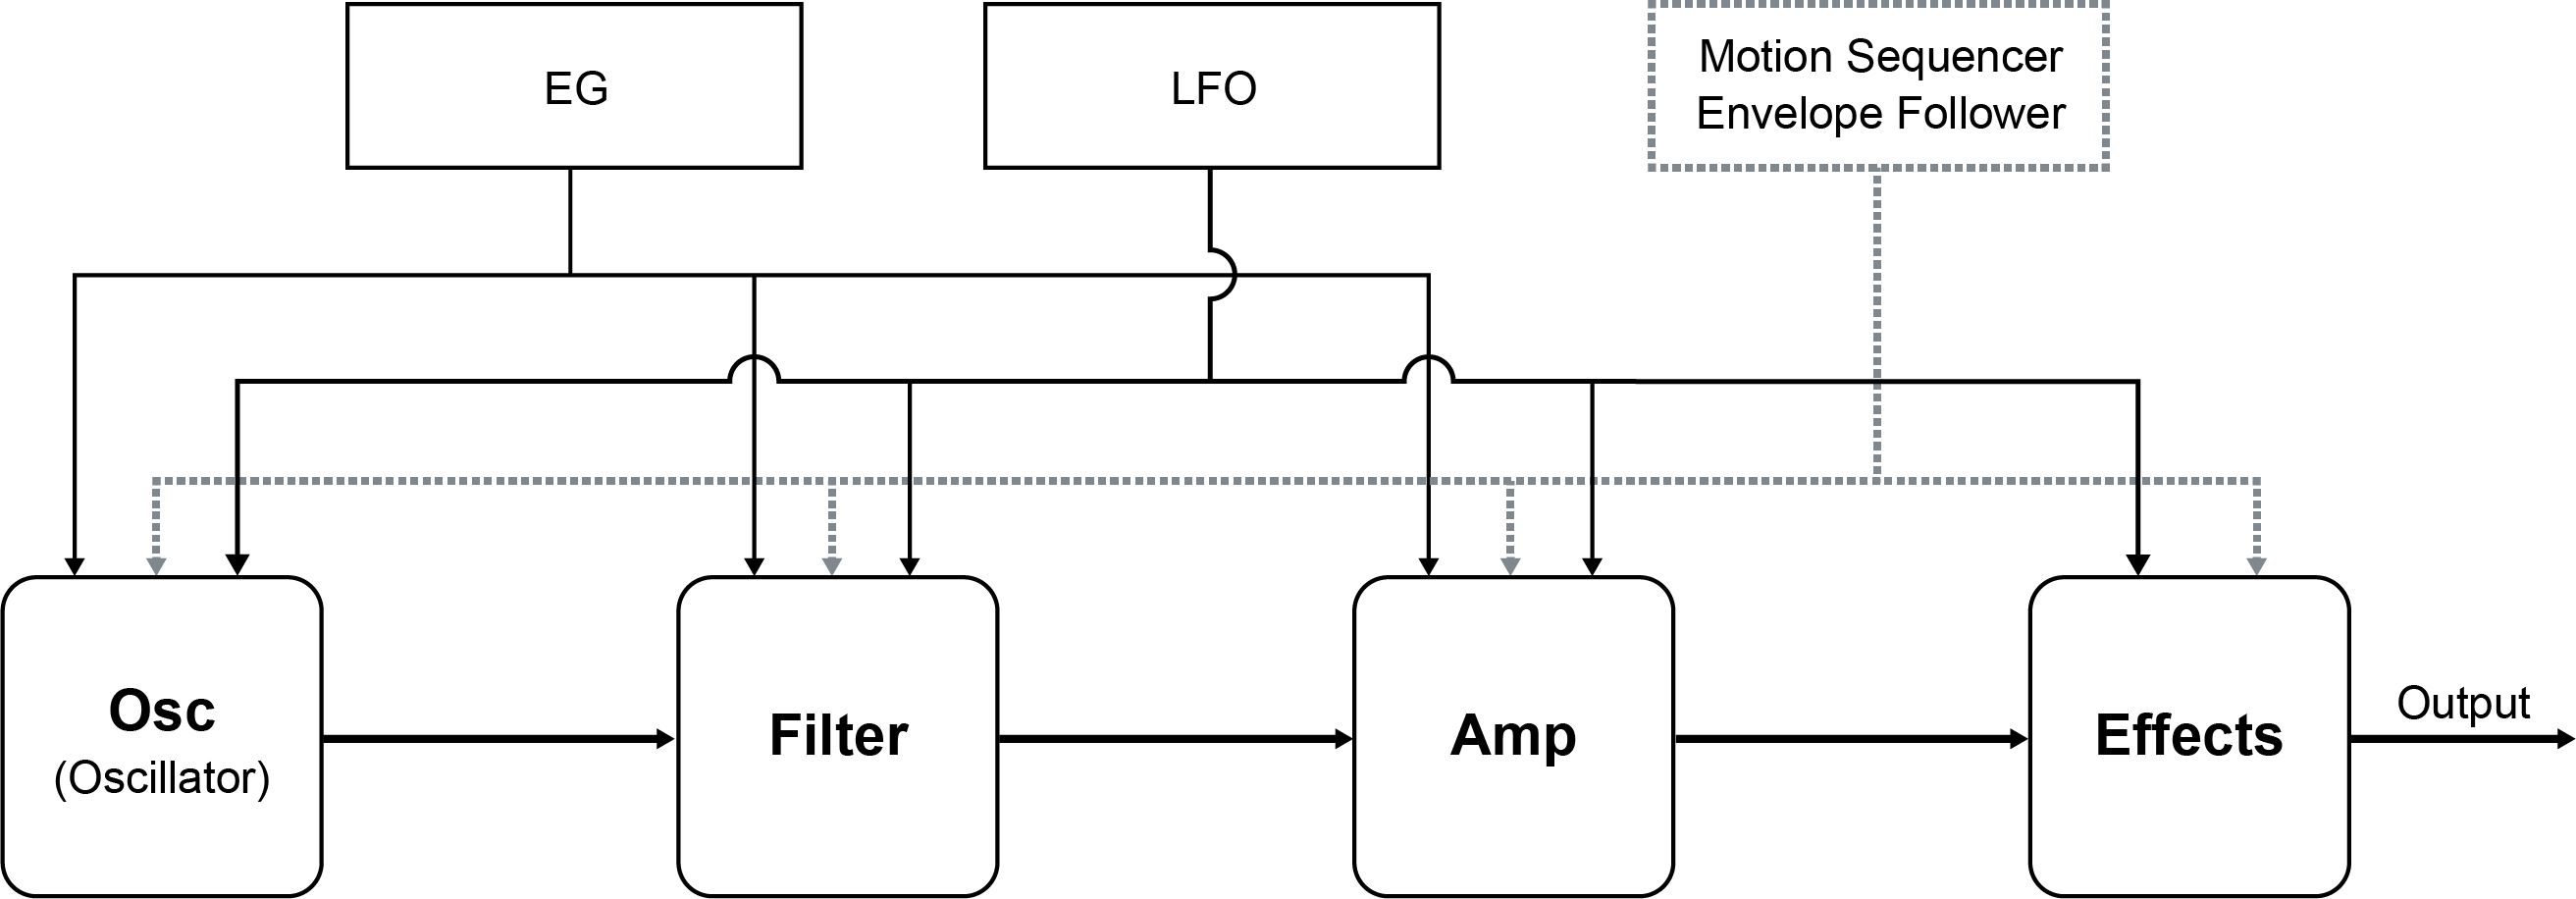
For creating tonal changes, you can use Oscillators, filters, EGs (or Envelope Generators), LFOs (or Low-Frequency Oscillators), and effects. By changing those parameters, you can change the brightness, resonance, or other timbral qualities of the sound.
The available settings are different depending on the sound engine type. Some parameters (below) are commonly used for all sound engine types.
- Oscillator (Osc): Creates the basic sound waves
- Pitch: Controls the pitch
- Filter: Controls the cutoff frequency
- EG: Determines how the sound changes over time
- LFO: Determines the cyclical change of the sound
- Motion Sequencer: Creates complex changes to the sound over time
- Effects: Processes the sound
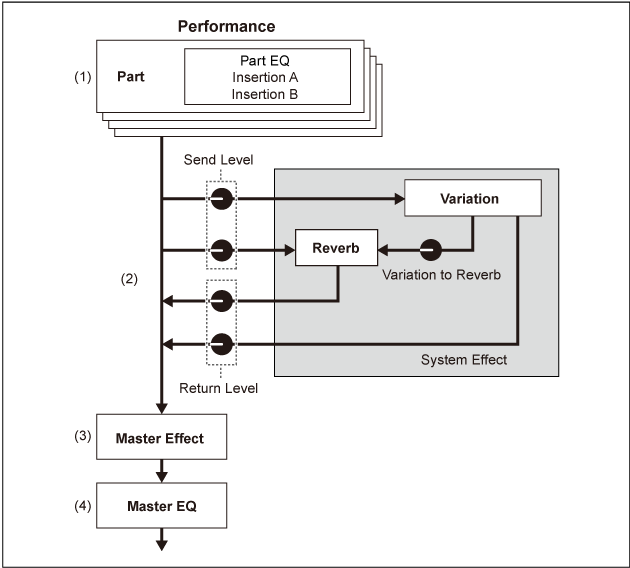
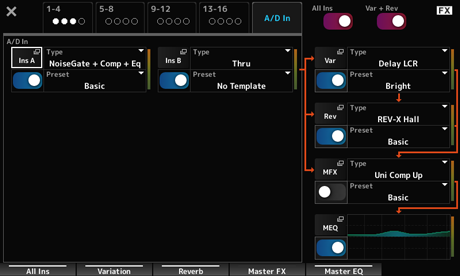
The effects available on the MONTAGE M include System effects which are applied to all Parts in the Performance, Insertion effects which are applied to each Part, Master effects which are applied to the final output, and Equalizers such as Part EQ and Master EQ. The signal flow diagram for the effects is shown below.
[PERFORMANCE] → Part selection → [EDIT/

[PERFORMANCE] → Common selection → [EDIT/
[PERFORMANCE] → Common selection → [EDIT/
The effects for the audio input from the A/D INPUT jack can be set from: [PERFORMANCE] → Common selection → [EDIT/] → Audio In.
For information on the effect categories and effect types, see Effect types.
For information on effect parameters, see Effect parameters.
For information on the Preset program for each effect type, refer to the Data List.
You can change the effects using Full Edit and Quick Edit.
By pressing the [NAVIGATION] button while holding down the [SHIFT] button, the FX Overview screen will appear, and you can see an overview of the effect settings.
Tap the buttons on the effect names such as Ins A and Var to open the Edit screen.
The Arpeggio function on the MONTAGE M allows you to play typical Arpeggios, as well as add more complicated rhythm patterns and backing tracks to your keyboard performance. It not only provides inspiration and full rhythmic passages in your live performances, but it gives you fully formed instrumental backing parts of various music genres for ease in creating songs.
You can assign the desired eight Arpeggio Types to each Part and simultaneously play back Arpeggios of up to eight Parts.
Also, you can set the note range (Note Limit) or the strength of the key pressure (Velocity Limit) for Arpeggio playback.
The Arpeggio function lets you play Accent Phrases (the sequence phrase played only when the keyboard is played at a higher velocity than the specified value) or effect sounds such as guitar fret noises using the Random SFX function. Some Preset Arpeggio Types are set to play back Accent Phrases and Random SFX sounds. You can find the Accent Phrases and Random SFX sounds by using the Arpeggio Category Search screen and checking Accent (Accent Phrase) or Random SFX for Attribute.
To turn the Arpeggio function on or off, press the [ARP ON/OFF] button on the top panel.

By pressing the [QUICK EDIT] button to select SELECTED PART and then using the Tab selection buttons to select the ARP/MS tab, you can then use Knobs 1 to 7 to change the Arpeggios.
Modify the Arpeggios by turning the knobs and listening to the Arpeggio playback. Check the names of the parameters assigned to Knobs 1 to 7 on the Sub display.
If you wish to fine-tune the settings, press the [PAGE JUMP] button to switch to the Main display to continue editing.

Normally the Arpeggio is played back while a key is being pressed. However, you can change the settings so that the Arpeggio continues to be played back after the finger is lifted off from the key.
The way the Arpeggio playback is turned on or off can be set with Hold and Trigger Mode.
[EDIT/] → Part selection → Common → Arpeggio → Common
[EDIT/] → Part selection → Common → Arpeggio → Advanced
| Played back only while a key is being pressed | Hold: Off Trigger Mode: Gate |
|---|---|
| Playback continues after the finger is lifted off from the key | Hold: On Trigger Mode: Gate |
| Playback is turned on or off each time the key is pressed | Trigger Mode: Toggle (regardless of the Hold settings) |
When Arp Master and Arp Part are set to ON, you can turn on the [KEYBOARD HOLD] button on the top panel to achieve the same effect as setting Hold to ON.
The Motion Control function lets you create Motion (rhythmic and dynamic sound changes) in real-time, so you can find completely new ways of expression. This function allows you to make the settings in advance so that you can change the parameters without actually operating the pedals or wheels. This lets you create dramatic and powerful expressive changes that follow the beat of your music.
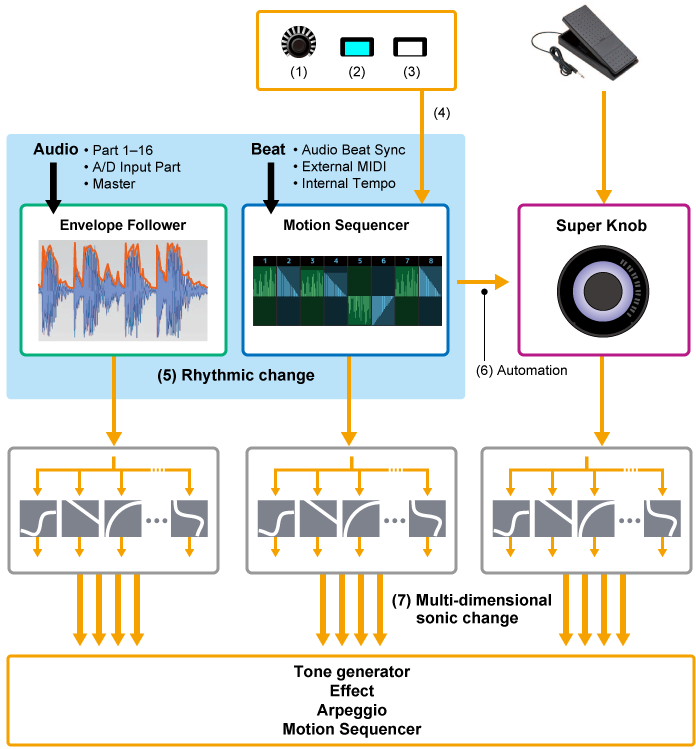
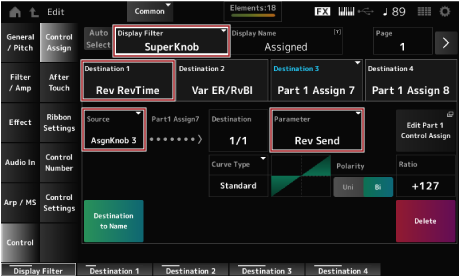
Motion Control can be set by setting the Source for the Controller as well as the control target (Destination and Parameter) from the Control Assign screen.
For Super Knob, set the Display Filter to SuperKnob and then set the Source (AsgnKnob 1–8) and Destination.
For Motion Sequence, set the Source to a Motion Sequence Lane from 1 to 4.
For Envelope Follower, set the Source to EnvFollow.
• [PERFORMANCE] → Common selection → [EDIT/] → Control → Control Assign
• [PERFORMANCE] → Part selection → [EDIT/] → Mod/Control → Control Assign
By using the Super Knob, you can simultaneously control the Assign 1 to 8 values that are assigned to Knobs 1 to 8 that are common to all Parts.
Moving the Super Knob while playing the keyboard lets you modify sounds, and you can see the parameter values on the Sub display.
If the [ASSIGN] button is turned on (and the button is lit), you will see the changes to the Knobs 1 to 8 on the indicator and the Sub display.
By combining the Super Knob and the Motion Sequencer, you can achieve more complex sound changes.
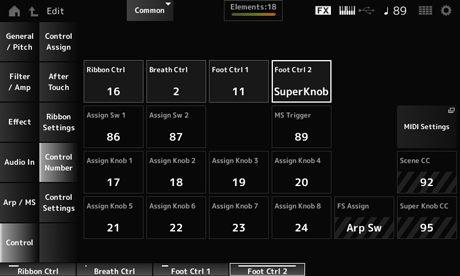
You can control the Super Knob from the separately sold Foot controller (FC7) connected to the MONTAGE M.
Follow the procedure shown below.
The Super Knob settings can be customized.
You can set two or three fixed values for using the Super Knob for morphing sounds. For setting three fixed values, you need to first enable the Mid setting.
Here, we will explain how to add morphing effects to the layered sound made with three Preset Performances (acoustic piano, pad sound, and electric piano) while keeping the original settings for these Performances.
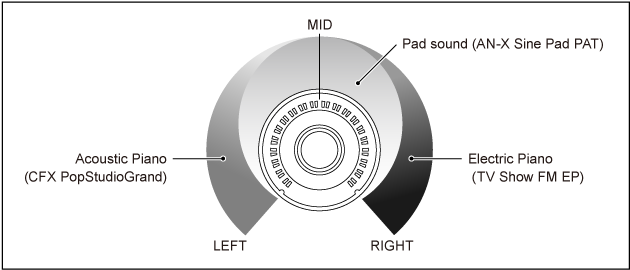
- Select sound for Parts 1 to 3 (Step 1)
- Set up the Super Knob to allow the control of the parameters for Parts 1 to 3 (Steps 2 to 4)
- Check the settings (Step 5)
- Set the parameters for the Super Knob for the leftmost, mid, and rightmost positions. (Steps 6 to 8)
The Control View screen appears.
The Control Assign screen appears.
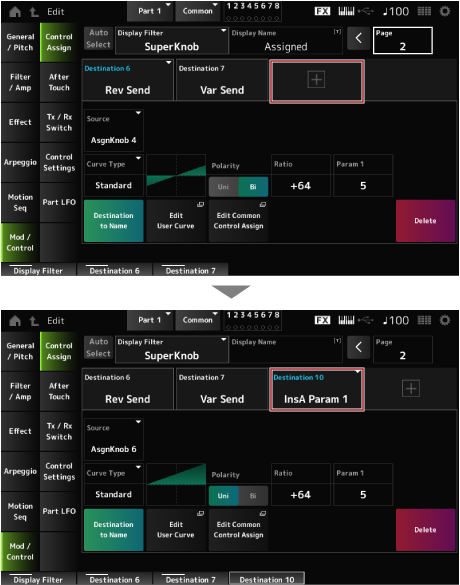
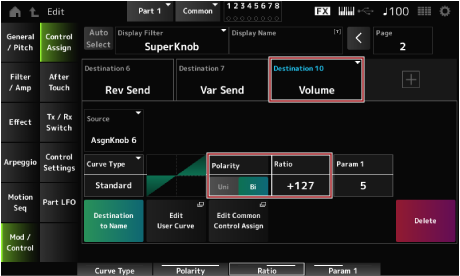
The Control Assign screen for Part 2 appears.
The Control Assign screen for Part 3 appears.
The Control Assign screen for the common part appears.
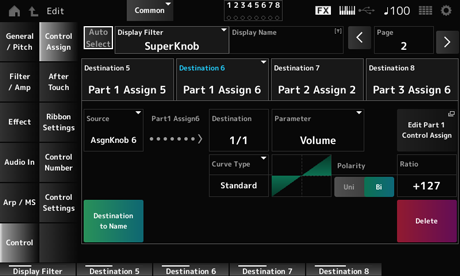
This makes the settings for the Super Knob when turned all the way to the left.
This makes the settings for the Super Knob when turned all the way to the right.
Enable the Mid position and then turn the Super Knob to set the value for the middle position.
The Navigation screen appears.
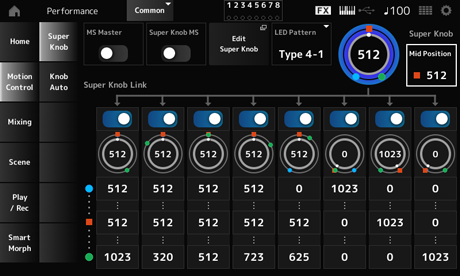
The main setting is now complete.
Adjust the Curve type, Ratio, and Param for each Part, LEFT, RIGHT, and MID for the KNOB POSITION if desired.
The Motion Sequencer function lets you create sound changes by controlling parameter times according to a sequence you create in advance.
It allows you to set up rhythmical changes that are in sync with the Performance tempo, Arpeggio, or the rhythms input from the connecting device and to control such changes interactively and in real-time according to the progression of the song.
With the Motion Sequencer, you can use up to four lanes per Part, or eight lanes for a Performance. You can use up to eight sequence patterns per lane.
You can also set the velocity range for playing the sequence, the way the sequence is played, or the number of Steps to play the same way you would with the Arpeggio.
The parameters for each lane can be set in the procedure shown below.
[PERFORMANCE] → Part selection → [EDIT/] → Motion Seq → Lane
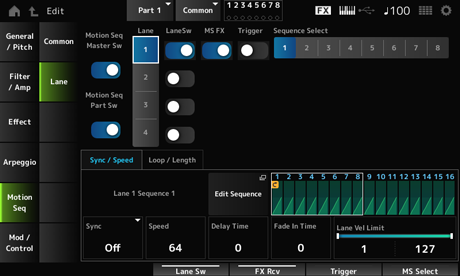
To turn Motion Sequencer on or off, press the [MSEQ ON/OFF] button on the top panel.

By pressing the [QUICK EDIT] button to select SELECTED PART and then using the Tab selection buttons to select the ARP/MS tab and using the Tab PAGE buttons to select Motion Sequence, you can then use Knobs 1 to 8 to change the Motion Sequencer.
Modify the Motion Sequencer settings by turning the knobs and listening to the Motion Sequencer playback. Check the names of the parameters assigned to Knobs 1 to 8 on the Sub display.

The way Motion Sequence is triggered can be set with the LaneSw and Trigger parameters.
[PERFORMANCE] → Part selection → [EDIT/] → Motion Seq → Lane
| Plays back the Motion Sequence when you press a key | LaneSw: On Trigger: Off |
|---|---|
| Plays back the Motion Sequence when you press the [MSEQ TRIGGER] button | LaneSw: On Trigger: On Sync: Other than Arp |
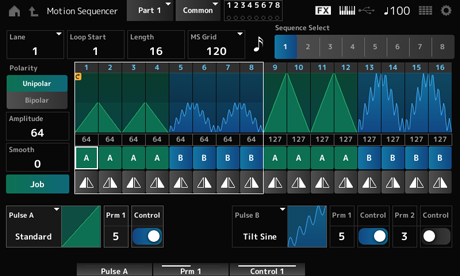
Motion Sequence is comprised of up to 16 steps.
Edit each Step from the Edit Sequence screen.
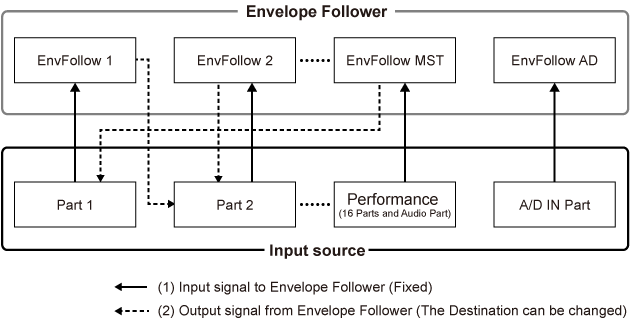
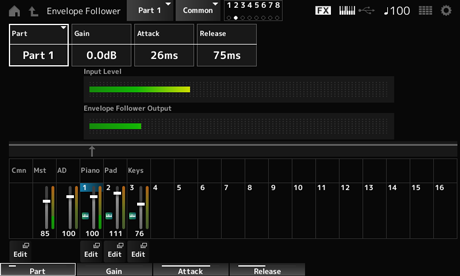
Envelope Follower is the function that extracts the envelope of the waveform from the audio input and is used as a controller for creating changes in the sound. It allows the output of Parts and the output from the external device connected to the A/D INPUT jack.
For example, you can set the Envelope Follower of the Part you have assigned a Rhythm Pattern as a Source to create changes in other Parts. It is useful, for example, when you wish to lower the volume of a Part while a certain other Part is being played (i.e., ducking).
Each Envelope Follower has its own input source, such as EnvFollow 1 for Part 1, EnvFollow 2 for Part 2, and EnvFollow AD for the Audio Part. The output from each Envelope Follower can be changed by selecting a different Source from the Control Assign screen.
For example, you can set up the Envelope Follower for Part 1 (EnvFollow 1) to create changes in Part 2. How the sound is modified by the output from each Envelope follower can be set from the Control Assign screen.
- [PERFORMANCE] → Common selection → [EDIT/
] → Effect → Routing → Envelope Follower (EnvFollow MST)
- [PERFORMANCE] → Common selection → [EDIT/
] → Audio In → Routing → Envelope Follower (EnvFollow AD)
- [PERFORMANCE] → Part selection → [EDIT/
] → Effect → Routing → Envelope Follower (EnvFollow 1–16)
You can set the Envelope Follower from the Rhythm Pattern screen. This way, you can quickly access the Envelope Follower parameters often used for the Rhythm Patterns.
You can play the keyboard to hear the effect of the Envelope Follower.
Here, set Polarity (Curve Polarity) to Bi, Ratio (Curve Ratio) to −63, Gain (Envelope Follower Gain) to −12dB.
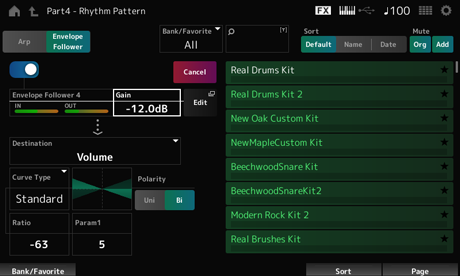
You can select a new kit or Arpeggio type for the Rhythm Pattern by simultaneously holding down the [SHIFT] button and pressing the [SONG/PATTERN] button to go back to the Rhythm Pattern screen. The Envelope Follower settings are retained after selecting a new kit or arpeggio for the Rhythm Pattern.
Smart Morph is a function that morphs FM-X Parts or AN-X Parts using machine learning.
By using Smart Morph, you can create a new sound for Part 1 from multiple FM-X Parts or AN-X Parts to play on the keyboard.
The Smart Morph function analyzes each sound assigned to Parts 9 to 16 and plots one dot per Part on the map. Each dot on the map represents a sound, and the distance between dots shows the similarities of these sounds.
Pressing the Learn button automatically generates a dot for the new sound between the existing dots on the map.
When you tap the dot on the map, the sound for that dot will be selected for Part 1.
You can find a new place you like from the map and save its settings to create a new part.
Also, by dragging the dot on the map while playing the keyboard, or by moving the Super Knob with the movements of two to eight dots assigned beforehand, you can create completely new sounds.