Pressing the [DAW REMOTE] button enables the DAW remote function, allowing you to conveniently control your preferred DAW with the controllers on the instrument.
- [DAW REMOTE]
Select the DAW remote function from four modes of operation.
You can also switch modes by pressing [DAW Remote] + one of the Slot number and Category name selection buttons (such as [Piano], [Keyboard], [Organ], and [Guitar]). Settings: Track, Plugin, Transport, ESP Control
Track: Mode for controlling multiple tracks on the DAW at once. Knob and control slider operations are sent as Mackie Control compatible protocols from Port 2.
Plugin: Mode for controlling a specific plugin on the DAW. Knob and control slider operations are sent as messages in Control Change Numbers for remote functions from Port 1.
Transport: Mode for playing the keyboard while playing back the recorded data on the DAW, or recording your keyboard performance on the DAW. You can use the Sequencer transport buttons to start or stop the playback on the DAW. All controllers except the Sequencer transport buttons operate as they normally do.
ESP Control: The mode for controlling the Expanded Softsynth Plugin (ESP) for MONTAGE M.
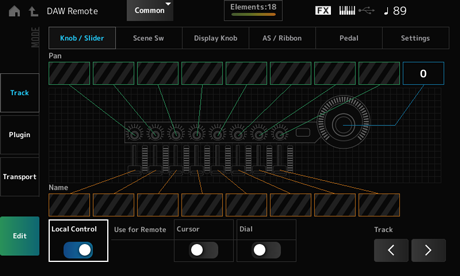
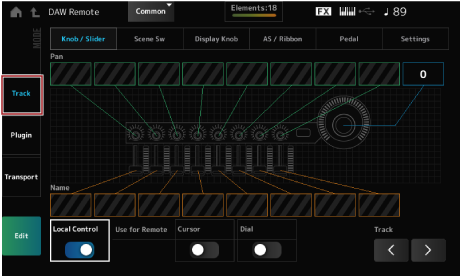
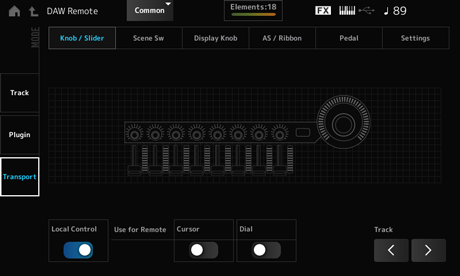
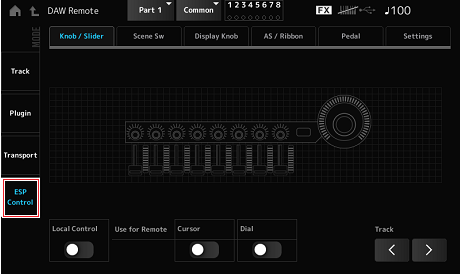
Opens the settings screen for each controller and the remote function. Settings: Knob/Slider, Scene Sw, Display Knob, AS/Ribbon, Pedal, Settings
Sets Local Control on or off.
This is the same setting that can be made from: [UTILITY] → Settings → MIDI I/O screen.
Sets whether to use the specific controllers on the Top Panel for controlling the DAW.
- On: For controlling the DAW
- Off: For controlling the Main display on the top panel.
Outputs the Track group selection (by eight tracks at a time).
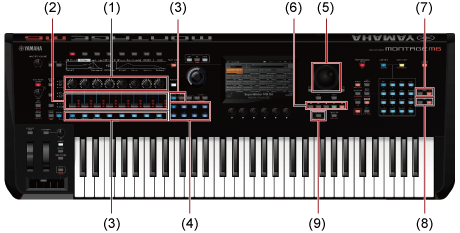
| Controllers | DAW Operations | |
|---|---|---|
| (1) | Knobs 1–8 | Controls the pan of the track. |
| (2) | Control sliders 1–8 | Controls the volume of the track. |
| (3) | PART buttons, [PART SELECT] button, [KEYBOARD CONTROL] button | Selects track(s), and switches mute and solo of the selected track(s) on or off. |
| (4) | SCENE buttons | Function |
| (5) | Data dial, cursor buttons | Moves the cursor position or Song position. |
| (6) | Sequencer transport buttons | Controls the transport actions (recording and playback). |
| (7) | BANK buttons | Selects a track group (eight tracks at a time). |
| (8) | PAGE buttons | Selects a track group (one track at a time). |
| (9) | [SONG/PATTERN] button | Turns loop playback on or off. |
Other controllers are set to send the Control Change messages set in remote mode.

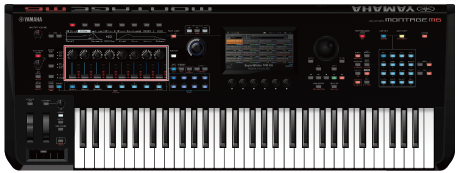
| Controllers | DAW operation |
|---|---|
| Knobs 1–8 | Any Control Change you have selected. (The Control Change number set with Edit in the DAW Remote screen is output.) |
| Control sliders 1–8 |
* PART buttons, [PART SELECT] button, [KEYBOARD CONTROL] button, data dial, cursor buttons, sequencer transport buttons, BANK buttons, and PAGE buttons behave the same way as in Track mode.

| Controllers | DAW Operations |
|---|---|
| Data dial, cursor buttons | Moves the cursor position or Song position. |
| Sequencer transport button | Controls the transport actions (recording and playback). |
| [SONG/PATTERN] button | Turns loop playback on or off. |
* Other controllers operate as normal.
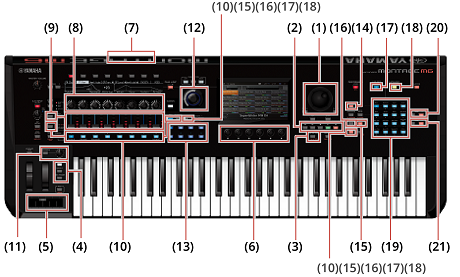
| Controllers | Operations | Location | |
|---|---|---|---|
| (1) | Data dial, cursor buttons | Moving the cursor position and song position | DAW |
| (2) | Sequencer transport buttons | Transport (Recording and playback) | DAW |
| (3) | [SONG/PATTERN] button | Turning the loop playback on or off | DAW |
| (4) | [ASSIGN 1] button, [ASSIGN 2] button, [MSEQ TRIGGER] button | Control change | DAW |
| (5) | Ribbon controller | Control change | DAW |
| (6) | Display knobs | Control change | DAW |
| (7) | FOOT CONTROLLER jacks, FOOT SWITCH jacks | Control change | DAW |
| (8) | Knobs 1–8 | Assignable knobs 1–8 | ESP |
| (9) | Slider function [PART VOLUME]/[EL/OP/OSC LEVEL] button, Control sliders 1–8 | Volume for Part, Element, Operator, and Oscillator | ESP |
| (10) | [SHIFT] button, Part group [1-8/9-16]/[USB AUDIO / A/D INPUT] button, PART buttons, [PART SELECT] button, [KEYBOARD CONTROL] button | • Selection of Part, Element, Operator, and Oscillator • Switching Mute and Solo for Part, Element, Operator and Oscillator. • Turning Keyboard Control on or off. | ESP |
| (11) | [PORTAMENTO] button, PORTAMENTO [TIME] knob | • Setting Portamento on or off. • Adjusting the Portamento Time. | ESP |
| (12) | Super knob | Super knob | ESP |
| (13) | SCENE buttons | Scene 1–8 | ESP |
| (14) | [UTILITY] button | Opening and closing the Utility screen. | ESP |
| (15) | [STORE] button | Opening and closing the Store screen. | ESP |
| (15) | [SHIFT] button + [STORE] button | Opening and closing the File Load/Save list. | ESP |
| (16) | [SHIFT] button + [EDIT/ | Opening and closing the Data Transfer screen. | ESP |
| (17) | [LIVE SET] button | Opening and closing the Live Set Edit screen. | ESP |
| (17) | [SHIFT] button + [LIVE SET] button | Opening and closing the Live Set Register screen. | ESP |
| (18) | [CATEGORY SEARCH] button | Opening and closing the Performance Category Search screen. | ESP |
| (18) | [SHIFT] button + [CATEGORY SEARCH] button | Opening and closing the Part Category Search screen. | ESP |
| (19) | Slot number and Category name selection buttons | Selecting a slot on the Live Set Edit screen or the Live Set Register screen. | ESP |
| (20) | BANK buttons | Selecting a bank on the Live Set Edit screen or the Live Set Register screen. | ESP |
| (21) | PAGE buttons | Selecting a page on the Live Set Edit screen or the Live Set Register screen. | ESP |
Sets the Control Change message, such as the control number and channel mode, that is output from Port 1.
The settings on each tab are as follows:
Sets Local Control on or off.
This is the same setting that can be made from: [UTILITY] → Settings → MIDI I/O screen.
Sets whether to use the specific controllers on the Top Panel for controlling the DAW.
- On: For controlling the DAW.
- Off: For controlling the Main display on the top panel.
Sets the control number for the knobs and control sliders. Settings: 1–95
Sets the control number for the SCENE buttons. Settings: 1–95
Momentary (Scene 1 Switch Mode)
Switches the operating mode of the SCENE buttons. Settings: Momentary, Latch
Sets the control number for the Display Knobs. Settings: 1–95
Sets the control number for the [PORTAMENTO] button. Settings: 1–95
Switches the operating mode of the [PORTAMENTO] button. Settings: Momentary, Latch
Sets the control number for the PORTAMENTO [TIME] knob. Settings: 1–95
Sets the control number for the ribbon controller. Settings: 1–95
Switches the operating mode of the ribbon controller. Settings: Hold, Reset
Assign SW 2 (Assignable Switch 2 Control Number)
MS Trigger (Motion Seq Trigger Switch Control Number)
Sets the control numbers for the [ASSIGN 1] button, [ASSIGN 2] button, and [MSEQ TRIGGER] button. Settings: 1–95
Assign SW 2 Latch (Assignable Switch 2 Mode)
MS Trigger Latch (Motion Seq Trigger Switch Control Number)
Switches the operating mode of the [ASSIGN 1] button, [ASSIGN 2] button, and [MSEQ TRIGGER] button. Settings: Momentary, Latch
Foot Ctrl 2 (Foot Controller 2 Control Number)
Sets the control number for Foot Controller 1 and Foot Controller 2. Settings: 1–95
Shows the control number for the foot switch. Settings: 1–95
Switches the operating mode of the foot switch. Settings: Momentary, Latch
Selects the particular DAW for use with this instrument. Settings: Cubase, Logic Pro, Pro Tools, Live
Sets the MIDI channel for input and output of the Common and the Part with the Keyboard Control Switch to be set to On.
The MIDI channel set here is used also for sending the Control Change message from DAW Remote.
This is the same setting that can be made from: [UTILITY] → Settings → MIDI I/O screen. Settings: Ch1–Ch16
 Print this page