The Performance screen lets you select a Performance for playing on the keyboard or modify the Performance settings to customize the Performance.
- Press the [PERFORMANCE] button.
- Tap the
 (Home) icon
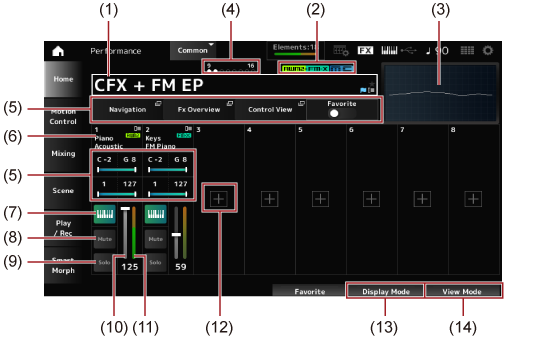
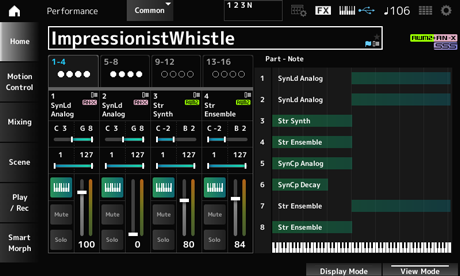
Shows the name of the selected Performance.
Tapping on the name calls up the context menu for Category Search, Edit, and Property.
The operation mode shows how you can change the Performance.
| Mode | Description |
|---|---|
| This icon indicates you can change the Performance in the order listed as default in the Category Search screen, by using the Data dial, [INC/YES] button, and [DEC/NO] button. | |
| This icon indicates you can change the Performance in the order of Live Set slots shown on the selected Live Set screen, by using the Data dial, [INC/YES] button, and [DEC/NO] button. |
You can check the status of the Performance with the following flags.
A star will be shown when you turn on the Favorite switch. The same star will be shown on the Performance Category Search screen.
The blue flag will be shown when you change a parameter in the Performance. The Edit flag will be turned off when you save the settings with the [STORE] button.
The Performance attributes will be shown.
| Attribute | Description |
|---|---|
| Performances using the AWM2 sound engine. | |
| Performances using the FM-X sound engine. | |
| Performances using an FM-X Part containing the Smart Morph information | |
| Performances using the AN-X sound engine | |
| Performances using an AN-X Part containing the Smart Morph information | |
| Performances featuring Motion Control | |
| Performances that support Seamless Sound Switching |
* Performances that combine multiple sound engine types are indicated with the “+” sign.
Shows the waveform of the Main L&R output.
When the cursor is on the Performance Name or on Parts 1 to 8, the status for Parts 9 to 16 will be shown.
When the cursor is on Parts 9 to 16, the status for Parts 1 to 8 will be shown.
Nothing will be shown when Parts 9 to 16 are not used.
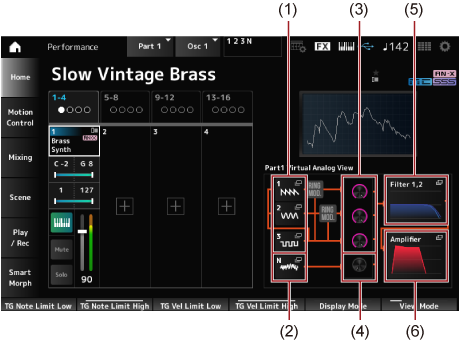
Different parameters will be shown in this view area depending on the Display Mode.
Part Type and Category, or Part Name will be shown.
You will see the context menu for Category Search, Edit, Copy, and Property when you tap on the Part Name.
When a Part other than Part 1 is selected and the sound is already set for that Part, the context menu for Category Search, Edit, Copy, and Delete is shown.
Tap [+] to add a Part.
Keyboard Control is used for selecting Parts to play on the keyboard.
When Keyboard Control is set to On, Parts with Keyboard Control set to On can simultaneously be played, if the Part is set to Common or Keyboard Control for the Part is set to On.
When Keyboard Control is set to Off, you can play the Part on the keyboard only when that Part is selected. Settings: Off, On
Switches Part Mute on or off. Settings: Off, On
Switches Part Solo on or off. Settings: Off, On
Sets the volume for the Part. Settings: 0–127
Shows the audio output level for the Part.
When you tap [+], the Part Category Search screen or the Performance Merge screen opens, allowing you to add a Part to the Performance.
When you change the Display Mode, different parameters will be shown in the view area of the Home screen.
You can select a different Display Mode by moving the corresponding display knob.

Opens the Navigation screen.
Opens the Fx Overview screen.
Opens the Control View screen.
Turns the Favorite switch on or off. Settings: Off, On
Sets the note range (the lowest and the highest notes) for the Part.
When the first note specified is higher than the second (for example, C5 to C4), the notes in the ranges C−2 to C4 and C5 to G8 will be played. Settings: C−2–G8
Sets the velocity range for the Part. Settings: 1–127
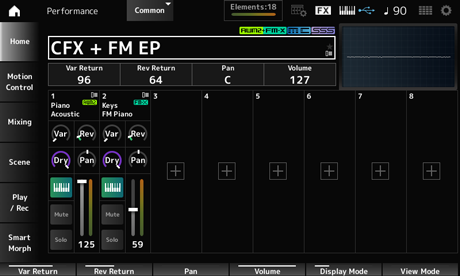
Sets the output level (Return Level) of the signals processed by the Variation Effect. Settings: 0–127
Sets the output level (Return Level) of the signals processed by the Reverb Effect. Settings: 0–127
Sets the Pan of the selected Performance. Settings: L63–C–R63
Sets the volume of the selected Performance. Settings: 0–127
Sets the level of the signals sent to the Part Variation Effect. Settings: 0–127
Sets the level of the signals sent to the Part Reverb Effect. Settings: 0–127
Sets the dry level (or the level of the signals not processed by the System Effect) of the Part. Settings: 0–127
Sets the Pan position (in the stereo field) for the Part. Settings: L63–C–R63
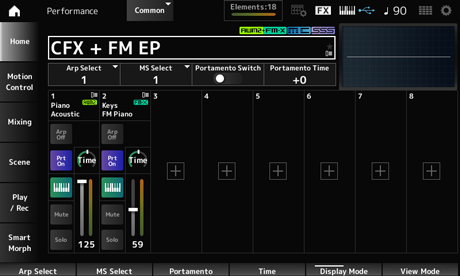
Changes the Arpeggio selection. Settings: 1–8
Changes the Motion Sequence selection. Settings: 1–8
Sets Portamento on or off for Parts having the Portamento Part Sw set to On.
This switch is linked to the [PORTAMENTO] button on the top panel. Settings: Off, On
Sets the time length (or speed) for the pitch transition of Portamento.
This is specified as an offset value to the Part Portamento time. Settings: −64–+63
Sets the Arpeggio on or off for the Part.
When both Arpeggio and Arpeggio Hold are set to On, this is shown as “Arp Hold On.” When the Arpeggio is set to on, you can switch Arp Hold On or Off by simultaneously holding down the [SHIFT] button and tapping the Arp On/Off button on the screen. Settings: Off, On
Sets Motion Sequencer for the Part on or off. Settings: Off, On
Sets Portamento for the Part on or off. Settings: Off, On
Sets the time length of the pitch transition for Portamento of the Part. Settings: 0–127
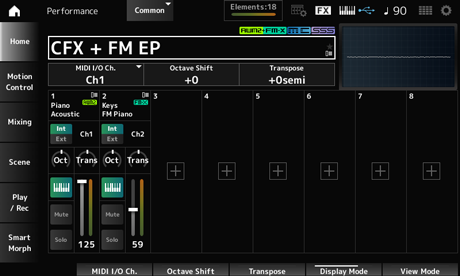
Sets the MIDI channel for input and output of the Part Common and the Part having the Keyboard Control Switch set to ON. Settings: Ch1–Ch16
Shifts the pitch of the keys in octaves.
This is linked to the OCTAVE buttons on the top panel. Settings: −3–+3
Shifts the pitch of the keys in semitones. Settings: −11semi–+11semi
For any notes outside the pitch range between C−2 and G8 (the range that can be played on this instrument), the resulting notes will sound one octave higher (or lower.)
Sets the Internal tone generator (Int) or the external sound module (Ext) for playing on the keyboard. Settings: Int, Ext
Sets the channel for transmitting and receiving MIDI messages for the Zone when Part Mode is set to Internal and the Keyboard Control Switch is set to Off. Settings: Ch1–Ch16, Off
Sets the channel for transmitting and receiving MIDI messages for the Zone when Part Mode is set to External. Settings: Ch1–Ch16
Shifts the pitch of the zone in octaves. Settings: −3–+0 (standard)–+3 (in octaves)
Shifts the pitch of the zone in semitones. Settings: −11–+0 (standard)–+11
Changes the sound by setting the cutoff frequency of the filter.
When the Low Pass Filter is selected, you can make the sound brighter by setting larger values here, or darker by setting smaller values.
This is specified as an offset value to the filter cutoff frequency for the Part. Settings: −64–+63
Adds characteristics to the sound by adjusting the signal level near the cutoff frequency.
This is specified as an offset value to the filter resonance for the Part.
Settings: −64–+63
Sets the range of the cutoff frequency change by the FEG.
This is specified as an offset value to the Part FEG Depth.
Settings: −64–+63
Changes the sound by setting the cutoff frequency of the filter. When the Low Pass Filter is selected, you can make a brighter sound by setting a larger value to this parameter, and a darker sound by setting a smaller value.
This is specified as an offset value to the filter cutoff frequency set on the Filter Type screen.
Settings: −64–+63
Adds special tonal variation in the sound by adjusting the signal level near the cutoff frequency.
This is specified as an offset value to the filter resonance set on the Filter Type screen.
Settings: −64–+63
Sets the range of the cutoff frequency change controlled by the Filter EG setting in the Filter Type screen.
When it is set to 0, the settings in the Filter Type screen will be used as is. Settings: −64–+63
You can access more detailed information from the Home screen by using View Mode.
You can select a different View Mode by moving the corresponding display knob.
When the cursor is on the Performance Name, pressing the [PERFORMANCE] button also changes the view.
Shown when the View Mode is set to Part Info and the current Part is a Normal Part (AWM2).
Switches the Element On or Off. Settings: Off, On
Sets the output level for the Element. Settings: 0–127
Shown when the View Mode is set to Part Info and the current Part is a Drum Part.
Sets the output level for the Drum Key. Settings: 0–127
Shown when the View Mode is set to Part Info and the current Part is a Normal Part (FM-X).
Changes the Algorithm.
Tapping the Algorithm image calls up the Algorithm Search screen. Settings: Refer to the Data List.
Sets the feedback level. Settings: 0–7
Shown when the View Mode is set to Part Info and the current Part is a Normal Part (AN-X).
Sets the output level for the Oscillator. Settings: 0–511
Sets the noise level. Settings: 0–511
Opens the OSC/Tune screen for Part Edit (AN-X).
Opens the Noise screen for Part Edit (AN-X).
Opens the Filter Type screen for Part Edit (AN-X).
Opens the Amp EG screen for Part Edit (AN-X).
Shown when the View Mode is set to Smart Morph.
The map will not be shown when there is no Smart Morph information.
Shown when the View Mode is set to Motion Seq.
Shows the lane set in the View Lane of the current Part.
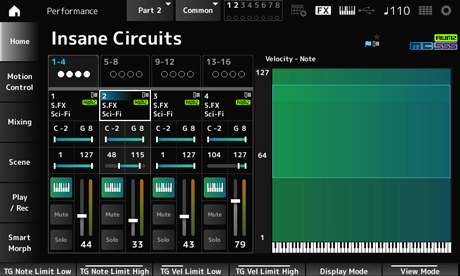
Shown when the View Mode is set to Velocity—Note.
This is convenient for setting velocity splits when using multiple Parts.
Shown when the View Mode is set to Part—Note or Part Info and the current Part is Common.
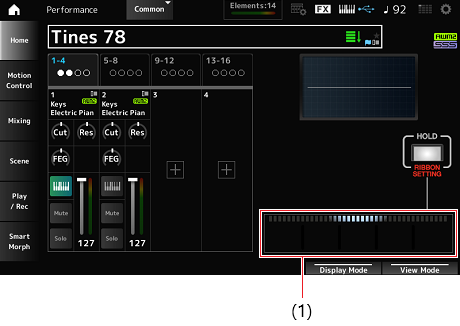
Shown when the View Mode is set to Ribbon.
The ribbon controller shown on the screen is linked to the ribbon controller on the top panel.
On the Motion Control screen, you can set the Motion Control settings applied to the entire Performance.
In the Super Knob screen, you can set the values for controlling the Super Knob.
You can set a link between the Super knob and each of the assignable knobs.
- [PERFORMANCE] → Motion Control → Super Knob
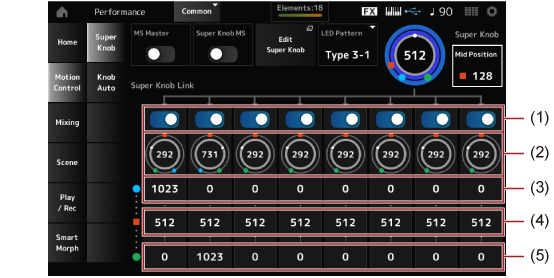
Sets the Motion Sequencer for the entire Performance on or off.
This switch is linked to the [MSEQ ON/OFF] button on the top panel. Settings: Off, On
Sets the Motion Sequencer used for the Super Knob on or off. Settings: Off, On
Sets the lighting pattern of the Super knob. Settings: Off, Type 1, Type 2-1, Type 2-2, Type 3-1, Type 3-2, Type 4-1, Type 4-2, Type 5-1, Type 5-2, Type 6, Type 7-1, Type 7-2, Type 8-1, Type 8-2, Type 9, Type 10, Type 11, Type 1B, Type 2-1B, Type 2-2B, Type 3-1B, Type 3-2B, Type 4-1B, Type 4-2B, Type 5-1B, Type 5-2B, Type 6B, Type 7-1B, Type 7-2B, Type 8-1B, Type 8-2B, Type 9B, Type 10B, Type 11B, Rotary 1, Rotary 2, Rotary 3, Rotary 4, Rotary 5, Rotary 6, Rotary 7, Rotary 8, Rotary 9, Rotary 10
Sets the Super Knob value. Settings: 0–1023
Set the Mid value for the Super Knob. Settings: Off, 1–1022
Opens the Common Edit Control Assign screen for setting the parameters controlled by the Super Knob.
Sets the corresponding knob to link to the Super Knob.
When these switches are set to Off, the operation of the Super Knob will not affect the parameter of the knob. Settings: Off, On
Shows the current values for the Assignable knobs (Knobs 1 to 8). Settings: 0–1023
Shows the value of the assignable knobs (Knobs 1–8) when the Super Knob Value is set to 0 (or the Super Knob is turned all the way to the left). Settings: 0–1023
Shows the value of the assignable knobs (Knobs 1–8) when the Super Knob Value is set to Mid Position.
This parameter is not available when the Mid Position is Off. Settings: 0–1023
Shows the value of the assignable knobs (Knobs 1–8) when the Super Knob Value is set to 1023 (or the Super Knob is turned all the way to the right). Settings: 0–1023
When you set Value Left to a smaller value and Value Right to a larger value, Knobs 1–8 will move in the same direction as the Super Knob.
When you set Value Right to a smaller value and Value Left to a larger value, Knobs 1–8 will move in the opposite direction to the Super Knob.
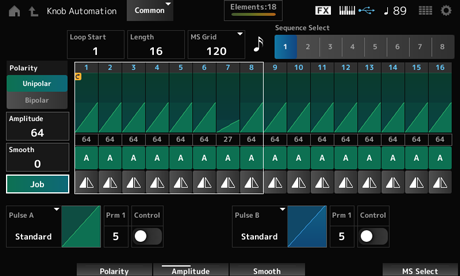
In the Knob Auto screen, you can set the Motion Sequencer for the Super Knob (Super Knob Motion Sequencer).
You can set the Motion Sequencer to automatically control the Super Knob value.
Only one Lane can be used by the Super Knob.
Up to eight Lanes can be used at the same time for the entire Performance. However, the Lane set for the Super Knob is not included in the eight referred to here.
- [PERFORMANCE] → Motion Control → Knob Auto

Sets the Motion Sequencer for the entire Performance on or off.
This switch is linked to the [MSEQ ON/OFF] button on the top panel. Settings: Off, On
Sets the Super Knob Motion Sequencer on or off. Settings: Off, On
Sets Knobs to be affected by the operation of the Super Knob. Settings: Off, On
Sets to receive the signals from the [MSEQ TRIGGER] button.
When set to On, the Motion Sequence will not be played back unless you press the [MSEQ TRIGGER] button. Settings: Off, On
Changes the Motion Sequence type selection. Settings: 1–8
Sets randomness of the changes in the Step value of the sequence. Settings: 0–127
Opens the Super Knob Motion Sequence Edit screen.
Selects the speed and the timing for the playback of the Super Knob Motion Sequence. Settings: Off, Tempo, Beat
Off: Plays back the Super Knob Motion Sequencer alone.
Tempo: Plays back at the Performance tempo.
Beat: Plays back in sync with the beat.
Sets the playback speed for the Motion Sequence.
This parameter is available when Super Knob Motion Sequencer Sync is set to Off. Settings: 0–127
Sets the delay time for starting playback of the Motion Sequence when Sync is set to Off. Settings: 0–127
Sets the time to reach the maximum amplitude for the Motion Sequence when Sync is set to Off. Settings: 0–127
Sets the percentage for stretching or compressing the Super Knob Motion Sequencer playback time.
This parameter is available when Super Knob Motion Sequencer Sync is set to something other than Off. Settings: 50%–6400%, Common
200%: The playback time is doubled, and the tempo is halved as a result.
100%: The playback time is kept unchanged.
50%: The playback time is halved, and the tempo is doubled as a result.
Common: The Unit Multiply value set in the Common Edit is applied.
Sets the delay time for starting the playback of the Motion Sequence when Sync is set to something other than Off. Settings: 0–32
Sets the time to reach the maximum amplitude for the Motion Sequence when Sync is set to something other than Off. Settings: 0–32
Sets the velocity range (lowest and highest values) for playing back the Motion Sequence. Settings: 1–127
Resets the Motion Sequence playback when you press any key on the keyboard.
This parameter is not available when the Trigger is On. Settings: Off, Each-On, 1st-On
Each-On: Each time you play any note, playback starts from the beginning.
1st-On: When you play a note, the sequence will be reset at the first note, and playback starts from the beginning. When second or subsequent notes are played while the first note is held, the sequence is not reset until another first note is played.
Sets the Motion Sequence to loop playback (in repeats) or one-shot playback. Settings: Off, On
Specifies the starting point for loop playback of the Motion Sequence. Settings: 1–16 (should be below the Length setting)
Sets the Motion Sequence length. Settings: 1–16 (should be above the Loop Start setting)
Sets the length of a step in the Motion Sequence (as a note value). Settings: 60, 80, 120, 160, 240, 320, 480
The setting screen for the Super Knob Motion Sequencer.
You can create a sequence of up to 16 steps.
Specifies the starting point for the loop playback of the Motion Sequence. Settings: 1–16 (should be below the Length setting)
Sets the Motion Sequence length. Settings: 1–16 (should be above the Loop Start setting)
Sets the length of a step in the Motion Sequence (as a note value). Settings: 60, 80, 120, 160, 240, 320, 480
Changes the Motion Sequence type selection. Settings: 1–8
Sets the polarity of the Motion Sequence. Settings: Unipolar, Bipolar
Unipolar: Only positive values are used for the parameter change.
Bipolar: Both positive and negative values are used for the parameter change.
Sets the degree of changes in the Motion Sequence. Settings: 0–127
Sets the smoothness of the changes in the Motion Sequence over time. Settings: 0–127
Shows various Jobs.
Sets the value for each step in the Motion Sequence.
You can use Control sliders 1 to 8 to change the values for Steps 1 to 8 and Steps 9 to 16.
Settings: 0–127
Sets the type and direction of each step in the Motion Sequence. Settings: A, B, Reverse A, Reverse B
Pulse B (Super Knob Motion Sequence Step Curve Type B)
Selects a parameter change curve for Pulse A and Pulse B.
Use the Super Knob Motion Sequence Step Type to select which of the curve types to use for each step.
The vertical axis represents the time while the horizontal axis represents the step value. Settings: (When a preset bank is selected) Standard, Sigmoid, Threshold, Bell, Dogleg, FM, AM, M, Discrete Saw, Smooth Saw, Triangle, Square, Trapezoid, Tilt Sine, Bounce, Resonance, Sequence, Hold, Harmonic, Steps
(When a user bank is selected) Init Curve 1–32
(When a library file is loaded) Curves used in Library 1–24
Prm 2 (Super Knob Motion Sequence Step Curve Parameter 2)
Adjusts the shape of the step curve in the Motion Sequence.
This setting may not be available depending on the curve type. Also, the range for the parameter value differs depending on the curve type.
Enables or disables the use of the knobs for controlling the step curve shape of the Motion Sequence.
Shown only when MS FX is set to On. This setting may not be available depending on the curve type. Settings: Off, On
Saves (stores) the edited Motion Sequence.
Loads the Motion Sequence.
Copies the Motion Sequence.
This is the setting screen for the User Curve.
You can create either an 8-point linear curve or an 8-step curve.
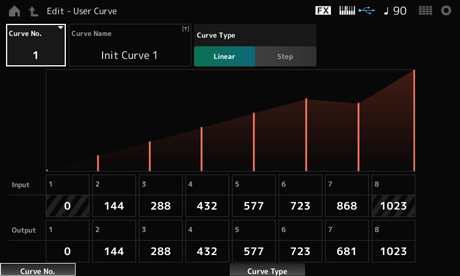
Indicates the current curve number. Settings: 1–32
You can save the curve you are editing under a new name.
Tapping on the name calls up the onscreen keyboard, allowing you to enter a name.
Sets the Curve type. Settings: Linear, Step
Sets the input level for the curve.
Input 1 is fixed to the value 0.
Input 8 is fixed to the value 1023 when the Curve Type is set to Linear. Settings: 0–1023
Sets the output level for the curve. Settings: 0–1023
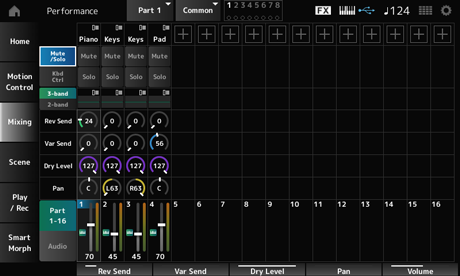
On the Mixing screen, you can change the mix by adjusting the volume of each Part and make effect settings.
The settings in the Mixing screen are saved (stored) in the Performance.
- [PERFORMANCE] → Mixing
Audio (Audio Switch)
Changes the view. Settings: Part 1–16, Audio (Part 1–8, Audio part, Master)
Sets the mix for Parts 1 to 16.
The Main category of the selected Part is shown.
Tapping on the name calls up the context menu for Category Search, Edit, and Property.
When a Part other than Part 1 is selected and the sound is already set for that Part, the context menu for Category Search, Edit, Copy, and Delete appears.
Tap [+] to add a Part. Settings: Refer to the Data List.
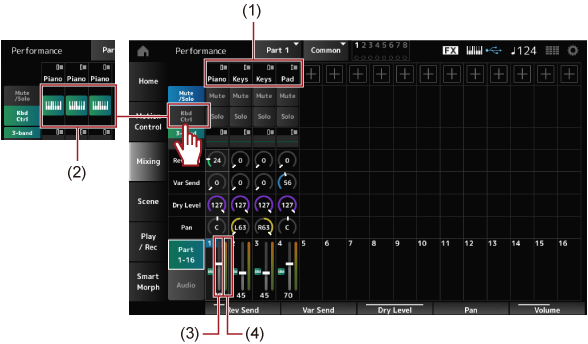
Kbd Ctrl Switch
Switches between Mute/Solo view and Keyboard Control view.
Solo (Part Solo)
Switches Mute and Solo for the Part on or off. Settings: Off, On
Switches Keyboard Control on or off.
For Parts 9 to 16, the buttons will not be shown since Keyboard Control cannot be set to On for those Parts. Settings: Off, On
2-band (2-band EQ Switch)
Switches between the 2-band EQ view and 3-band EQ view of Parts 1 to 16. Settings: 3-band, 2-band
Shows the EQ setting either in 3-band or 2-band views.
Tapping on the area calls up the context menu of Part EQ.
Sets the level of the signals sent from Parts 1 to 16 to the Reverb Effect. Settings: 0–127
Sets the level of the signals sent from Parts 1 to 16 to the Variation Effect. Settings: 0–127
Sets the dry level (or the level of the signals not processed by the System Effect) of Parts 1 to 16. Settings: 0–127
Sets the Pan position (in the stereo field) for Parts 1 to 16. Settings: L63–C–R63
Sets the volume for Parts 1 to 16. Settings: 0–127
Shows the level for Parts 1 to 16.
Sets the mix for the Audio Part.
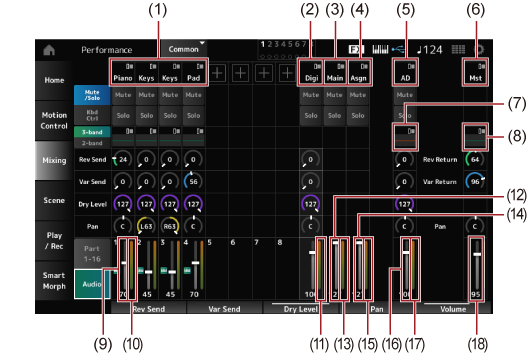
The Main category of the selected Part is shown.
Tapping on the name calls up the context menu for Category Search, Edit, and Property.
When a Part other than Part 1 is selected and the sound is already set for that Part, the context menu for Category Search, Edit, Copy, and Delete appears.
Tap [+] to add a Part. Settings: Refer to the Data List.
Main (USB Main Part)
Asgn (USB Assign Part)
AD (A/D Part)
Mst (Master)
Tapping on the name calls up the context menu for Edit.
Kbd Ctrl Switch
Switches between the Mute/Solo view and Keyboard Control view.
Solo (Part Solo)
Switches Mute and Solo for the Part on or off. Settings: Off, On
Tapping on the area calls up the context menu of Part EQ.
A/D Part Reverb Send
Sets the level of the signals sent from the Digital Part or A/D Part to the Reverb Effect. Settings: 0–127
A/D Part Variation Send
Sets the level of the signals sent from the Digital Part or A/D Part to the Variation Effect. Settings: 0–127
A/D Part Dry Level
Sets the dry level (or the level of the signals without the System Effect) of the Digital Part or A/D Part. Settings: 0–127
A/D Part Pan
Sets the Pan (location in the sound field) of the Digital Part or A/D Part. Settings: L63–C–R63
A/D Part Volume
USB Main Monitor Volume
USB Assign Monitor Volume
Sets the volume for the Audio Part. Settings: 0–127
Shows the 5-band parametric EQ.
Tapping on the name calls up the context menu for Master EQ Edit.
Var Return (Variation Return)
Sets the output level (Return Level) of the signals processed by the Reverb or Variation Effect. Settings: 0–127
Sets the level of the signals sent to the Reverb Effect. Settings: 0–127
Sets the level of the signals sent to the Variation Effect. Settings: 0–127
Sets the Pan (location in the sound field) of the Performance.
This parameter value offsets the pan setting for each Part. Settings: L63–C–R63
Sets the volume for the Performance. Settings: 0–127
Digi (Digital Part Level Meter)
Main (Main L&R Level Meter)
Asgn (Assign L&R Level Meter)
AD (A/D Part Level Meter)
Shows the level of Parts 1 to 8 and Audio Part.
On the Scene screen, you can register the settings for the Arpeggio type, Motion Sequence type, and Part parameters to each of the SCENE buttons.
On this screen, set the appropriate Memory (Memory Switch) On, and edit the desired parameter values so that you can save the settings to the Scene.
The Scene function can be set from a screen other than Scene. You can change the assigned Scene parameters by moving the corresponding knobs and sliders and registering the settings by simultaneously holding down the [SHIFT] button and pressing the desired SCENE button.
- [PERFORMANCE] → Scene
Select a Scene tab to register the settings.
The Scene1 to Scene8 tabs are linked to the SCENE buttons on the top panel. Settings: 1–8
Selects each of the parameter values such as Arpeggio, Motion Sequencer, Super knob, Super knob link, Mixing, Keyboard Control, Amplitude EG, Arp/MS FX, and Note Limit to register to the Scene.
When these switches are set to Off, the parameter values will not be shown on the display even when the corresponding tabs are selected. Settings: Off, On
Changes the view between Part 1–16 and Common.
The views are available in the Mixing 1, Mixing 2, Kbd Ctrl, AEG, Arp/MS FX1, and Arp/MS FX2 tabs.
By setting Offset to Off, you can use smaller increments to set some of the Scene parameters.
Shown on the Mixing 1, Mixing 2, and AEG tabs. Settings: Off (Absolute), On (Offset)
Sets the Arpeggio on or off for the entire Performance. Settings: Off, On
Changes the Arpeggio selection. Settings: 1–8
Sets the Motion Sequencer on or off for the entire Performance. Settings: Off, On
Changes the Motion Sequence Selection. Settings: 1–8
Sets the Super Knob value. Settings: 0–1023
Sets the link between the Super Knob and Assignable Knobs 1–8.
When this switch is set to Off, operation of the Super knob will not affect the parameters of the Assignable knobs. Settings: Off, On
Part 1–16 view: Scene parameters for Parts 1–16 are shown.
Common view: Scene parameters for Parts 1–8 and Common are shown.
Common parameters are applied to the entire Performance.
Sets the Reverb Send for each Part. Settings: 0–127
Sets the Variation Send for each Part. Settings: 0–127
Sets the Dry Level of each Part. Settings: 0–127
Sets the Pan for each Part. Settings: L63 –C–R63
Sets the Volume for each Part. Settings: 0–127
Adjusts the pan for the Part with the Part Mode set to External.Settings: L63–C–R63
Sets the volume of the Part with the Part Mode set to External.Settings: 0–127
Sets the Reverb Return. Settings: 0–127
Sets the Variation Return. Settings: 0–127
Sets the Pan for the Performance. Settings: L63 –C–R63
Sets the cutoff frequency for each Part. Settings: −64–+63
Sets the filter resonance or filter width for each Part. Settings: −64–+63
Sets the FEG depth for each Part. Settings: −64–+63
By setting Offset to Off, some Scene parameters can be finely-adjusted.
Settings: (FM-X, AN-X): 0–1023
Settings: (FM-X): 0–127Settings: (AN-X): 0–255
Settings: (AN-X): −9600–+9600
It is recommended to set Offset to On when you wish to use both Smart Morph and Scene.
Switches Mute for the Part on or off. Settings: Off, On
Sets the volume for the Part. Settings: 0–127
Sets the offset value for the cutoff frequency of the Part. Settings: −64–+63
Sets the offset value for the filter resonance or filter width of the Part. Settings: −64–+63
This is specified as an offset value to the Part FEG Depth. Settings: −64–+63
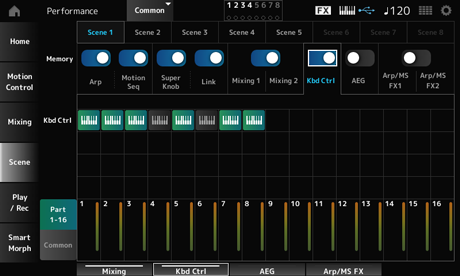
Switches Keyboard Control for the Part on or off.
When Keyboard Control for the Part is set to Off, no sound will be produced when you play the keyboard. Settings: Off (gray), On (green)
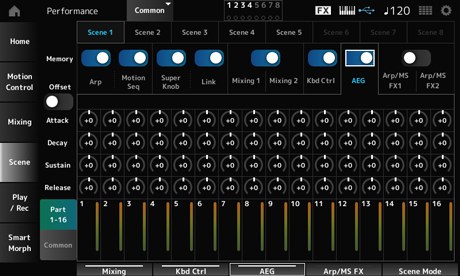
Sets the AEG attack time for the Part. Settings: −64–+63
Sets the AEG decay time for the Part. Settings: −64–+63
Sets the AEG sustain level for the Part. Settings: −64–+63
Sets the AEG release time for the Part. Settings: −64–+63
By setting Offset to Off, some Scene parameters can be finely-adjusted.
Settings: (AN-X): 0–255
Settings: (AN-X): 0–255
Settings: (AN-X): 0–511
Settings: (AN-X): 0–255
Sets the offset value to Attack for the Part.Settings: −64–+63
Sets the offset value to Decay for the Part.Settings: −64–+63
Sets the offset value to Sustain for the Part.Settings: −64–+63
Sets the offset value to Release for the Part.Settings: −64–+63
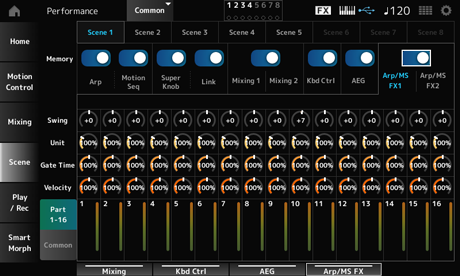
Sets the swing value of the Arpeggio or Motion Sequencer for each Part. Settings: −120–+120
Sets the Unit Multiply value of the Arpeggio or Motion Sequencer for each Part. Settings: 50%–400%, Common
200%: The playback time is doubled, and the tempo is halved as a result.
100%: The playback time is kept unchanged.
50%: The playback time is halved, and the tempo is doubled as a result.
Common: The value set in the Unit Multiply common to all Parts is applied.
Sets the Arpeggio gate time rate for each Part. Settings: 0%–200%
Sets the Arpeggio velocity rate for each Part. Settings: 0%–200%
Sets the offset value to Swing for each Part. Settings: −120–+120
Sets the Unit Multiply for all Parts. Settings: 50%–400%
200%: The playback time is doubled, and the tempo is halved as a result.
100%: The playback time is kept unchanged.
50%: The playback time is halved, and the tempo is doubled as a result.
Sets the offset value to Arpeggio Gate Time Rate for each Part. Settings: −100–+100
Sets the offset value to Arpeggio Velocity Rate for each Part. Settings: −100–+100
Sets the Motion Sequencer Amplitude for each Part. Settings: −127–+127
Sets the Motion Sequencer Pulse Shape for each Part. Settings: −100–+100
Sets the Motion Sequencer Smoothness for each Part. Settings: −127–+127
Sets the Motion Sequencer Randomness for each Part. Settings: 0–127
Sets the offset value to Motion Sequencer Amplitude for each Part. Settings: −127–+127
Sets the offset value to Motion Sequencer Pulse Shape for each Part. Settings: −100–+100
Sets the offset value to Motion Sequencer Smoothness for each Part. Settings: −127–+127
Sets the offset value to Motion Sequencer Randomness for each Part. Settings: −127–+127
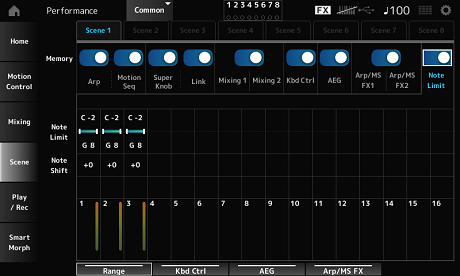
Sets the note range (lowest and highest notes).
When the first note of Note Limit is set higher than the second (for example, C5 to C4), the notes in the ranges C−2 to C4 and C5 to G8 will be played.
Settings: C−2–G8
Adjusts the pitch of the notes played by the internal sound in semitones.
Settings: −48–+48
Sets the note range (lowest and highest notes) for the Zone.
When the first note of Note Limit is set higher than the second (for example, C5 to C4), the notes in the ranges C−2 to C4 and C5 to G8 will be played.
Settings: C−2–G8
Shifts the pitch of the notes sent by MIDI in semitones.
Settings: −47–+47
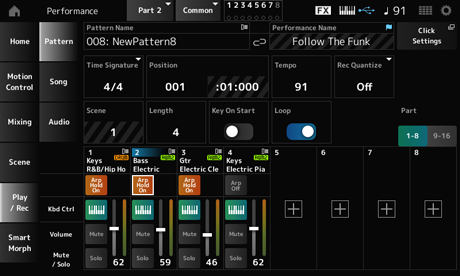
On the Play/Rec screen, you can record Patterns and Songs to the Internal memory of this instrument, and Audio to a USB flash drive, and play back your recordings.
- [SONG/PATTERN] button → Pattern
- [PERFORMANCE] → Play/Rec → Pattern
- [
 ] (Play) button → Pattern
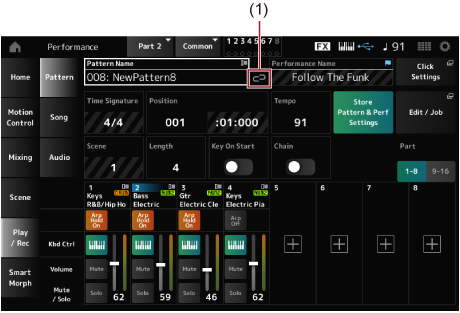
Shows the name of the selected Pattern.
By tapping on the name, you will see the context menu for Load, Rename, and New Pattern.
You can select a Pattern by using the [INC/YES] and [DEC/NO] buttons when the cursor is on the Pattern Name.
The link icon is shown if the Performance used for recording the Pattern and the selected Performance are the same. If not, the broken link icon will be shown.
Shows the name of the selected Performance.
The blue flag will be shown when you change a parameter in the Performance.
The Tempo Settings screen appears.
Shows the meter for the Pattern.
Sets the position for starting playback and recording, as well as the current position of the playback.
The number shown on the left is the measure, and the numbers shown on the right are the beats and clicks.
Sets the tempo for Pattern playback. Settings: 5–300
Saves the link between the edited Patterns and the Performance used.
If you have edited the Performance parameters, you will also need to store the Performance.
Opens the screen for Pattern edit and jobs.
Shows the name of the selected Scene.
This switch is linked to the SCENE buttons on the top panel.
Sets the sequence length of the selected Scene. Settings: 1–256
Sets the Pattern to start recording or playback the moment you press a key on the keyboard. Settings: Off, On
Enables/disables chain playback. Settings: Off, On
Undo cancels the last recording action and deletes what has been just recorded.
This button is active when you change any settings to a sequence.
Redo restores the recording that has been canceled by Undo. This button is active only after Undo has been used.
Part 9–16
Switches between Part views.
- [SONG/PATTERN] button → Pattern → [
 ] (Record) button
 - [PERFORMANCE] → Play/Rec → Pattern → [] (Record) button
Sets the meter of the Scene. Settings: 1/16–16/16, 1/8–16/8, 1/4–8/4
Quantize is a function that corrects the recorded notes to be on the exact fraction of the beat (in note values). Settings: Off, 60 (thirty-second note), 80 (sixteenth note triplet), 120 (sixteenth note), 160 (eighth note triplet), 240 (eighth note), 320 (quarter note triplet), 480 (quarter note)
When Loop is set to On, Pattern recording continues in a loop. Settings: Off, On
Pressing the [![]() ] (Record) button during Song recording sets the recorder to Rehearsal mode and makes the [
] (Record) button during Song recording sets the recorder to Rehearsal mode and makes the [![]() ] (Record) button flash. In Rehearsal mode, playback of the Pattern continues but recording is temporarily paused, making it useful for practicing. During Song recording, you can press the [
] (Record) button flash. In Rehearsal mode, playback of the Pattern continues but recording is temporarily paused, making it useful for practicing. During Song recording, you can press the [![]() ] (Record) button to switch between the Recording mode and Rehearsal mode.
] (Record) button to switch between the Recording mode and Rehearsal mode.
- [SONG/PATTERN] button → Pattern → [] (Record) button → [] (Play) button
- [PERFORMANCE] → Play/Rec → Pattern → [] (Record) button → [] (Play) button
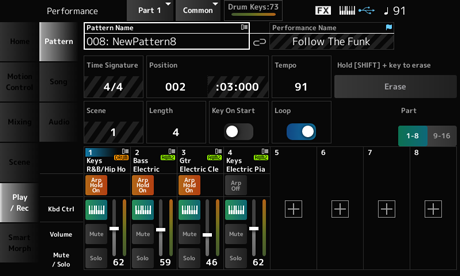
Erase
You can delete specific note events by holding down the [SHIFT] button and pressing the key corresponding to the note you wish to delete.
Alternately, you can tap on the Erase button on the screen to turn on the function, and then press the corresponding key on the keyboard to delete the note event.
When you operate a controller during overdub recording, you can delete the existing events of that controller and record the operation as new events.
- [PERFORMANCE] → Play/Rec → Pattern → (with the Song already recorded) → [] (Record) button → Tap Record Type → Select Overdub from the menu → [] (Play) button

Selects from Replace or Overdub recording. Settings: Replace, Overdub
By using the Pattern function, you can register a sequence for each Scene.
Undo cancels the last recording action and deletes what has been just recorded.
This button becomes available when one or more Jobs have been used after a sequence has been recorded.
Redo restores the recording that has been canceled by Undo. This button becomes available after Undo is used.
Carries out the selected Job to the MIDI sequence.
- [] (Play) button → Pattern → [EDIT/
 ] → Overview
 - [PERFORMANCE] → Play/Rec → Pattern → Edit/Job → Overview
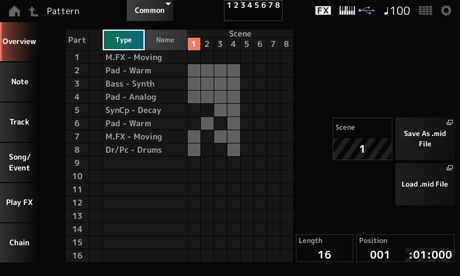
Tap this button to see the Main and Sub categories of the Part.
It also changes the list shown on the Play/Rec screen.
Tap to see the Part Name.
It also changes the list shown on the Play/Rec screen.
Part Solo Icon
Shows the status of mute and solo settings for the Part.
Shows the selected Scene number.
Opens the Save screen. You can save the sequence of the selected Scene as a MIDI file.
Opens the Load screen for loading a MIDI file.
After you have selected a MIDI file, select a Pattern and Scene in the load location.
Sets the sequence length of the selected Scene.
Shows the current position of the Scene playback, and lets you specify the playback position. Settings: 001–256
Quantization is the process of adjusting the timing of note events by moving them closer to the nearest exact beat. You can use this feature, for example, to improve the timing of a Pattern you have recorded in real time.
- [] (Play) button → Pattern → [EDIT/] → Note → Quantize
- [PERFORMANCE] → Play/Rec → Pattern → Edit/Job → Note → Quantize
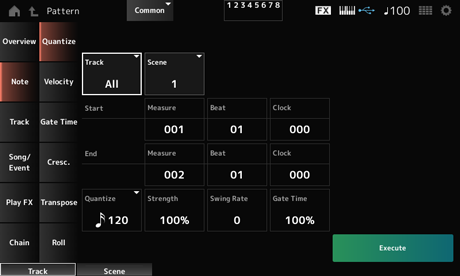
Specifies the track for the Quantize operation. Settings: All, 1–16
Specifies the Scene for the Quantize operation. Settings: 1–8
Specifies the starting measure position for the Quantize operation. Settings: 001–257
Specifies the starting beat position for the Quantize operation. Settings: Depends on the Time Signature setting.
Specifies the starting clock position for the Quantize operation. Settings: Depends on the Time Signature setting.
Specifies the ending measure position for the Quantize operation. Settings: 001–257
Specifies the ending beat position for the Quantize operation. Settings: Depends on the Time Signature setting.
Specifies the ending clock position for the Quantize operation. Settings: Depends on the Time Signature setting.
Sets the quantization resolution (or a note to be used as a base for the quantization). Settings: Thirty-second note, sixteenth note triplet, sixteenth note, eighth note triplet, eighth note, quarter note triplet, quarter note, sixteenth note + sixteenth note triplet, eighth note + eighth note triplet
Sets the “magnetic strength” of the quantization.
When this parameter is set to 100%, all notes will move to the position specified in Quantize.
A setting of 0% results in no quantization. Settings: 0%–100%
Changes the timing of the even-numbered beats (backbeats) counted from the value specified in Quantize to add a swing feel to the rhythms. Settings: Depends on the Quantize (quantization resolution) setting.
When Quantize is set to quarter note, eighth note, sixteenth note, or thirty-second note: 0 to half the grid
When Quantize is set to quarter note triplet, eighth note triplet, or sixteenth note triplet: 1 to half the grid
When Quantize is set to eighth note + eighth note triplet, or sixteenth note + sixteenth note triplet: 0 to half the triplet grid
Changes the gate time (or the actual time for the note to be played) of the even-numbered beats (backbeats) counted from the value specified in Quantize to add a swing feel to the rhythms. Settings: 0%–200%
Changes the Velocity value, letting you change the volume of the notes in the specified range.
Velocity is calculated by the formula as shown below.
Adjusted Velocity = (original Velocity × Rate) + Offset
If the result is 0 or less, the value is set to 1. If the result is higher than 128, the value is set to 127.
- [] (Play) button → Pattern → [EDIT/] → Note → Velocity
- [PERFORMANCE] → Play/Rec → Pattern → Edit/Job → Note → Velocity
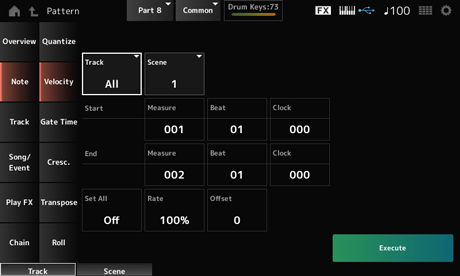
Sets the velocity of all notes in the selected section.
When set to Off, Set All will not work.
When set to other than Off, Rate and Offset will be disabled. Settings: Off, 001–127
Sets the percentage for changing the velocity.
When set to 99% or lower, the velocity will be slower. When set to 101% or higher, the velocity will be faster.
At 100% the velocity will be kept unchanged.
This parameter cannot be changed when Set All is set to a value other than Off. Settings: 0%–200%
Sets the value to add to or subtract from the original Velocity value.
When set to −1 or smaller, the velocity will be slower. When set to +1 or larger, the velocity will be faster.
When set to 0, the velocity will be kept unchanged.
This parameter cannot be changed when Set All is set to a value other than Off. Settings: −127–+127
Specifies the time for playing notes in the specified section (Gate Time).
Gate Time is calculated by the formula as shown below.
Adjusted Gate Time = (Original Gate Time × Rate) + Offset
If the result is 0 or less, the value is set to 1.
- [] (Play) button → Pattern → [EDIT/] → Note → Gate Time
- [PERFORMANCE] → Play/Rec → Pattern → Edit/Job → Note → Gate Time
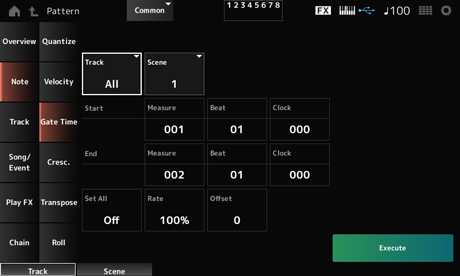
The screen here is the same as the one opened from Note → Velocity on the Pattern Edit, except that the available Set All settings are different.
Settings: Off, 001–9999
This Job lets you create a crescendo or decrescendo over a specified range of notes. (Crescendo is a gradual increase in volume, and decrescendo is a gradual decrease.)
- [] (Play) button → Pattern → [EDIT/] → Note → Cresc.
- [PERFORMANCE] → Play/Rec → Pattern → Edit/Job → Note → Cresc.
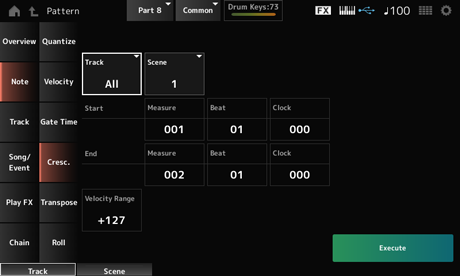
Sets the intensity of the crescendo or decrescendo. The velocity values of the notes in the specified range are gradually increased or decreased starting at the first note in the range. The velocity of the last note in the range becomes the original velocity of the note plus the Velocity Range value. If the resultant velocity is outside the 1–127 range, it is set to 1 or 127 accordingly. The setting of +1 or higher produces a crescendo, and the setting of −1 or lower produces a decrescendo. A setting of 0 produces no change. Settings: −127–+127
This Job lets you change the key or pitch of the notes in the specified range.
When the Transpose job is carried out, any notes outside the allowed range of C−2–G8 will be automatically changed to fit within the range.
- [] (Play) button → Pattern → [EDIT/] → Note → Transpose
- [PERFORMANCE] → Play/Rec → Pattern → Edit/Job → Note → Transpose
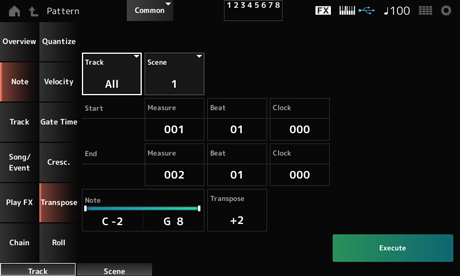
For the most part, the screen here is the same as the one opened from Note → Quantize on the Pattern Edit.
Specifies the range of keys (notes) for transposing.
Tap to open the context menu and then set Keyboard On to use the keys on the keyboard to set the range.
Settings: C−2–G8
Sets the range of notes to shift in semitones.
A setting of +12 transposes up one octave, while a setting of −12 transposes down an octave.
The value 0 produces no change. Settings: −127–+127
This Job creates a series of repeated notes (like a drum roll) over the specified range.
- [] (Play) button → Pattern → [EDIT/] → Note → Roll
- [PERFORMANCE] → Play/Rec → Pattern → Edit/Job → Note → Roll
For the most part, the screen here is the same as the one opened from Note → Quantize on the Pattern Edit, except that the available Track settings are different.
Settings: 1–16
Sets the size of the step (i.e., the number of clocks) between each note in the roll.
By setting a smaller value, you can play faster rolls.
The clock specified here is for the beginning of the range. Settings: 015–999
Sets the size of the step (i.e., the number of clocks) between each note in the roll.
By setting a smaller value, you can play faster rolls.
The clock specified here is for the end of the range. Settings: 015–999
Sets the note for rolls.
Tap to open the context menu and then set the Keyboard On, so that you can use the key on the keyboard. Settings: C−2–G8
Sets the velocity for the strength of rolls.
The velocity specified here is for the beginning of the range. Settings: 001–127
Sets the velocity for the strength of rolls.
The velocity specified here is for the end of the range. Settings: 001–127
By setting both Start Velocity and End Velocity, you can create crescendo or decrescendo for the rolls.
This Job copies data from a specified source track to the specified destination track or exchanges data between two specified tracks.
- [] (Play) button → Pattern → [EDIT/] → Track → Copy/Exchange
- [PERFORMANCE] → Play/Rec → Pattern → Edit/Job → Track → Copy/Exchange
Copies data from the specified track to another track.
When Copy Track is carried out, the existing data on the destination track will be overwritten and lost.
Exchanges data between two tracks.
Specifies the Pattern to copy from.
Specifies the track to copy from. Settings: All, 1–16
Specifies the Scene to copy from. Settings: All, 1–8
Specifies the Pattern to copy to.
Specifies the track to copy to.
This parameter is not available when Source is set to All. Settings: 1–16
Specifies the Scene to copy to.
This parameter is not available when Source is set to All. Settings: 1–8
Carries out the Copy operation.
When Copy Track is carried out with the track and Scene set to All, the Chain data will also be copied.
Carries out the Exchange operation.
When Exchange Track is carried out with the track and Scene set to All, the Chain data will also be exchanged.
Mixes (merges) the data from the specified track A and track B and places the result in track B.
- [] (Play) button → Pattern → [EDIT/] → Track → Mix
- [PERFORMANCE] → Play/Rec → Pattern → Edit/Job → Track → Mix
Specifies the first Pattern to mix.
Specifies the track for the Mix operation. Settings: 1–16
Specifies the Scene for the Mix operation. Settings: All, 1–8
Specifies the first Pattern to mix.
Specifies the track for the Mix operation. Settings: 1–16
Specifies the Scene for the Mix operation.
This parameter is not available when Source A is set to All. Settings: 1–8
Shows the name of the Pattern to mix to.
Shows the track number for the Mix operation.
Shows the Scene number for the Mix operation.
This parameter is not available when Source A is set to All.
Carries out the Mix operation.
Adds the data in the specified track to the end of another track.
- [] (Play) button → Pattern → [EDIT/] → Track → Append
- [PERFORMANCE] → Play/Rec → Pattern → Edit/Job → Track → Append
Specifies the Pattern to add from.
Specifies the track for the Append operation. Settings: All, 1–16
Specifies the Scene for the Append operation. Settings: 1–8
Specifies the Pattern to add to.
Specifies the track for the Append operation.
This parameter is not available when Source is set to All. Settings: 1–16
Specifies the Scene for the Append operation. Settings: 1–8
Carries out the Append operation.
Splits the data of the specified track at the specified measure and moves the second half to another specified track.
- [] (Play) button → Pattern → [EDIT/] → Track → Split
- [PERFORMANCE] → Play/Rec → Pattern → Edit/Job → Track → Split

Specifies the Pattern to split.
Specifies the track for the Split operation. Settings: All, 1–16
Specifies the Scene for the Split operation. Settings: 1–8
Specifies the measure at which the data is to be split. Settings: 2–256
Shows the Pattern to split into.
Shows the track for the Split operation.
Shows the Scene for the Split operation.
Specifies the Pattern to which the split data is to be sent.
Specifies the track for the Split operation.
This parameter is not available when Source is set to All. Settings: 1–16
Specifies the Scene for the Split operation. Settings: 1–8
Carries out the Split operation.
Deletes data of the specified track.
- [] (Play) button → Pattern → [EDIT/] → Track → Clear
- [PERFORMANCE] → Play/Rec → Pattern → Edit/Job → Track → Clear
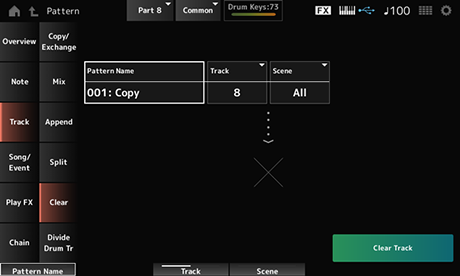
Specifies the pattern to delete.
Specifies the track for the Clear operation. Settings: All, 1–16
Specifies the Scene for the Clear operation. Settings: 1–8
Carries out the Clear operation.
When Clear Track is carried out with the track and Scene set to All, the Chain data will also be deleted.
Takes the recorded drums from the specified track and assigns each Instrument (individual percussion instrument in the drum set) to Tracks 9 to 16.
When there is existing data on Tracks 9 to 16 and Parts 9 to 16, carrying out the Divide Drum Track operation will overwrite the existing data. Undo and Redo cannot be used with this operation.
- [] (Play) button → Pattern → [EDIT/] → Track → Divide Drum Tr
- [PERFORMANCE] → Play/Rec → Pattern → Edit/Job → Track → Divide Drum Tr
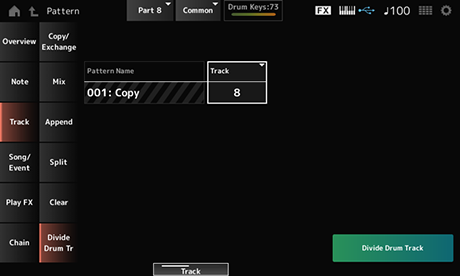
Specifies the Pattern for the Divide operation.
Specifies the track for the Divide operation. Settings: 1–16
Carries out the Divide operation.
Copies a specific section of the Song to the specified track.
The existing data at the copy destination will be overwritten and lost.
- [] (Play) button → Pattern → [EDIT/] → Song/Event → Get Phrase
- [PERFORMANCE] → Play/Rec → Pattern → Edit/Job → Song/Event → Get Phrase
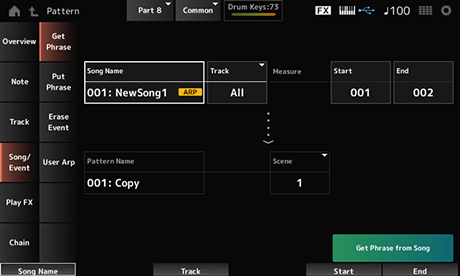
Specifies the Song to copy from.
Specifies the track for the Get Phrase operation. Settings: All, 1–16
Specifies the starting measure position for the Get Phrase operation. Settings: 001–998
Specifies the ending measure position for the Get Phrase operation. Settings: 002–999
Specifies the Pattern to copy to.
Specifies the track to copy to.
This parameter is not available when Source is set to All. Settings: 1–16
Specifies the Scene to copy to. Settings: 1–8
Carries out the Get Phrase operation.
Copies specified measures of the Pattern track to the specified Song track.
The copied data will be merged into the existing data on the destination track.
- [] (Play) button → Pattern → [EDIT/] → Song/Event → Put Phrase
- [PERFORMANCE] → Play/Rec → Pattern → Edit/Job → Song/Event → Put Phrase
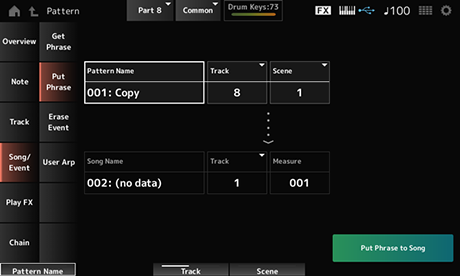
Specifies the Pattern to copy from.
Specifies the track for the Put Phrase operation. Settings: 1–16
Specifies the Scene for the Put Phrase operation. Settings: 1–8
Specifies the Song to copy to.
Specifies the track for the Put Phrase operation. Settings: 1–16
Specifies the measure to copy to. Settings: 001–999
Carries out the Put Phrase operation.
Erases the event.
- [] (Play) button → Pattern → [EDIT/] → Song/Event → Erase Event
- [PERFORMANCE] → Play/Rec → Pattern → Edit/Job → Song/Event → Erase Event

For the most part, the screen here is the same as the one opened from Note → Quantize in Pattern Edit.
Switches the Auto Select setting of the Event Type.
When this is set to On, you can simply move the controller whose data you wish to erase, and the corresponding controller’s event will automatically be set for Event Type. Settings: Off, On
Specifies the type of event you wish to erase. Settings: Note, Poly, CC, NRPN, RPN, PC, AfterTouch, PitchBend, SysEx, All
Shown when the Event Type is set to CC. Specify the Control Change number of the event to erase. Settings: All, 1–127
Carries out the Erase Event operation.
Registers the data in the specified measures of the Scene as a User Arpeggio.
The existing data at the Destination will be overwritten and lost.
- [] (Play) button → Pattern → [EDIT/] → Song/Event → User Arp
- [PERFORMANCE] → Play/Rec → Pattern → Edit/Job → Song/Event → User Arp
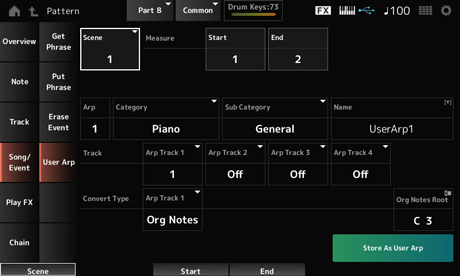
Specifies the Scene for the User Arpeggio operation. Settings: 1–8
Specifies the starting measure position for the User Arpeggio operation. Settings: 1–256
Specifies the ending measure position for the User Arpeggio operation. Settings: 2–257
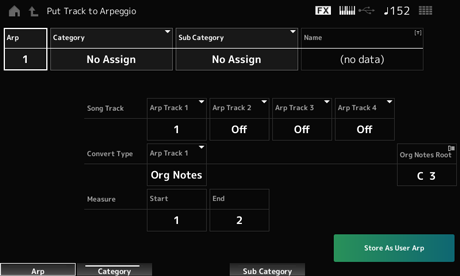
Sets the Arpeggio Number of the User Arpeggio to convert to.
Initially, the lowest unused number will be set.
When you specify a number that is already used, the existing Arpeggio at the Destination will be lost. Settings: 1–256
Sub Category (Arpeggio Sub Category)
Sets the Main and Sub categories of the converted Arpeggio. Settings: Refer to the Data List.
Enter the Arpeggio Type Name. Up to 20 characters using alphanumeric characters can be used.
Sets the track number to convert from for each Arpeggio track. Settings: 1–16
Selects how the MIDI sequence recorded in the Track is to be converted to an Arpeggio.
You can use a different Convert Type for each Arpeggio track. Settings: Normal, Fixed, Org Notes
Normal: Only the MIDI sequence using the notes played on the keyboard (at the octave used) is played.
Fixed: The same MIDI sequence is played back no matter how you play the keyboard.
Org Notes: Basically the same as Fixed, but the MIDI sequence changes according to the chords you play on the keyboard.
Sets the root note when the Convert Type of any track is set to Org Notes.
This parameter is not available when there is no track set to Org Notes. Settings: C−2–G8
Converts the Pattern to a User Arpeggio using the settings on the screen.
This button is not available when all tracks are set to Off because conversion is not possible.
Applies effects to the MIDI sequence during Pattern playback. Sets the range and level of the effect for each parameter of the specified track.
- [] (Play) button → Pattern → [EDIT/] → Play FX
- [PERFORMANCE] → Play/Rec → Pattern → Edit/Job → Play FX
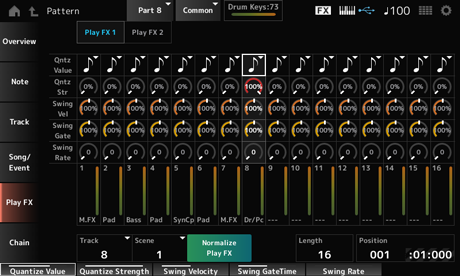
Specifies the track to be normalized. Settings: All, 1–16
Specifies the Scene to be normalized. Settings: All, 1–8
Fixes the effect specified in Play FX to the MIDI data.
Sets the sequence length of the selected Scene.
Shows the current position for the Scene playback, and lets you specify the playback position. Settings: 001–256
Controls Qntz Value, Qntz Str, Swing Vel, Swing Gate, and Swing Rate.
Sets the quantization resolution (or a note to be used as a base for the quantization). Settings: Off, 60 (thirty-second note), 80 (sixteenth note triplet), 120 (sixteenth note), 160 (eighth note triplet), 240 (eighth note), 320 (quarter note triplet), 480 (quarter note)
Sets the “magnetic strength” of the quantization.
When this parameter is set to 100%, all notes will move to the position specified in the Qntz Value (Quantize Value).
A setting of 0% results in no quantization. Settings: 0%–100%
Changes the velocity of the even-numbered beats (backbeats) counted from the value specified in Qntz Value (Quantize Value) to add a swing feel to the rhythms. This parameter is not available when the quantize resolution is set to Off. Settings: 0%–200%
Changes the gate time (or the actual time for the note to be played) of the even-numbered beats (backbeats) counted from the value specified in Qntz Value (Quantize Value) to add a swing feel to the rhythms. This parameter is not available when the quantize resolution is set to Off. Settings: 0%–200%
Changes the timing of the even-numbered beats (backbeats) counted from the value specified in Qntz Value (Quantize Value) to add a swing feel to the rhythms. This parameter is not available when the quantize resolution is set to Off. Settings: 0–Half of quantize resolution
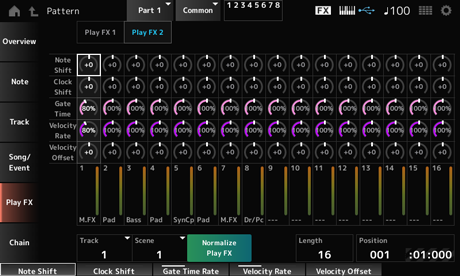
Controls Note Shift, Clock Shift, Gate Time, Velocity Rate, and Velocity Offset.
Adjusts the pitch in semitones. Settings: −99–+99
Shifts the timing of the notes back or forward in clock increments. Settings: −120–+120
Changes the gate time (the actual time for the sound of the note to be generated) of the note events. Settings: 0%–200%
Changes the velocity by the specified percentage. Settings: 0%–200%
Increases or decreases velocity by the specified value. Settings: −99–+99
This Job chains Scenes for playback.
- [] (Play) button → Pattern → [EDIT/] → Chain
- [PERFORMANCE] → Play/Rec → Pattern → Edit/Job → Chain
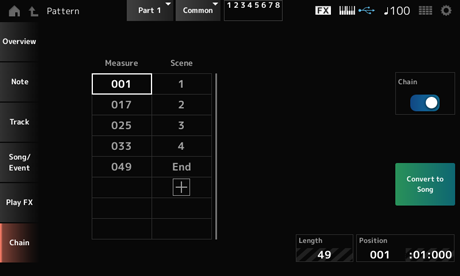
Enables chain playback. Settings: Off, On
Specifies the starting measure position for Scene playback. Settings: 001–999
Sets the Scene to play back at the specified measure. Settings: 1–8, End
When there are more than eight rows for the list of Measure and Scene, the up or down arrow will be shown.
Saves the chain as a Song.
Shows the length of the entire sequence.
Shows the current position of chain playback, and lets you specify the playback position. Settings: 001–999
In the Song screen, you can record your keyboard performance in MIDI Song, and play back the Song.
The data of both the keyboard performance and the operation of controllers and knobs is recorded to the MIDI track.
You can also select Arpeggio playback to be recorded to the Song.
- [SONG/PATTERN] button → Song
- [PERFORMANCE] → Play/Rec → Song
- [] (Play) button → Song
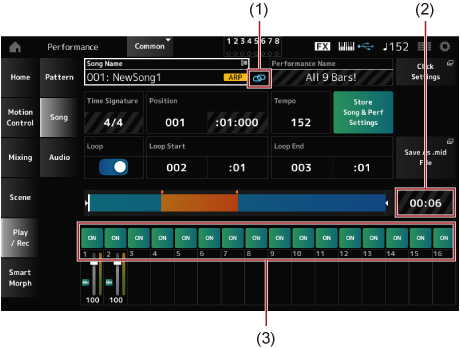
Shows the name of the selected Song.
Tapping on the name calls up the context menu for Load, Rename, New Song, and User Arp.
You can select a Song by using the [INC/YES] and [DEC/NO] buttons when the cursor is on the Song Name.
Shows the name of the selected Performance.
The blue flag will be shown when you change a parameter in the Performance.
The link icon is shown if the Performance used for recording the Song and the selected Performance are the same. If not, a broken link icon will be shown.
This calls up the Tempo Settings screen.
Shows the meter for the Pattern.
Sets the position for starting playback and recording, as well as the current playback position.
The number shown on the left is the measure, and the numbers shown on the right are the beats and ticks.
Sets the tempo for Song playback. Settings: 5–300
Sets Loop playback on or off.
When set to On, the playback of a section between the Loop Start and Loop End points will be repeated. Settings: Off, On
Sets the section for Loop playback. The number shown on the left is the measure, and the number shown on the right is the beat. This parameter is not available when Loop is set to Off.
Saves the link between the edited Songs and the Performance used.
If you have edited the Performance parameters, you will also need to store the Performance.
Pressing this button calls up the Save screen, allowing you to save the Song as a file.
Save As .mid File is not available in the following situations.
- For a new recording (when there is no Song)
- During playback
- When recording standby is enabled
- During recording
Shows the length of the entire sequence.
Turns playback of each track on or off. Settings: Off, On
- [SONG/PATTERN] button → Song → [] (Record) button
- [PERFORMANCE] → Play/Rec → Song → [] (Record) button
New recording
When something has already been recorded
Shows the meter for the Song. Settings: 1/16–16/16, 1/8–16/8, 1/4–8/4
Quantize is a function that corrects the recorded notes to be on the exact fraction of the beat (in note values). Settings: Off, 60 (thirty-second note), 80 (sixteenth note triplet), 120 (sixteenth note), 160 (eighth note triplet), 240 (eighth note), 320 (quarter note triplet), 480 (quarter note)
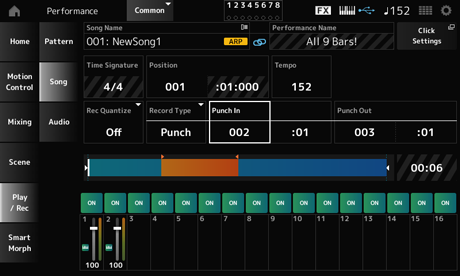
Selects a record type for the tracks already recorded.
This parameter is not available for a new recording. Settings: Replace, Overdub, Punch
Replace: Overwrite and record in real-time. The existing data will be lost.
Overdub: Overdub and record in real-time. The existing data will not be lost.
Punch: Re-record a section and record in real-time. This overwrites the existing data of a specified section.
Sets the Punch in point (specific measure and beat at which to start re-recording).
This parameter is available only when Record Type is set to Punch.
Sets the Punch out point (specific measure and beat at which to end re-recording).
This parameter is available only when Record Type is set to Punch.
When Arp Rec is On, the results of Arpeggio playback are recorded. When set to Off, only the keyboard performance is recorded.
This parameter can be set for recording a new Song. The setting cannot be changed after the recording.
To add something to the Song recorded with Arp Rec set to Off, only Replace can be used for Record Type. Settings: Off, On
With the Song with Arp Rec set to Off, you can select a different Arpeggio for playback by changing the Arpeggio selection in the Performance.
Undo cancels the last recording action and deletes what has been just recorded.
This button is active when you change any settings to a sequence.
Redo restores the recording that has been canceled by Undo. This button is only active after Undo has been used.
Converts the selected Song to a User Arpeggio.
Up to 16 different notes can be converted. (All notes with the same Note Number are counted as one.)
Make sure to use only up to 16 notes for a Song if you wish to convert it to a User Arpeggio, especially when you use multiple tracks.
- Open the screen from the [PERFORMANCE] → Play/Rec → Song → Tap on the Song Name to open the context menu → User Arp
Sets the Arpeggio Number of the User Arpeggio for conversion.
Initially, the next unused number will be set.
Keep in mind that if you change this to a number already being used, the Arpeggio will be overwritten, meaning that you will lose the existing User Arpeggio for that number. Settings: 1–256
Sub Category (Arpeggio Sub Category)
Sets the Main and Sub categories of the converted Arpeggio. Settings: Refer to the Data List.
Sets the Arpeggio Name. You can use up to 20 alphanumeric characters.
Sets the track number of the Song to convert from for each Arpeggio track. Settings: 1–16
Selects how to convert the MIDI sequence recorded in the Song to the Arpeggio from three different settings.
You can use a different Convert Type for each Arpeggio track. Settings: Normal, Fixed, Org Notes
Normal: The Arpeggio is played back at the same octave as the recorded MIDI Sequence.
Fixed: The recorded MIDI sequence is played back the same way no matter how you play the keyboard.
Org Notes: Basically, the same as Fixed; however, the playback of the MIDI sequence changes according to the chords you play on the keyboard.
Sets the root note when the Convert Type of any track is set to Org Notes.
This parameter is not available when no track is set to Org Notes. Settings: C−2–G8
Sets the starting measure for the conversion. Settings: 1–998
Sets the ending measure for the conversion. Settings: 2–999
Converts the Song to a User Arpeggio with the settings specified on this screen.
This button is not available when all tracks are set to Off.
On the Audio screen, you can record your keyboard performance as an audio file in WAV (44.1-kHz, 24-bit stereo) to the USB flash drive. You can record up to 74 minutes or longer, to the maximum capacity of the USB flash drive.
- [SONG/PATTERN] button → Audio
- [PERFORMANCE] → Play/Rec → Audio
- [] (Play) button → Audio
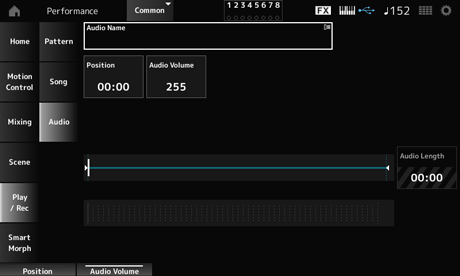
Shows the name of the selected Audio file.
Tapping on the name calls up the context menu for Load.
Sets the position for starting playback, as well as the current playback position.
Sets the position for starting playback. This parameter is not available during recording. Settings: 0–255
Shows the total length of the audio file.
Shows the audio input and output level.
- [PERFORMANCE] → Play/Rec → Audio → [] (Record) button
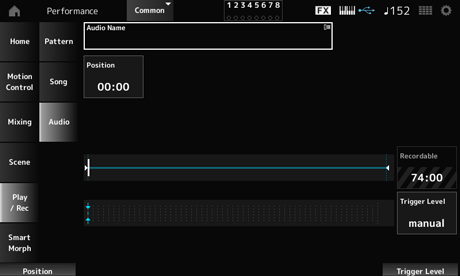
Shows the recordable time for audio.
This parameter is shown only while recording standby is enabled.
Selects how to start recording.
This parameter is shown only while recording standby is enabled.
When Trigger Level is set to manual, you can start recording by pressing the [![]() ] (Play) button.
] (Play) button.
When Trigger Level is set to a value between 1 to 127, you can start recording after you press the [![]() ] (Play) button and the signal level exceeds the specified value. The level set here will be indicated by blue triangles in the level meter.
] (Play) button and the signal level exceeds the specified value. The level set here will be indicated by blue triangles in the level meter.
For best results, set this parameter as low as possible to capture the entire signal, but not so low as to record unwanted noise. Settings: manual, 1–127
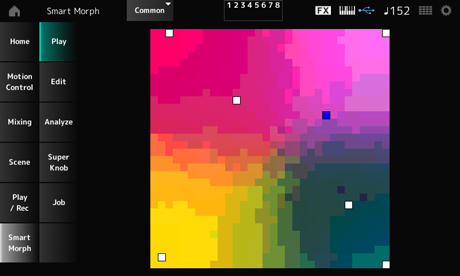
Tap on the Smart Morph map, and create changes in the FM-X sound or AN-X sound on Part 1.
- [PERFORMANCE] → Smart Morph → Play
- [PERFORMANCE] → Smart Morph → Edit
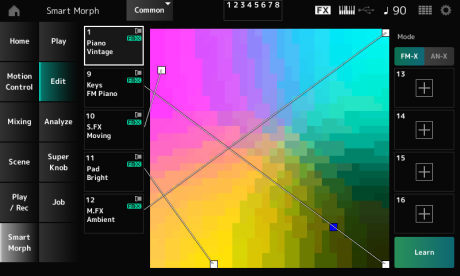
Tap to open the Part Category Search screen for selecting an FM-X sound or AN-X sound.
Tapping on the name calls up the context menu for Category Search, Edit, and Property.
Selects the Part Main Category view or Part Name view for Parts.
Switches between FM-X and AN-X.Settings: FM-X, AN-X
Tap the button to start machine learning (map creation).
This button will not be shown when there is no FM-X sound or AN-X sound on Parts 9 to 16.
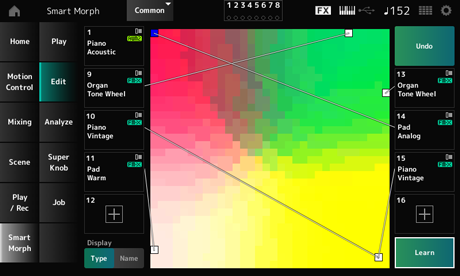
Redo
After the Learn operation, the Undo button will be shown on the upper right.
Use the Undo button to restore the original map before using machine learning.
After the Undo operation, the Redo button will appear, and you can use it to restore the map before the Undo operation.
- [PERFORMANCE] → Smart Morph → Analyze

Each dot on the map represents the parameter value indicating a degree or level as a shade of red.
For the list of available parameters, see “Parameters that can be set for Red, Green, and Blue.”
Each dot on the map represents the parameter value indicating a degree or level as a shade of green.
For the list of available parameters, see “Parameters that can be set for Red, Green, and Blue.”
Each dot on the map represents the parameter value indicating a degree or level as a shade of blue.
For the list of available parameters, see “Parameters that can be set for Red, Green, and Blue.”
When set to Auto, the Red, Green, and Blue are automatically reset for the Learn process.
When set to Manual, the Red, Green, and Blue are not reset automatically for the Learn process. Settings: Auto, Manual
Tap the button to start machine learning (map creation).
Redo
After the Learn operation, the Undo button will be shown on the upper right.
Use the Undo button to restore the original map before using machine learning.
After the Undo operation, the Redo button will appear, and you can use it to restore the map before the Undo operation.
FM Common
| Display Name | Parameter Name |
|---|---|
| Random Pan Depth | Random Pan Depth |
| Alternate Pan | Alternate Pan Depth |
| Scaling Pan Depth | Scaling Pan Depth |
| KeyOnDly Time | Key On Delay Time Length |
| KeyOnDly Sync | Key On Delay Tempo Sync Switch |
| KeyOnDly Note | Key On Delay Note Length |
| Pitch/Vel | Pitch Velocity Sensitivity |
| Random Pitch Depth | Random Pitch Depth |
| Pitch/Key | Pitch Key Follow Sensitivity |
| Pitch/Key Center | Pitch Key Follow Sensitivity Center Note |
| PEG Initial Lvl | PEG Initial Level |
| PEG Attack Lvl | PEG Attack Level |
| PEG Decay 1 Lvl | PEG Decay 1 Level |
| PEG Decay 2 Lvl | PEG Decay 2 Level |
| PEG Release Lvl | PEG Release Level |
| PEG Attack Tm | PEG Attack Time |
| PEG Decay 1 Tm | PEG Decay 1 Time |
| PEG Decay 2 Tm | PEG Decay 2 Time |
| PEG Release Tm | PEG Release Time |
| PEG Depth/Vel | PEG Depth Velocity Sensitivity |
| PEG Depth | PEG Depth |
| PEG Time/Key | PEG Time Key Follow Sensitivity |
| 2nd LFO Wave | 2nd LFO Wave |
| LFO Speed | 2nd LFO Speed |
| LFO Phase | 2nd LFO Phase |
| LFO Delay | 2nd LFO Delay Time |
| LFO Key On Reset | 2nd LFO Key On Reset |
| LFO Pitch Mod | 2nd LFO Pitch Modulation Depth |
| LFO Amp Mod | 2nd LFO Amplitude Modulation Depth |
| LFO Filter Mod | 2nd LFO Filter Modulation Depth |
| Algorithm Number | Algorithm Number |
| Feedback Level | Feedback Level |
| LFO Speed Range | LFO Speed Range |
| LFO Ex Speed | LFO Extended Speed |
| Filter Type | Filter Type |
| Cutoff | Filter Cutoff Frequency |
| Cutoff/Vel | Filter Cutoff Velocity Sensitivity |
| Resonance / Width | Filter Resonance/Width |
| Res/Vel | Filter Resonance Velocity Sensitivity |
| HPF Cutoff | HPF Cutoff Frequency |
| Distance | Distance |
| Filter Gain | Filter Gain |
| FEG Hold Tm | FEG Hold Time |
| FEG Attack Tm | FEG Attack Time |
| FEG Decay 1 Tm | FEG Decay 1 Time |
| FEG Decay 2 Tm | FEG Decay 2 Time |
| FEG Release Tm | FEG Release Time |
| FEG Hold Lvl | FEG Hold Level |
| FEG Attack Lvl | FEG Attack Level |
| FEG Decay 1 Lvl | FEG Decay 1 Level |
| FEG Decay 2 Lvl | FEG Decay 2 Level |
| FEG Release Lvl | FEG Release Level |
| FEG Depth | FEG Depth |
| FEG Segment | FEG Time Velocity Sensitivity Segment |
| FEG Time/Vel | FEG Time Velocity Sensitivity |
| FEG Depth/Vel | FEG Depth Velocity Sensitivity |
| FEG Curve | FEG Depth Velocity Sensitivity Curve |
| FEG Time/Key | FEG Time Key Follow Sensitivity |
| FEG Center | FEG Time Key Follow Sensitivity Center Note |
| Flt Cutoff/Key | Filter Cutoff Key Follow Sensitivity |
| Flt Break Point 1 | Filter Cutoff Scaling Break Point 1 |
| Flt Break Point 2 | Filter Cutoff Scaling Break Point 2 |
| Flt Break Point 3 | Filter Cutoff Scaling Break Point 3 |
| Flt Break Point 4 | Filter Cutoff Scaling Break Point 4 |
| Flt Cutoff Offset 1 | Filter Cutoff Scaling Offset 1 |
| Flt Cutoff Offset 2 | Filter Cutoff Scaling Offset 2 |
| Flt Cutoff Offset 3 | Filter Cutoff Scaling Offset 3 |
| Flt Cutoff Offset 4 | Filter Cutoff Scaling Offset 4 |
| HPF Cutoff/Key | HPF Cutoff Key Follow Sensitivity |
| Display Name | Parameter Name |
|---|---|
| Key On Reset | Oscillator Key On Reset |
| Freq Mode | Oscillator Frequency Mode |
| Coarse | Tune Coarse |
| Fine | Tune Fine |
| Detune | Detune |
| Pitch/Key | Pitch Key Follow Sensitivity |
| Pitch/Vel | Pitch Velocity Sensitivity |
| Spectral | Spectral Form |
| Skirt | Spectral Skirt |
| Resonance | Spectral Resonance |
| PEG Initial Lvl | PEG Initial Level |
| PEG Attack Lvl | PEG Attack Level |
| PEG Attack Tm | PEG Attack Time |
| PEG Decay Tm | PEG Decay Time |
| AEG Attack Lvl | AEG Attack Level |
| AEG Decay 1 Lvl | AEG Decay 1 Level |
| AEG Decay 2 Lvl | AEG Decay 2 Level |
| AEG Release Lvl | AEG Release (Hold) Level |
| AEG Attack Tm | AEG Attack Time |
| AEG Decay 1 Tm | AEG Decay 1 Time |
| AEG Decay 2 Tm | AEG Decay 2 Time |
| AEG Release Tm | AEG Release Time |
| AEG Hold Tm | AEG Hold Time |
| AEG Time/Key | AEG Time Key Follow Sensitivity |
| Level | Operator Level |
| Lvl Break Point | Level Scaling Break Point |
| Lvl/Key Lo | Level Scaling Low Depth |
| Lvl/Key Hi | Level Scaling High Depth |
| Curve Lo | Level Scaling Low Curve |
| Curve Hi | Level Scaling High Curve |
| Level/Vel | Level Velocity Sensitivity |
| LFO PM Depth | 2nd LFO Pitch Modulation Depth Offset |
| LFO AM Depth | 2nd LFO Amplitude Modulation Depth Offset |
| Pitch/Ctrl | Pitch Controller Sensitivity |
| Level/Ctrl | Level Controller Sensitivity |
| Display Name | Parameter Name |
|---|---|
| Random Pan | Random Pan Depth |
| Alternate Pan | Alternate Pan Depth |
| Scaling Pan | Scaling Pan Depth |
| Delay Length | Key On Delay Time Length |
| KeyOnDly Sync | Key On Delay Tempo Sync Switch |
| Delay Length | Key On Delay Note Length |
| Unison | Unison |
| Unison Detune | Unison Detune |
| Unison Spread | Unison Spread |
| OSC Reset | OSC Reset |
| Voltage Drift | Voltage Drift |
| Ageing | Ageing |
| Attack | Pitch EG Attack Time |
| Decay | Pitch EG Decay Time |
| Sustain | Pitch EG Sustain Level |
| Release | Pitch EG Release Time |
| Time/Vel | Pitch EG Time Velocity Sensitivity |
| Wave | Pitch LFO Wave |
| Speed | Pitch LFO Speed |
| Key On Reset | Pitch LFO Key On Reset |
| Phase | Pitch LFO Phase |
| Delay | Pitch LFO Delay Time |
| Fade In | Pitch LFO Fade In Time |
| Noise Tone | Noise Generator Tone |
| Connect | Noise Generator Out Select |
| Out Level | Noise Generator Out Level |
| Out Level/Vel | Noise Generator Out Level Velocity Sensitivity |
| Attack | Filter Cutoff EG Attack Time |
| Decay | Filter Cutoff EG Decay Time |
| Sustain | Filter Cutoff EG Sustain Level |
| Release | Filter Cutoff EG Release Time |
| Time/Vel | Filter Cutoff EG Time Velocity Sensitivity |
| Wave | Filter Cutoff LFO Wave |
| Speed | Filter Cutoff LFO Speed |
| Key On Reset | Filter Cutoff LFO Key On Reset |
| Phase | Filter Cutoff LFO Phase |
| Delay | Filter Cutoff LFO Delay Time |
| Fade In | Filter Cutoff LFO Fade In Time |
| Level | Amplitude Level |
| Level/Vel | Amplitude Level Velocity Sensitivity |
| LFO Depth | Amplitude Level LFO Depth |
| Level/Key | Amplitude Level Key Follow |
| Drive | Amplitude Saturator Drive |
| Attack | Amplitude EG Attack Time |
| Decay | Amplitude EG Decay Time |
| Sustain | Amplitude EG Sustain Level |
| Release | Amplitude EG Release Time |
| Time/Vel | Amplitude EG Time Velocity Sensitivity |
| Wave | Amplitude LFO Wave |
| Speed | Amplitude LFO Speed |
| Key On Reset | Amplitude LFO Key On Reset |
| Phase | Amplitude LFO Phase |
| Delay | Amplitude LFO Delay Time |
| Fade In | Amplitude LFO Fade In Time |
| Display Name | Parameter Name |
|---|---|
| Wave | Oscillator Wave |
| Octave | Oscillator Octave |
| Pitch | Oscillator Pitch |
| Pitch EG Depth | Oscillator Pitch EG Depth |
| Pitch EG Depth/Vel | Oscillator Pitch EG Depth Velocity Sensitivity |
| Pitch LFO Depth | Oscillator Pitch LFO Depth |
| Sync Pitch | Oscillator Self Sync Pitch |
| Sync Pitch/Vel | Oscillator Self Sync Pitch Velocity Sensitivity |
| Sync | Oscillator Self Sync EG Depth |
| Sync | Oscillator Self Sync LFO Depth |
| Pulse Width | Oscillator Pulse Width |
| PulseWidth/Vel | Oscillator Pulse Width Velocity Sensitivity |
| Pulse Width | Oscillator Pulse Width EG Depth |
| Pulse Width | Oscillator Pulse Width LFO Depth |
| Shaper | Oscillator Wave Shaper |
| Shaper/Vel | Oscillator Wave Shaper Velocity Sensitivity |
| Shaper | Oscillator Wave Shaper EG Depth |
| Shaper | Oscillator Wave Shaper LFO Depth |
| FM Level | Oscillator FM Level |
| FM Level/Vel | Oscillator FM Level Velocity Sensitivity |
| Ring Level | Oscillator Ring Level |
| Ring Level/Vel | Oscillator Ring Level Velocity Sensitivity |
| Connect | Oscillator Out Select |
| Invert | Oscillator Out Invert Enable |
| Out Level | Oscillator Out Level |
| Out Level/Vel | Oscillator Out Level Velocity Sensitivity |
| Attack | Oscillator EG Attack Time |
| Decay | Oscillator EG Decay Time |
| Sustain | Oscillator EG Sustain Level |
| Release | Oscillator EG Release Time |
| Wave | Oscillator LFO Wave |
| Speed | Oscillator LFO Speed |
| Key On Reset | Oscillator LFO Key On Reset |
| Phase | Oscillator LFO Phase |
| Delay | Oscillator LFO Delay Time |
| Fade In | Oscillator LFO Fade In Time |
| Display Name | Parameter Name |
|---|---|
| Type | Filter Type |
| Cutoff | Filter Cutoff |
| Cutoff/Vel | Filter Cutoff Velocity Sensitivity |
| Filter EG Depth | Filter Cutoff EG Depth |
| Filter EG Depth/Vel | Filter Cutoff EG Depth Velocity Sensitivity |
| Filter LFO Depth | Filter Cutoff LFO Depth |
| Cutoff/Key | Filter Cutoff Key Follow |
| Resonance | Filter Resonance |
| Resonance/Vel | Filter Resonance Velocity Sensitivity |
| Saturator Drive | Filter Saturator Drive |
| Saturator Drive/... | Filter Saturator Drive Velocity Sensitivity |
| Out Level | Filter Out Level |
| Display Name | Parameter Name |
|---|---|
| Wave Folder | Modifier Wave Folder |
| Folder/Vel | Modifier Wave Folder Velocity Sensitivity |
| EG Depth | Modifier Wave Folder EG Depth |
| LFO Depth | Modifier Wave Folder LFO Depth |
| Texture | Modifier Wave Folder Texture |
| Type | Modifier Wave Folder Type |
| Attack | Modifier EG Attack Time |
| Decay | Modifier EG Decay Time |
| Sustain | Modifier EG Sustain Level |
| Release | Modifier EG Release Time |
| Time/Vel | Modifier EG Time Velocity Sensitivity |
| Wave | Modifier LFO Wave |
| Speed | Modifier LFO Speed |
| Key On Reset | Modifier LFO Key On Reset |
| Phase | Modifier LFO Phase |
| Delay | Modifier LFO Delay Time |
| Fade In | Modifier LFO Fade In Time |
- [PERFORMANCE] → Smart Morph → Super Knob

When set to On, you can use the Super Knob for following the path on the map from start to end, instead of running your finger across the touchscreen. Settings: Off, On
Sets the position of the smallest Super Knob value on the map.
When the cursor is on Start, tap on the map to set the value for the Starting point.
Sets the position of the largest Super Knob value on the map.
When the cursor is on End, tap on the map to set the value of the ending point.
Sets the number of interspersed points (waypoints) between the start and end. Settings: 0–6
Sets the position on the map.
- [PERFORMANCE] → Smart Morph → Job
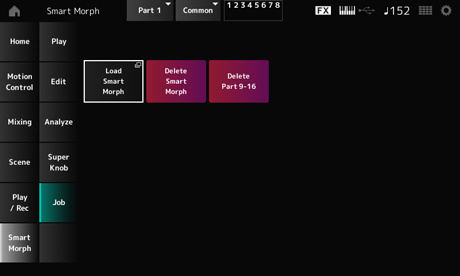
Opens the Load screen.
On the Load screen, you can select another Performance and import the Smart Morph settings from that Performance to the current Performance.
Deletes the Smart Morph settings from the selected Performance.
Deletes all Parts 9 to 16 at once to make these Parts unused.
When Parts 9 to 16 are set to unused, the SSS will be enabled.
Parts 9 to 16 are used for creating a Smart Morph map.
When you are finished adjusting the parameters and you no longer need to use the map, you can delete Parts 9 to 16.
 Print this page