By connecting your computer to the MONTAGE M, you can use a DAW or sequencer software on the computer to create your own music.
The acronym DAW (digital audio workstation) refers to music software for recording, editing, and mixing audio and MIDI. The notable DAW applications include Cubase, Logic, Pro Tools, and Live.
By connecting a computer to the [USB TO HOST] terminal, you can send and receive audio signals and MIDI messages.
An AB-type USB cable and the driver for sending and receiving audio and MIDI are required for the connection.
You can install the Yamaha Steinberg USB driver or use a generic driver included in your computer’s operating system.
Information on the system requirements is also available at the above URL.
The Yamaha Steinberg USB driver may be updated without prior notice.
For instructions on how to install the driver, refer to the Installation Guide included in the downloaded file.
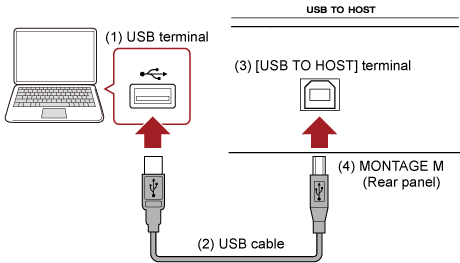
When connecting this instrument to a computer, connect the USB cable to the [USB TO HOST] terminal of this instrument and the USB terminal of the computer as shown below.
Connect the computer with a USB cable, and then set the parameters for handling audio and MIDI through the USB connection.
For audio, you only need to connect the cable. And, if necessary, change settings such as sampling frequency and gain.
For MIDI, connect the cable and then set the parameters for transmitting and receiving MIDI.
Open the screen from the [UTILITY] → Settings → MIDI I/O → MIDI IN/OUT and select USB.
Set the instrument to enable the transmission and reception of MIDI through the [USB TO HOST] terminal.
Open the screen from the [UTILITY] → Settings → Advanced → USB Driver Mode.
Select Vendor for using the Yamaha Steinberg USB driver, and select Generic for using the generic driver.
For the output of audio signals, you can use the [USB TO HOST] terminal and the OUTPUT jacks.
If you wish to connect a computer directly to the instrument, use the [USB TO HOST] terminal. This allows you to use up to 32 channels (or 16 stereo channels) at a sampling frequency of 44.1 kHz, or up to 8 channels (or 4 stereo channels) at a sampling frequency of 44.1 kHz to 192 kHz. To select which signal to output to a specific channel, open the screen from the [PERFORMANCE] → Part selection → [EDIT/![]() ] → General/Pitch → Part Settings, and select the appropriate Part Output.
] → General/Pitch → Part Settings, and select the appropriate Part Output.
For the input of audio signals, you can use the [USB TO HOST] terminal and A/D INPUT jacks.
Audio signals coming in through the [USB TO HOST] terminal can contain up to 6 channels (or 3 stereo channels), and Digital In L/R, Main L/R, and Assign L/R are used. These channels are used exclusively for monitoring when the instrument is connected to the DAW software, for example.
The signals received at Main L/R are output from the OUTPUT L/R jacks, while the signals received at the Assign L/R are output from the ASSIGNABLE OUT jacks.
The audio signals received at Digital In L/R can be changed as to volume, effect send, or output destination settings.
These settings are available also for the audio signals handled through the A/D INPUT jacks.
| Audio channel (input) | Output destination |
|---|---|
| Main L/R or 1/2 | OUTPUT L/R jacks |
| Digital L/R or 3/4 | Digital In section |
| Assign L/R or 5/6 | ASSIGNABLE OUT L/R jacks |
There are 16 MIDI channels for playing 16 Parts on this instrument. When you wish to use more than 16 channels, you can use MIDI ports, which allow 16 channels per port. While a single MIDI cable is capable of handling MIDI data for one port (or 16 channels), a single USB cable is capable of handling MIDI data for up to 8 ports (or 128 channels) simultaneously.
On the MONTAGE M, the determined ports are provided for the USB terminals, as shown below.
Dedicated for using the tone generator block of this instrument.
Make sure to set to Port 1 on the external MIDI device or the computer, if you wish the tone generator block to be played on the external MIDI device or the computer.
Dedicated for using the DAW remote control.
Dedicated for receiving MIDI messages from a MIDI device and sending them to another MIDI device (for MIDI Thru).
On Port 3, the MIDI messages received through the [USB TO HOST] terminal are treated as “Thru” on the MIDI [OUT] terminal, while the MIDI messages received through the MIDI [IN] terminal are treated as “Thru” on the [USB TO HOST] terminal.
Dedicated for using the Expanded Softsynth Plugin (ESP).
For sending MIDI messages between the MONTAGE M and the computer through the USB cable, you need to select the appropriate MIDI Port as well as the MIDI channel. Set the Port settings on the external device suitable for the situation.
This instrument supports MIDI 2.0 functionality. By connecting this instrument to a computer that meets the MIDI 2.0 operational requirements, you can use data of higher resolution than that of any MIDI 1.0 instrument. For more information on MIDI 2.0, refer to the MIDI2.0 Special site (https://www.yamaha.com/2/midi-2-0/).
For details on the supported MIDI 2.0 messages, refer to the Data List.
https://download.yamaha.com/
To use the MIDI 2.0 functionality, first make settings from [UTILITY] → Settings → USB Driver Mode to select Generic, and [UTILITY] → Settings → Advanced → Legacy Mode to Off, and then connect to a computer that meets the MIDI 2.0 operating requirements.
By connecting the MONTAGE M and the computer, you can use the DAW software as in the examples shown below.
- Using the DAW software on the computer to record your keyboard performance in MIDI or audio
- Using the tone generator block to play back the Song recorded on the DAW software
These instructions assume that the instrument and the computer are already connected. Shown below are some examples of using the DAW software and this instrument.
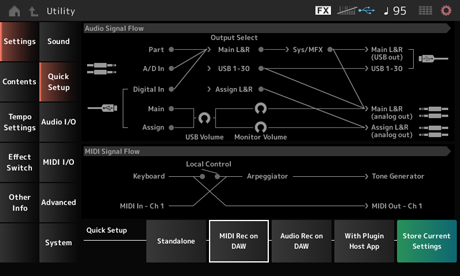
This shows how to record your keyboard performance on the DAW as MIDI data.
Alternately, you can simultaneously press the [QUICK SETUP] button and one of the Slot number and Category name selection buttons to select MIDI Rec on DAW.
MIDI Thru is a setting used for sending MIDI messages from the built-in keyboard to the computer and back to the Tone generator block of the instrument according to the settings on the recording tracks.
As shown below, for example, the MIDI data entered from the MONTAGE M are sent to Channel 1. If MIDI Thru is set to ON on the computer, then the MIDI data is sent to Channel 3 from the computer to play the tone generator block at Channel 3. By using this setup, you can record the keyboard performance while listening to the same sound as the final output.
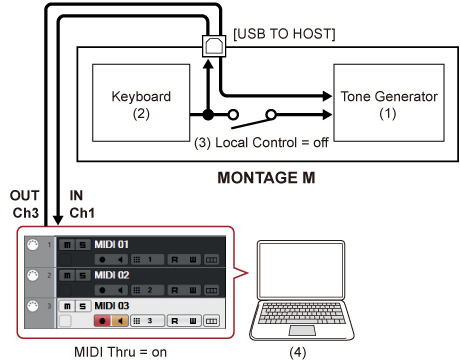
(recognizing data over MIDI Channel 3)
(output via MIDI Channel 1)
This shows how to use the DAW software as a Multi-timbral sound generator.
It allows you to use the high-quality MIDI sound generator without placing too much load on your computer’s CPU.
After selecting a Performance, you may find it helpful to use the Mixing screen from: the [PERFORMANCE] → Mixing to mix Part 1 to 16.
Also, set Kbd Ctrl Lock On from the [UTILITY] → Effect Switch screen to set Tx/Rx Ch. of each Part to enable the reception of messages.
The sound engine that corresponds to each track on the MIDI channel should be controlled on the Mixing screen on the MONTAGE M.
The Expanded Softsynth Plugin (ESP) for MONTAGE M features the same sound engine as the hardware MONTAGE M.
Since this software plugin works in sync with the hardware MONTAGE M, the same MONTAGE M sounds can be integrated seamlessly into your music production (where software is most convenient for a DAW), and into your live performance (where the actual instrument is used onstage). This lets you use either version of the MONTAGE M, depending on your personal preferences and specific application.
For more information on the installation and activation of the ESP, access the MONTAGE M Welcome page from the Expanded Softsynth Plugin for MONTAGE M Download Information leaflet included with the hardware MONTAGE M.
ESP Manual can be downloaded from the website below.
https://download.yamaha.com/
The DAW Remote function allows you to control the DAW software from the controllers on the top panel of the MONTAGE M.
This function is available only when the instrument is connected to the computer with a USB cable. It cannot be used when connected with a MIDI cable.
This section explains how to set up the DAW software.
Depending on the version of your DAW software, the setup procedure may be different or the setup itself may not be possible. For details, please refer to the relevant owner’s manual for the DAW software you are using.
Once the connection between the computer and MONTAGE M is lost, the DAW software may not recognize MONTAGE M even after reconnection. If this happens, restart the DAW after the reconnection.
 Print this page