The Utility screen is used for setting common items for the entire instrument.
The Sound screen is used for setting the sound output from the instrument.
- [UTILITY] → Settings → Sound
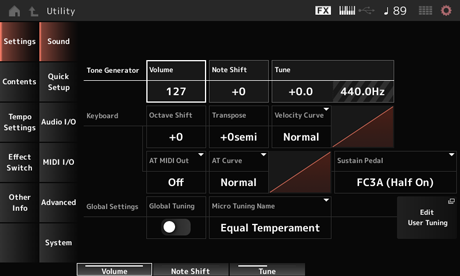
Sets the overall volume of the sound output from the instrument. Settings: 0–127
Adjusts the pitch of the overall sound produced by the Tone Generator block of the instrument in semitones. Settings: −24semi–+24semi
Adjusts the tuning of the overall sound produced by the Tone Generator block of the instrument in semitones. You can fine-adjust the pitch in cents. Settings: −102.4–+102.3
Adjusts the SSS Time for the entire sound played by the internal sound.
When a Live Set Slot is selected, the SSS Time for the Live Set Slot will be used.
Settings: 0.0s–30s (seconds), Hold
Hold: does not fade
Shifts the pitch of the keys in octaves.
It is linked to the OCTAVE buttons on the top panel. Settings: −3–+3
The Keyboard Octave Shift setting is reset to 0 at the next startup.
Shifts the pitch of the keys in semitones. Settings: −11semi–+11semi
For any notes outside the range C−2 to G8 (the range that can be played on the Tone Generator of this instrument), the note will be played at one octave higher (or lower).
The Keyboard Transpose setting is reset to +0 semi at the next startup.
Determines the actual velocity to be generated and transmitted according to the velocity with which you play notes on the keyboard.
The graph shown in the display indicates the velocity response curve. The horizontal axis represents the received velocity value (or the strength with which you have pressed the key), while the vertical axis represents the actual velocity value transmitted to the internal or external tone generators. Settings: Normal, Soft 1, Soft 2, Hard 1, Hard 2, Wide, Fixed
Normal: Commonly used setting where the linear “curve” produces one-to-one correspondence between the strength of your keyboard playing (velocity) and the actual sound change.
Soft 1: Provides increased response
Soft 2: A curve between Soft 1 and Normal
Hard 1: Provides decreased response
Hard 2: A curve between Hard 1 and Normal
Wide: Accentuates your playing strength by producing lower velocities in response to softer playing and louder velocities in response to harder playing. As such, you can use this setting to expand your dynamic range.
Fixed: Produces the same velocity value, no matter what your playing strength. The value set in Keyboard Fixed Velocity is used here.
Sends a fixed velocity to the tone generator regardless of how hard or soft you play the keyboard.
This parameter is available only when the Keyboard Velocity Curve is set to Fixed. Settings: 1–127
Selects the type of aftertouch output to external devices. Settings: Off, Channel, Poly
Sets the curve that determines the level of the aftertouch value relative to the strength when you press the key. Settings: Normal, Soft 1, Soft 2, Hard 1, Hard 2
Select the type of footswitch connected to the FOOT SWITCH [SUSTAIN] jack on the rear panel.
Select FC3A (Half On).
If you do not need to use the half-damper feature, select FC3A (Half Off).
Select FC4A or FC5.
The half-damper feature is not available with the FC4, FC4A, and FC5.
Select Reverse Polarity.
The half-damper feature is not available.
Settings: FC3A (Half On), FC3A (Half Off), FC4A/FC5, Reverse Polarity
The Sustain Pedal (Sustain Pedal Select) setting is not necessary when you use the half-damper feature by sending the Control Change from the external MIDI device.
When this parameter is on, the micro tuning settings in the global settings are prioritized over the micro tuning settings for each Part of the Performance.
This applies to all Parts except the Drum Part. Settings: Off, On
The Global Tuning setting is reset to Off the next time the instrument is turned on.
Shows the name of the selected micro tuning.
Tapping on the name lets you call up the menu for selecting the micro tuning. Settings: Equal Temperament, Pure Major, Pure Minor, Weckmeister, Kirnberger, Vallotti & Young, 1/4 shift, 1/4 tone, 1/8 tone, Indian, Arabic1, Arabic2, Arabic3
User: Init Tuning 1–8
Library: Library name (when a Library file is loaded)
Sets the root note for the micro tuning.
This parameter is not shown if the selected type in Micro Tuning Name does not require a root note. Settings: C–B
Opens the Edit User Micro Tuning screen.
This is the setting screen for User Micro Tuning.
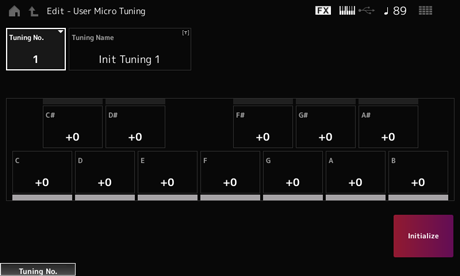
Indicates the selected User Micro Tuning Number. Settings: 1–8
You can save the User Micro Tuning you are editing under a new name.
Tapping on the name calls up the onscreen keyboard, allowing you to enter a name.
You can adjust the pitch of each note in cents to set the micro tuning. Settings: −99–+99
Initializes the selected User Micro Tuning.
This function allows you to set all necessary settings for connecting the external device to the optimal values by simply selecting a group of settings.
Parameters across several setting screens can be set at once.
- [QUICK SETUP]
- [UTILITY] → Settings → Quick Setup
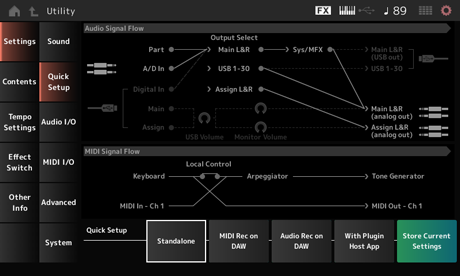
Displays the audio signal flow diagram.
The signal flow depicted changes depending on the connection on the [USB TO HOST] terminal and the other settings of the instrument.
Displays the MIDI signal flow diagram.
The signal flow diagram changes depending on the settings of the instrument.
Sets to one from Quick Setup. Settings: Standalone, 1–3
The parameters for Quick Setup are as follows.
| Audio settings | Direct Monitor Switch |
|---|---|
| MIDI settings | Local Control |
| Performance settings | Part 1–16 Output Select A/D In Output Select Digital In Output Select Part 1–8 Keyboard Control Switch Part 1–16 Part Mode Part 1–16 Tx Channel |
For Audio settings, see Audio I/O. For MIDI settings, see MIDI I/O.
Settings for using the instrument by itself and for operating the external device from the instrument
| Local Control | Direct Monitor | Output Select | Keyboard Sw | Part Mode | Tx Channel |
|---|---|---|---|---|---|
| On | On | Main L&R | Part 1–8: On | Part 1–16: Int | Part 1–16: Ch 1–16 |
Settings for recording your performance in MIDI on DAW software
| Local Control | Direct Monitor | Output Select | Keyboard Sw | Part Mode | Tx Channel |
|---|---|---|---|---|---|
| Off | On | Main L&R | Part 1–8: On | Part 1–16: Int | Part 1–16: Ch 1–16 |
Settings for recording each Part on the internal Tone Generator to DAW software as an individual audio track
| Local Control | Direct Monitor | Output Select | Keyboard Sw | Part Mode | Tx Channel |
|---|---|---|---|---|---|
| On | Off | Different for each Part | Part 1–8: On | Part 1–16: Int | Part 1–16: Ch 1–16 |
Settings for using the internal Tone Generator with a sound generator plug-in on a computer
| Local Control | Direct Monitor | Output Select | Keyboard Sw | Part Mode | Tx Channel |
|---|---|---|---|---|---|
| On | On | Main L&R | Part 1–5: On Part 6–8: Off | Part 1–4: Int Part 5–16: Ext | Part 1–4: Ch 1–4 Part 5–8: Ch 1–4 Part 9–16: Ch 9–16 |
Stores the current settings to any one of Quick Setup 1 to 3.
On the Audio I/O screen, you can set the audio signal input and output.
- [UTILITY] → Settings → Audio I/O
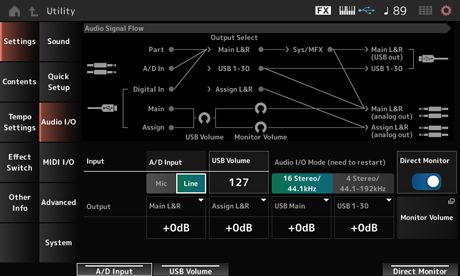
Displays the current audio signal flow diagram.
The flow diagram changes depending on the connection on the [USB TO HOST] terminal and the other settings of the instrument.
When you tap on the Main Monitor Volume in the Audio Signal Flow, the cursor moves to Main, and when you tap on Assign, the cursor moves to Assign.
Sets the input gain for the A/D INPUT jack to Mic or Line. Settings: Mic, Line
Mic: Intended for a device with a low output level, such as a microphone.
Line: Intended for a device with a high output level, such as a synthesizer, or audio device.
A guitar or bass having an active pickup can be directly connected. On the other hand, when using a passive pickup, connect the instrument via an effect unit or direct box.
Adjusts the volume of the audio signal input from the [USB TO HOST] terminal. This is applied to the output signals from both the OUTPUT (BALANCED) jacks and the ASSIGNABLE OUTPUT (BALANCED) jacks. Settings: 0–127
USB Input Volume is stored as a global setting and not for each Performance.
Sets the audio signal output from Main L&R (USB Out) and USB 1–30 channels to the external device (such as a computer) to be also played back from this instrument (direct monitoring).
When this is set to on, the audio signal output to the Main L&R (USB Out) channel and USB 1–30 channels is also sent to the OUTPUT (BALANCED) jacks and [PHONES] jack of this instrument.
When there is no USB connection, the Direct Monitor switch is automatically turned on. Settings: Off, On
Sets the output gain of the OUTPUT (BALANCED) jacks. Settings: −6dB, +0dB, +6dB, +12dB
Sets the output gain of the ASSIGNABLE OUTPUT (BALANCED) jacks. Settings: −6dB, +0dB, +6dB, +12dB
Sets the output gain of the Main L&R channel of the [USB TO HOST] terminal. Settings: −6dB, +0dB, +6dB, +12dB
Sets the output gain of the channels 1–30 of the [USB TO HOST] terminal. Settings: −6dB, +0dB, +6dB, +12dB
Shows the Monitor Volume screen.
On the MIDI I/O screen, you can set the MIDI input and output.
- [UTILITY] → Settings → MIDI I/O
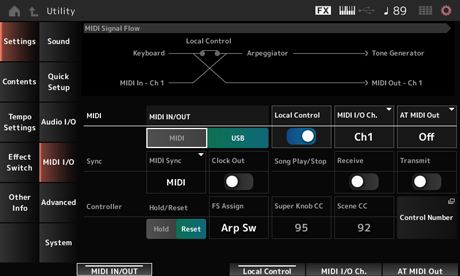
Displays the current MIDI signal flow diagram.
The flow diagram changes depending on the settings of the instrument.
By tapping near the Local Control switch on the MIDI Signal Flow, you can turn Local Control on or off.
Selects the terminal(s) for transmitting and receiving MIDI messages. Settings: MIDI, USB
Switches Local Control on or off.
When the Local Control is set to off, the Controller block and the Tone Generator block will be disconnected, and no sound is produced when you play the keyboard. However, regardless of this setting, the keyboard performance data on this instrument are transmitted as MIDI messages, and MIDI messages sent from the external device are processed by the Tone Generator block. Settings: Off, On
Sets the MIDI channel for input and output of the Part with Common and the Part with the Keyboard Control Switch to be set to On. Settings: Ch1–Ch16
Selects the type of aftertouch output to external devices. Settings: Off, Channel, Poly
Sets the parameters related to synchronization to the connected external device.
Select the internal clock of this instrument or the external MIDI clock of DAW software on the computer or the external MIDI device, or the audio signal input from the A/D INPUT jacks for playing back the Arpeggios, Motion Sequencer, Songs, and Patterns. Settings: Internal, MIDI, A/D In (ABS)
Internal: Synchronizes to the internal clock. For using this instrument by itself or as the primary clock source for other devices.
MIDI: Synchronizes to the MIDI clock received from the external MIDI device. For using the external device as the primary clock source.
A/D In: Synchronizes to the tempo, extracted by the Audio Beat Sync function, of the audio signal input from the A/D INPUT jacks.
Sets the MIDI clock messages to be transmitted. Settings: Off, On
Receives the MIDI messages for starting and stopping the Song. Settings: Off, On
Transmits the MIDI messages for starting and stopping the Song. Settings: Off, On
Sets whether to use the current settings of the controllers such as modulation wheel, aftertouch, foot controller, and breath controller (Hold) or to reset to their initial settings (Reset) when you switch between Performances. Settings: Hold, Reset
When set to Reset, the controllers will be reset when you switch between Performances as shown below:
| Pitch bend | Center |
| Modulation wheel | Minimum |
| Aftertouch | Minimum |
| Foot controller | Maximum |
| Footswitch | Off |
| Ribbon controller | Center |
| Breath controller | Maximum |
| Expression | Maximum |
| Assignable switches 1 and 2 | Off |
| Each lane of the motion sequencer | When the Motion Seq Polarity for the lane is set to Unipolar: the value is 0 (minimum) When the Motion Seq Polarity for the lane is set to Bipolar: the value is 64 (center) |
Sets the Control Change number generated by the operation of the footswitch connected to the FOOT SWITCH [ASSIGNABLE] jack. When this instrument receives a MIDI message with the same Control Change number specified here from the external MIDI device, the instrument will act as if the footswitch has been operated. Settings: Off, 1–95, Arp Sw, MS Sw, Play/Stop, Live Set+, Live Set−, Oct Reset, Tap Tempo
Sets the Control Change number generated by the operation of the Super Knob.
When this instrument receives the MIDI message with the same Control Change number specified here from the external device, the instrument will act as if the Super Knob has been operated. Settings: Off, 1–95
When this parameter is set to Off, the System Exclusive (SysEx) is used for handling MIDI messages.
Sets the Control Change number generated when you switch between Scenes.
Also, Scene will change when a MIDI message with the same Control Change number set here is received from the external MIDI device. Settings: Off, 1–95
Depending on the Control Change number, one of the Scenes 1–8 will be selected.
0–15: Scene 1, 16–31: Scene 2, 32–47: Scene 3, 48–63: Scene 4, 64–79: Scene 5, 80–95: Scene 6, 96–111: Scene 7, 112–127: Scene 8
If the Super Knob CC and the Scene CC are set to the same value, an exclamation mark appears in front of the number. In that case, the Scene CC takes priority, and the Super Knob CC is disabled.
Opens the Control → Control Number screen for the Common Edit.
On the Advanced screen, you can set the detailed settings for the instrument.
- [UTILITY] → Settings → Advanced
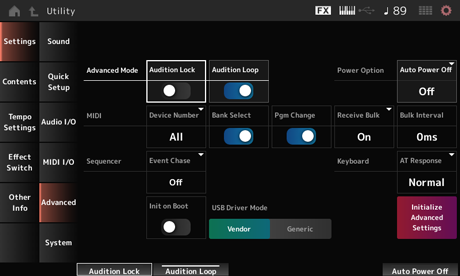
Switches the audition lock on or off.
When set to on, the audition function is disabled. Settings: Off, On
When this parameter is set to on, the audition phrase will be played back in a loop.
When this is set to on, the playback of the audition phrase will stop automatically after it has been played to the end. Settings: Off, On
Switches the Keyboard Hold function on or off.
When set to on, the Keyboard Hold function is disabled.
Settings: Off, On
Auto Power Off is a function that automatically turns off the instrument when the instrument is inactive for a certain length of time to reduce energy consumption.
Here, you can set the length of time until the instrument is automatically turned off. Settings: Off (Auto Power Off disabled), 5 min, 10 min, 15 min, 30 min, 60 min, 120 min
Sets the MIDI device number.
For sending and receiving System Exclusive messages such as Bulk Dump and Parameter Change to and from an external MIDI device, you need to set this number to match the device number of the other device. Settings: 1–16, All, Off
Sets the reception and transmission of Bank Select messages between the instrument and the external MIDI device.
When this is set to on, the instrument will receive or recognize Bank Select messages sent from the external MIDI device. Settings: Off, On
Sets the reception and transmission of Program Change messages between the instrument and the external MIDI device.
When this is set to on, the instrument will receive or recognize Program Change messages sent from the external MIDI device. Settings: Off, On
Sets the reception of Bulk Dump messages. Settings: Protect (does not receive), On (receive)
Sets the interval time for transmission of Bulk data when this instrument receives the Bulk Request message from the external device. Settings: 0–900ms
This ensures that specified events to be recognized properly when, for example, a Song is played back from the middle, or with the Forward (fast-forward) and Back (rewind) operations.
Events set with MIDI Event Chase will then function properly with the Forward and Back operations. Settings: Off, PC (Program Change), PC+PB+Ctrl (Program Change + Pitch Bend + Control Change)
Initializes the User data when the instrument is turned on. Settings: Off, On
Switches the mode for the audio signal output from the [USB TO HOST] terminal.
The instrument must be rebooted for this setting to take effect. Settings: 16 Stereo/44.1kHz, 4 Stereo/44.1–192kHz
16 Stereo/44.1kHz: Up to 32 channels (16 stereo channels) at a sampling frequency of 44.1 kHz
4 Stereo/44.1–192kHz: Up to 8 channels (4 stereo channels) at a sampling frequency of 44.1 kHz to 192 kHz
When set to 4 Stereo/44.1–192kHz, the available frequencies are: 44.1 kHz, 48 kHz, 96 kHz, and 192 kHz.
Set to Vendor for connecting to the computer with the Yamaha Steinberg USB Driver installed.
Set this to Generic when you connect this instrument to a computer that meets the MIDI 2.0 operational requirements or when you use a smartphone or any device that does not allow the Yamaha Steinberg USB Driver to be installed.Settings: Vendor, Generic
Turn this on for using the instrument in MIDI 1.0.Settings: Off, On
Initializes the settings on the Advanced screen.
On the System screen, you can set the parameters related to the entire instrument.
- [UTILITY] → Settings → System
- [UTILITY] + [DAW REMOTE] (→ Calibrate Touch Panel setting)
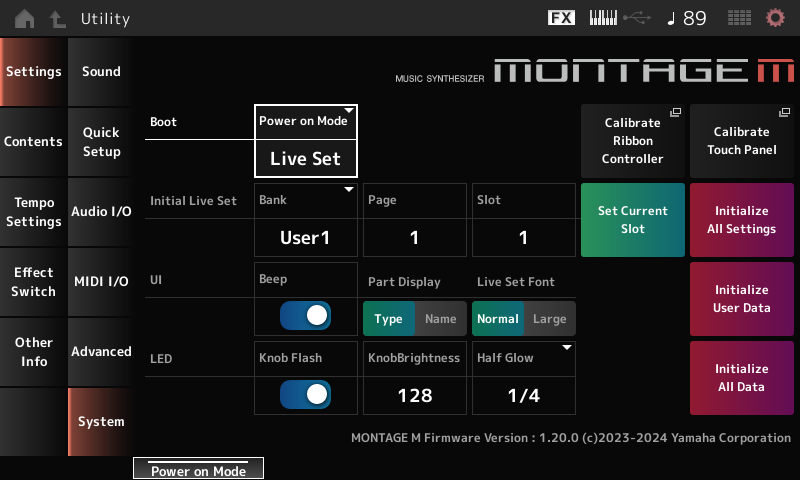
Sets the screen to be shown on the display when the instrument is turned on. Settings: Perform, Live Set
Opens the screen for ribbon controller calibration.
Use it when the ribbon controller does not respond correctly.
Opens the screen for touchscreen calibration.
Use it when the touchscreen does not respond correctly.
Initial Live Set Page (Initial Live Set Page)
Initial Live Set Slot (Initial Live Set Slot)
When Power On Mode is set to Live Set, use this parameter to set the initial Live Set Slot to be selected after startup.
You can also set the slot by selecting a Performance on the Live Set screen, opening this screen, and then tapping the Set Current Slot button.
Sets the current Performance to the Live Set slot selected after startup.
Initializes all Utility screen settings.
Determines whether the animation of screen transition is turned on or off.Settings: Off, On
Turns the touchscreen operation sound on or off. Settings: Off, On
Sets the Part Name to show the Category and Part Type or just Part Name. Settings: Type, Name
Determines the font size of the contents names and category names on the Live Set screen and the Category Search screen.Settings: Normal, Large
Initializes all data in the User area of User memory (Performances, Motion Sequences, Live Sets, and such) and all settings on the Utility screen.
When Initialize User Data is carried out, all applicable data and system settings you created will be reset to the factory default.
Be careful not to lose important data. It is also recommended saving the necessary settings to a USB flash drive in advance.
Sets the flashing function of the Super Knob on or off. Settings: Off, On
Sets the brightness of lighting on the Super Knob. Settings: 0–128
Controls the dimming of the button lamps. Settings: Off, 1/4, 1/2
Sets the operation mode for using the Data dial, [INC/YES] button, and [DEC/NO] button to select a Performance on the Home screen. Settings: Default, Live Set
Initializes all data in User memory and all Utility screen settings.
When Initialize User Data is carried out, all applicable data and system settings you created will be reset to the factory default.
Be careful not to lose important data. It is also recommended to save the necessary settings to a USB flash drive in advance.
Shows the firmware (MONTAGE M OS) version of the instrument.
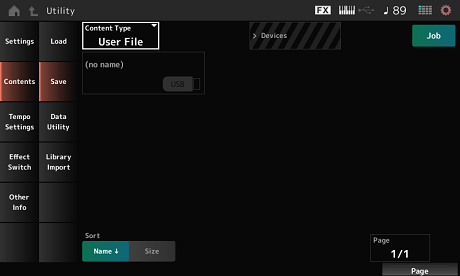
On the Load screen, you can load files and data.
- [UTILITY] → Contents → Load
- [SHIFT] + [STORE]
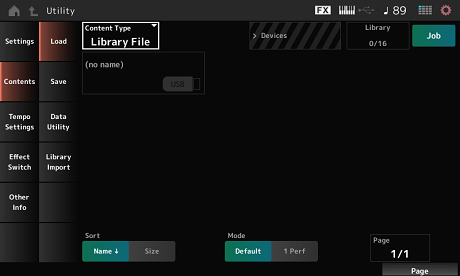
All data or a specific set of data is loaded from a single file saved on a USB flash drive or setting stored on the instrument.
Here, you can select which set of data in a file to load.
Available settings vary depending on the route you take to open the screen.
Settings: The file types which can be loaded are as follows.
| Content Type | Device Type | File extension | Description |
|---|---|---|---|
| User File | File | .Y2U .X8U | User file saved on a USB flash drive is loaded into the User area of User memory. When the User file has been divided, both .Y2U and .Y2W must be saved on the USB flash drive. The following settings are included in a User file.Performance Arpeggio Motion Sequence Curve Live Set Micro Tuning Waveform Audition Utility settings (.Y2U only) Quick Setup (.Y2U only) |
| Library File | File | .Y2L .X8L | Library files saved on a USB flash drive are loaded into the Library area of User memory. When a Library file has been divided, both .Y2L and .Y2M must be saved on the USB flash drive. The following settings are included in a Library file.Performance Arpeggio Motion Sequence Curve Live Set (only one bank) Micro Tuning Waveform Audition |
| Backup File | File | .Y2A .X8A | Backup files saved on a USB flash drive are loaded into the User memory. |
| Song&Perf (Song & Performance) | Internal data | Only the specified Song is loaded from Songs stored in the User area of the User memory. Both MIDI sequences and Performances can be loaded. | |
| Song | Internal data | Only the specified Song is loaded from Songs stored in the User area of the User memory. Only MIDI sequences can be loaded. | |
| .mid File | File | .MID | Standard MIDI Files (SMF) saved on a USB flash drive are loaded (either in format 0 or format 1). |
| .wav File | File | .WAV | Audio files saved on a USB flash drive are loaded. |
| Pattern&Perf (Pattern & Performance) | Internal data | Only the specified Pattern is loaded from Patterns stored in the User area of the User memory. Both MIDI sequences and Performances can be loaded. | |
| Pattern | Internal data | Only the specified Pattern is loaded from Patterns stored in the User area of the User memory. Only MIDI sequences can be loaded. | |
| Audio File * | File | .WAV .AIF | Audio files saved on a USB flash drive are loaded as Waveforms. Example: [PERFORMANCE] → [EDIT/ |
| Motion Seq (Motion Sequence) * | Internal data | Only the specified sequence is loaded from the Motion Sequences saved (stored) in the User area of the User memory. | |
| Smart Morph * | Internal data | Only Smart Morph data is loaded from the Performance saved (stored) in the User area of User memory. |
Content types marked with an asterisk (*) are not displayed when this screen is opened from the Utility screen.
Current Folder Name
Indicates the name of the parent folder and the name of the current folder.
Once you tap on the parent folder name, it is then the current folder.
Sets whether the Job function is enabled (On) or disabled (Off).
When this parameter is turned on, tapping on the current file, folder, or content will call up the Rename or Delete context menu.
When you tap on the connected USB flash drive, the context menu for Format will appear. Settings: Off, On
Indicates the used capacity and total capacity of the selected storage.
The indication differs depending on the content type.
Indicates the folders and files within the current folder.
Sets the sort order for the files in File select. Settings: Name, Size, Date, Default (Varies by content type)
Name: Sorts by name. The down arrow indicates that the list is arranged in ascending order (A to Z). The up arrow indicates that the list is arranged in descending order.
Size: Sorts in order of data size. The down arrow indicates that the list is in ascending order (small to large). The up arrow indicates that the list is in descending order. This is not available when the content type is Motion Seq, Song, Song&Perf, Pattern, Pattern&Perf, Performance, or Smart Morph.
Date: Sorts by the date the setting was stored. The down arrow indicates that the list is arranged in descending order (new to old). The up arrow indicates that the list is arranged in ascending order. This is available only when the content type is Motion Seq, Song, Song&Perf, Pattern, Pattern&Perf, Performance, or Smart Morph.
Default: Sorts in ascending order of content number. This is available only when the content type is Song, Song&Perf, Pattern, Pattern&Perf, Performance, Motion Seq, or Smart Morph.
Selects the mode for loading.
This is shown only for a User File or a Library File. Settings: Default, 1 Perf
Default: Loads all Performances.
1 Perf: Loads only a specified Performance.
Select the key to which the loaded WAV or AIFF is to be assigned.
This is shown only for audio files. Settings: Keyboard Select (C−2–G8), All
Sets whether Center Key is updated by keyboard operation.
This is shown only for audio files.
When the files appearing in the File select do not fit on a single page, a scroll button will appear to allow you to select a page. Alternately you can use a Display knob to select a page.
On the Save screen, you can save files and data.
- [UTILITY] → Contents → Save
This is basically the same as the Load screen.
All data or a specific set of data is saved on a USB flash drive or stored on the instrument.
Here, you can set which data to store or save.
Available settings vary depending on the route you take to open the screen. Settings: The following table shows the content types that can be stored or saved.
| Content Type | Device Type | File extension | Description |
|---|---|---|---|
| Performance | Internal data | Saves (Stores) the Performance to the User area of the User memory. | |
| User File | File | .Y2U (.Y2W) | Settings stored in the User area of User memory are saved to a USB flash drive as a User file. The following settings are included in a User file. |
| Library File | File | .Y2L (.Y2M) | Settings stored in the Library area of User memory are saved to a USB flash drive as a Library file. The settings contained in the Library file are as follows (same as the User file, except for the Utility settings). |
| Backup File | File | .Y2A (.Y2B) | Settings stored in the User memory are saved to a USB flash drive as a backup file. A backup file includes everything in the User and Library areas, Songs, and Patterns. When the file size exceeds 2 GB and the file has been divided, both .Y2A and .Y2B must be handled as a set. |
| .mid File | File | .MID | MIDI data stored in the Song and Pattern area of User memory is saved to a USB flash drive as a Standard MIDI File (SMF; only in format 1). |
| Motion Seq (Motion Sequence) * | Internal data | Stores (saves) the Motion Sequence being edited to the User area. |
Content types marked with an asterisk (*) are not displayed when this screen is opened from the Utility screen.
On the Data Utility screen, you can manage files and data in User memory.
- [UTILITY] → Contents → Data Utility
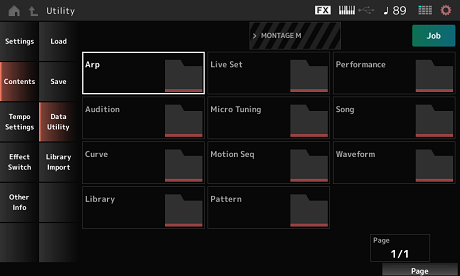
This is basically the same as the Load screen.
Shows the Content types in User memory as folders. Tap the folder to open.
- Arp
- Audition
- Curve
- Library
- Live Set
- Micro Tuning
- Motion Seq
- Pattern
- Performance
- Song
- Waveform
Tapping on the name calls up the context menu for Rename and Delete.
When Job is turned on, the following three items are displayed.
Selects all of the contents in the folder.
Displayed when nothing has been selected.
Unselects all of the contents in the folder.
Displayed when any of the contents have been selected.
Deletes all selected content.
Displayed when any of the contents have been selected.
On the Library Import screen, you can copy specific Performance(s) in the library to the User Bank.
- [UTILITY] → Contents → Library Import
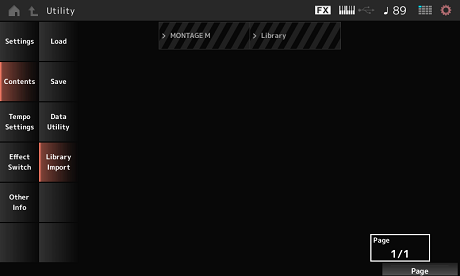
This is basically the same as the Load screen.
Selects all Performances in the current library folder.
Shown only when no Performance has been selected.
Deselects all Performances in the current library folder.
Displayed only when any Performance has been selected.
Copies the selected Performance to the User Bank.
When this operation is carried out, the User Waveforms and User Arpeggios, User Curves, User Micro Tuning, and User Auditions used in the selected Performance are also copied to the User Bank.
Displayed only when any Performance has been selected.
On the Tempo Settings screen, you can set the parameters related to tempo and synchronization.
- [TEMPO/TAP]
- [UTILITY] → Tempo Settings
 (Tempo Settings) icon
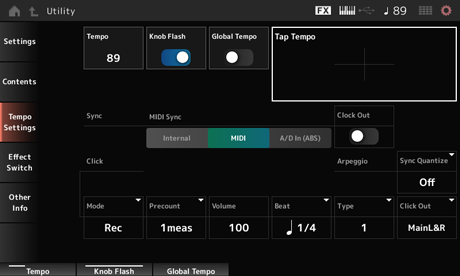
Sets the Performance tempo.
When MIDI Sync is set to MIDI or A/D In and the instrument is set to synchronize to an external device, Ex.Tempo will be shown instead of the setting value. Settings: 5–300
Sets the flashing of the Super Knob on or off. Settings: Off, On
When this parameter is set to off, a tempo setting for each Performance is used.
When set to on, the current tempo is retained when you change the Performance. Settings: Off, On
You can set the desired tempo by tapping the area shown on the screen or by pressing (tapping) the [ENTER] button on the top panel while the cursor is on this parameter.
Or you can use the [TEMPO/TAP] button to set the tempo in the same way.
This parameter is not available when MIDI Sync is set to MIDI and the instrument is set to synchronize to an external device.
When MIDI Sync is set to A/D In, the tempo search starts at the first tapping action.
Sets the parameters related to synchronization to the connected external device.
Select Internal for using the internal clock of this instrument, MIDI for using the external MIDI clock of the DAW software on the computer or the external MIDI device, or A/D In (ABS) for using the audio signal input from the A/D INPUT jacks, for playing back the Arpeggios, Motion Sequencer, and Songs. Settings: Internal, MIDI, A/D In (ABS)
Internal: Synchronizes to the internal clock. For using this instrument by itself or as the primary clock source for other devices.
MIDI: Synchronizes to the MIDI clock received from the external MIDI device. For using the external device as the primary clock source.
A/D In: Synchronizes to the tempo of the audio signal input from the A/D INPUT jacks.
Sets the MIDI clock messages to be transmitted. Settings: Off, On
Sets when to play back the click sound (metronome). Settings: Off, Rec, Rec/Play, Always
Off: No click sound is played.
Rec: The click sound is played during Song or Pattern recording.
Rec/Play: The click sound is played during Song or Pattern recording and playback.
Always: The click sound is always played.
Sets the number of count-in measures from the time the [![]() ] (Play) button is pressed until recording actually starts when recording a Song or Pattern. Settings: Off (recording starts when you press the [
] (Play) button is pressed until recording actually starts when recording a Song or Pattern. Settings: Off (recording starts when you press the [![]() ] (Play) button), 1meas–8meas
] (Play) button), 1meas–8meas
Since the click sound uses the internal Tone Generator, the use of the click sound affects the overall polyphony of the instrument.
Sets the volume of the click sound. Settings: 0–127
Sets the beat at which the click sound is played. Settings: 1/16 (sixteenth notes), 1/8 (eighth notes), 1/4 (quarter notes), 1/2 (half notes), Whole (whole notes)
Selects the type of click sound. Settings: 1–10
Adjusts the timing for starting the next Arpeggio when playing back an Arpeggio for multiple Parts. When set to Off, the Arpeggio is played back when you play the Part on the keyboard. Settings: Off, 60 (thirty-second note), 80 (sixteenth note triplet), 120 (sixteenth note), 160 (eighth note triplet), 240 (eighth note), 320 (quarter note triplet), 480 (quarter note)
Sets the output destination for the click sound. Settings: MainL&R, AsgnL&R, USB1&2–USB29&30, AsgnL, AsgnR, USB1–USB30
MainL&R: Outputs in stereo (two channels) to the OUTPUT [L/MONO] and [R] jacks.
AsgnL&R: Outputs in stereo (two channels) to the ASSIGNABLE OUTPUT [L] and [R] jacks.
USB1&2–USB29&30: Outputs in stereo (channels 1 and 2, to channels 29 and 30) to the [USB TO HOST] terminal.
AsgnL: Outputs in mono (one channel) to the ASSIGNABLE OUTPUT [L] jack.
AsgnR: Outputs in mono (one channel) to the ASSIGNABLE OUTPUT [R] jack.
USB1–30: Outputs in mono (channels 1 to 30) to the [USB TO HOST] terminal.
On the Effect Switch screen, you can set the parameters related to effect bypass.
The settings on this screen are not saved (stored), so the settings are reset to the default when the instrument is restarted.
- [UTILITY] → Effect Switch
- Tap the
 (Effect) icon
 - [SHIFT] + [QUICK SETUP]
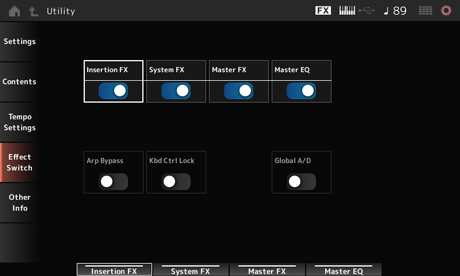
Sets the Insertion Effect on or off. Settings: Off, On
Sets the System Effect on or off. Settings: Off, On
Sets the Master Effect on or off. Settings: Off, On
Sets the Master EQ on or off. Settings: Off, On
Sets the Arpeggio Bypass on or off.
When this parameter is set to on, all Arpeggio operations are disabled. Settings: Off, On
When Arp Bypass is on, the [ARP ON/OFF] button flashes.
When Arp Bypass is on, changing the Arpeggio switch for any Part will turn off Arp Bypass.
The Songs recorded by using the Arpeggio function will have the Arpeggio sequence included in the data. When you edit such Songs in the DAW software, you can set Arp Bypass to On to prevent the Arpeggio playback from being affected twice.
Sets lock for the Keyboard Control on or off.
When set to on, Keyboard Control is locked for all Parts.
Turning it off unlocks Keyboard Control.
This is useful for creating or editing each MIDI track separately, for example, when using the instrument as a 16-part multi-timbral sound module with the DAW software.
When the Keyboard Control for each Part is changed while Keyboard Control Lock is on, Keyboard Control will be unlocked.
Settings: Off, On
When this parameter is set to on, the volume of the A/D Part stays the same when you change the Performance, and other parameters related to the A/D Part also stay the same.
When this parameter is set to off, the volume set for the Performance is used when you change Performances, and other parameters related to the A/D Part will change accordingly.
Master FX and Master EQ are switched on and off simultaneously. Settings: Off, On
On the Other Info screen, you can find other information.
Shows the list of shortcut operations for simultaneous pressing of the [SHIFT] button and other buttons.
Shows content such as copyrights.
 Print this page