On the Part Settings screen, you can set general parameters (such as the Part names and tone generation system) for the Part.
- [PERFORMANCE] → Part Common selection → [EDIT/
 ] → General/Pitch → Part Settings
Sub Category (Part Sub Category)
Sets the Main category and Sub category of the selected Part. Settings: Refer to the Data List.
You can save the Part you are editing under a new name, using up to 20 alphanumeric characters.
Tapping on the name calls up the onscreen keyboard, allowing you to enter a name.
Sets the volume of the selected Part. Settings: 0–127
Sets the Pan for the selected Part. Settings: L63–C (center)–R63
Sets the Dry Level of the selected Part.
This parameter is available only when Part Output is set to MainL&R. Settings: 0–127
Sets the Variation Send of the selected Part.
This parameter is available only when Part Output is set to MainL&R. Settings: 0–127
Sets the Reverb Send of the selected Part.
This parameter is available only when Part Output is set to MainL&R. Settings: 0–127
Sets the output destination for the audio signals of the selected Part. Settings: MainL&R, AsgnL&R, USB1&2–USB29&30, AsgnL, AsgnR, USB1–30, Off
MainL&R: Outputs in stereo (two channels) to the OUTPUT [L/MONO] and [R] jacks.
AsgnL&R: Outputs in stereo (two channels) to the ASSIGNABLE OUTPUT [L] and ASSIGNABLE OUTPUT [R] jacks.
USB1&2–USB29&30: Outputs in stereo (channels 1 and 2, to channels 29 and 30) to the [USB TO HOST] terminal.
AsgnL: Outputs in mono (one channel) to the ASSIGNABLE OUTPUT [L] jack.
AsgnR: Outputs in mono (one channel) to the ASSIGNABLE OUTPUT [R] jack.
USB1–30: Outputs in mono (channels 1 to 30) to the [USB TO HOST] terminal.
Off: No output of the audio signal for the Part.
Sets the tone generation mode of the current Part. Mono is for playing single notes, and Poly is for playing multiple simultaneous notes.
When using the Mono setting for playing the keyboard in Legato, you can create a smooth transition of sounds from one note to another. Settings: Mono, Poly
Determines the method for producing the sound when the internal tone generator receives a Note On message of the same sound twice in a row.
The Multi setting is recommended for most cases. However, the Multi setting uses up many notes in the maximum polyphony, so it is recommended to change to Single if sounds in other Parts are dropped or not played properly. Settings: Single, Multi
Single: Stops the first note and then plays the same note again. This is convenient for repeating the same note on the same channel.
Multi: Plays the second note over the first note. This setting makes rolls and repeated notes sound natural, with crash cymbals or other percussion instruments having a long decay.
Sets the Part to play only in response to the Arpeggio.
Any Part set to On will be played by the Note On messages sent from the Arpeggio. Settings: Off, On
Sets the Pan to On or Off from the Element Edit ([EDIT/![]() ]→Part selection→Element selection→Amplitude→Level/Pan→Pan).
]→Part selection→Element selection→Amplitude→Level/Pan→Pan).
When set to Off, the Pan in the Element Edit will be set to C (center). Settings: Off, On
Sets the note range (lowest and highest notes) for the Part.
When the first note of Note Limit is set higher than the second (for example, C5 to C4), the notes in the ranges C−2 to C4 and C5 to G8 will be played. Settings: C−2–G8
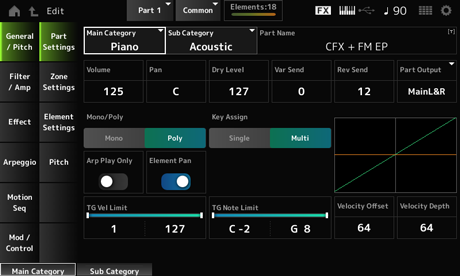
Sets the velocity range (lowest and highest values) for the Part.
When this is set so that the higher value is first and the lower value is second (for example, 93 to 34), the notes are played only for velocities of 1 to 34 and 93 to 127. Settings: 1–127
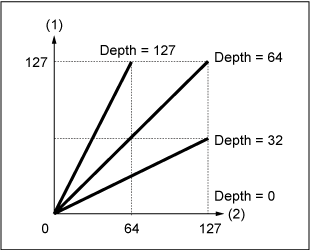
Increases or decreases the velocity value that is sent to the internal tone generator. Settings: 0–127
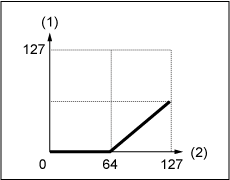
When Depth = 64 and Offset = 32
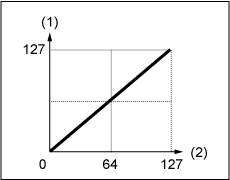
When Depth = 64 and Offset = 64
When Depth = 64 and Offset = 96
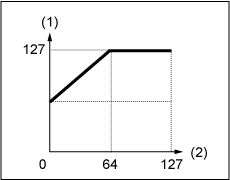
Sets how the level of the velocity value that is sent to the internal tone generator responds to Velocity or the strength of the keystroke. Settings: 0–127
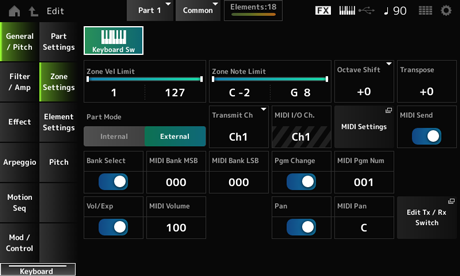
On the Zone Settings screen, you can set the parameters for the Zone function.
This function allows you to divide the entire keyboard into a maximum of eight sections (Zones) and independently assign a separate channel to each Zone. This way, you only need one keyboard to play the sounds of multiple keyboards. You can play multiple Parts on an external multi-timbral sound module or play both the internal tone generator and any connected external sound modules.
- [PERFORMANCE] → Part Common selection → [EDIT/] → General/Pitch → Zone Settings
Keyboard Control is used for selecting Parts to be played from the keyboard.
When this switch is set to On, you can simultaneously play all Parts having Keyboard Control set to On, if the Part is set to Common or Keyboard Control for the Part is set to On.
When Keyboard Control is set to Off, you can play the Part on the keyboard only when that Part is selected. Settings: Off, On
Sets the velocity range (lowest and highest values) for the Zone.
When this is set so that the higher value is first and the lower value is second (for example, 93 to 34), the notes are played only for velocities of 1 to 34 and 93 to 127. Settings: 1–127
Sets the note range (lowest and highest notes) for the Zone.
When the first note of Note Limit is set higher than the second (for example, C5 to C4), the notes in the ranges C−2 to C4 and C5 to G8 will be played. Settings: C−2–G8
Shifts the pitch of the zone in octaves. Settings: −3–+0 (standard)–+3 (in octaves)
Shifts the pitch of the zone in semitones. Settings: −11–+0 (standard)–+11
Switches the Part Mode.
Settings: Internal, External
Internal: Uses the internal tone generator.
External: Uses the external sound generator. Any Part set to External does not receive MIDI messages from the external device.
Sets the channel for transmitting and receiving MIDI messages when the Part Mode is set to Internal. Settings: Ch1–Ch16, Off
Sets the channel for transmitting and receiving MIDI messages when the Part Mode is set to External. Settings: Ch1–Ch16
Shows the channel for controlling the Part set to Common and the Part with the Keyboard Sw set to On.
This setting is common to the entire instrument. The setting can be changed on the Utility MIDI Settings screen.
When using Tx/Rx Ch and Transmit Ch, do not use the same channel specified in MIDI I/O Ch. If the same channel is set to Tx/Rx Ch and Transmit Ch, the setting in MIDI I/O Ch will take priority. Settings: Ch1–Ch16
Opens the same screen as the Utility → Settings → MIDI I/O.
When this parameter is set to On, the MIDI Bank, MIDI Pgm Number, MIDI Volume, and MIDI Pan settings are transmitted to the external device whenever those parameters are changed.
However, the setting is not transmitted when the corresponding transmit switch is set to Off. Note that this parameter is common to all Performances and cannot be set independently for individual Performances.
This parameter is available only when Part Mode is set to External. Settings: Off, On
The transmit switch for sending MIDI Bank MSB and MIDI Bank LSB to the external device.
This parameter is available only when Part Mode is set to External. Settings: Off, On
MIDI Bank LSB
Selects the bank for transmitting the Performance selection. You can specify the MSB and LSB messages.
This parameter is not available when the Transmit Bank Select is set to Off, and is available only when Part Mode is set to External. Settings: MSB and LSB: 000–127
This is the transmit switch for sending Program Change messages to the external device.
This parameter is available only when Part Mode is set to External. Settings: Off, On
Selects the Program Change number for transmitting the Performance selection.
This parameter is not available when the Transmit Program Change is set to Off, and is available only when Part Mode is set to External. Settings: 001–128
This is the transmit switch for sending the volume setting to the external device.
This parameter is available only when Part Mode is set to External. Settings: Off, On
Sets the volume for transmitting the Performance selection.
This parameter is available only when Part Mode is set to External. Settings: 0–127
This is the transmit switch for sending the pan setting to the external device.
This parameter is available only when Part Mode is set to External. Settings: Off, On
Sets the pan for transmitting the Performance selection.
This parameter is not available when the Transmit Pan is set to Off. Settings: L64–C–R63
Opens the Tx/Rx Switch screen.
Sets the maximum number of Elements to use.
- [PERFORMANCE] → Part Common selection → [EDIT/] → General/Pitch → Element Settings
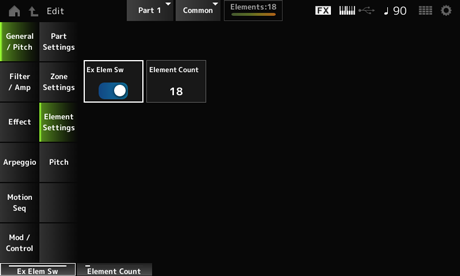
Enables the extension of Element capacity.
When set to Off, only up to eight elements are available. Settings: Off, On
Sets the maximum number of elements to use.Settings: 8–128
Even when Element Sw is set to Off, the number set in Element Count is saved.
On the Pitch screen, you can set the pitch for the Part.
- [PERFORMANCE] → Part Common selection → [EDIT/] → General/Pitch → Pitch
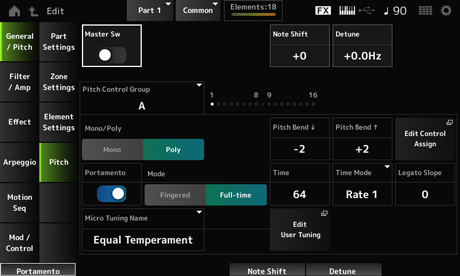
Portamento is a function for creating a smooth transition between two notes.
By setting this parameter to On, you can apply Portamento to Parts having the Portamento Part Switch set to On.
This switch is linked to the [PORTAMENTO] button on the top panel. Settings: Off, On
Adjusts the pitch in semitones. Settings: −48–+0–+48
Adjusts the pitch of the Part in 0.1 Hz increments.
By slightly shifting the pitch, you can detune the sound. Settings: −12.8Hz–+0.0Hz–+12.7Hz
Parts assigned to the same group are given the same pitch.
Sets the tone generation mode of the current Part. Mono is for playing single notes, and Poly is for playing multiple simultaneous notes.
When using the Mono setting for playing the keyboard in Legato, you can create a smooth transition of sounds from one note to another. Settings: Mono, Poly
Pitch Bend↑ (Pitch Bend Range Upper)
Sets the range of the changes created with the pitch bend wheel in semitones.
Settings: −48–+0–+24
Opens the Control Assign screen with the DisplayFilter set to PitchBend.
Sets Portamento on or off for the Part. Settings: Off, On
Sets the way Portamento is applied according to your keyboard performance. Settings: Fingered, Full-time
Fingered: Portamento is applied only when you play legato (playing the next note before releasing the previous one).
Full-time: Portamento is applied at all times.
Sets the time length (or speed) for the pitch transition of Portamento. Settings: 0–127
Sets how the pitch changes over time. Settings: Rate 1, Time 1, Rate 2, Time 2
Rate 1: Pitch changes at a specific rate.
Time 1: Pitch changes at a specific time.
Rate 2: Pitch changes at a specific rate within an octave.
Time 2: Pitch changes at a specific time within an octave.
Sets the attack of the legato notes when Mono/Poly is set to Mono.
When set to Mono, the attack of the note may sound unnatural depending on the attack speed of the waveform assigned to the Part. If this is the case, use this parameter to adjust the attack.
In most cases, it is recommended to set this parameter to a smaller value for waveforms having a short attack, and a larger value for waveforms having a long attack. Settings: 0–7
Sets the micro tuning (temperament) for the Part. Settings: Equal Temperament, Pure Major, Pure Minor, Werckmeister, Kirnberger, Vallotti & Young, 1/4 shift, 1/4 tone, 1/8 tone, Indian, Arabic 1, Arabic 2, Arabic 3, Init Tuning 1–8 (when a User bank is selected), Library 1-1–24-8 (when a library file is loaded)
| Equal Temperament | Each octave is divided into 12 intervals of equal size. This is the most commonly used tuning in music today. |
| Pure Major Pure Minor | These tunings preserve the pure mathematical intervals of each scale, especially for triad chords (root, third, fifth). You can hear this best in actual vocal harmonies, such as choirs and a cappella singing. |
| Werckmeister Kirnberger Vallotti & Young | Each of the scales combines the mean-tone and Pythagorean scales. The main feature of these scales is that each key has its unique character. These scales were used extensively during the time of Bach and Beethoven, and even now they are often used when performing period music on the harpsichord. |
| 1/4 shift | The equal-tempered scale shifted up 50 cents. You can create tension in your music by mixing this setting with Equal Temperament. |
| 1/4 tone | Twenty-four equally spaced notes per octave. Playing twenty-four consecutive keys on the keyboard makes up an octave. |
| 1/8 tone | Forty-eight equally spaced notes per octave. Playing forty-eight consecutive keys on the keyboard makes up an octave. |
| Indian | Usually observed in Indian music. Play white keys only. |
| Arabic | Usually observed in Arabic music. |
Sets the root note for the micro tuning.
This parameter is shown only when micro tuning that requires a root note is selected. Settings: C–B
Opens the Edit User Micro Tuning screen.
On the Filter EG screen, you can set the Filter Envelope Generator (FEG) for the Part.
The FEG lets you set the degree (or level) of changes to the cutoff frequency and how those changes evolve over time, starting from the moment you press a key on the keyboard to the moment the sound decays.
- [PERFORMANCE] → Part Common selection → [EDIT/] → Filter/Amp → Filter EG
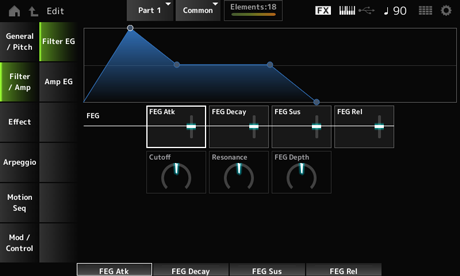
Sets the length of time it takes for the sound to change from the moment you press a key to when the Cutoff Frequency reaches the value set at Attack Level.
This is specified as an offset value to the Element FEG. Settings: −64–+63
Sets the length of time it takes for the Cutoff Frequency to change from the attack level. You can control the crispness or the decay speed of the sound.
This is specified as an offset value to the Element FEG. Settings: −64–+63
Sets the Cutoff Frequency level that follows the end of the decay segment (or the level that is maintained while the key is held down).
This is specified as an offset value to the Element FEG. Settings: −64–+63
Sets the length of time it takes for the Cutoff Frequency to fall to the Release level when you lift your finger from the key.
This is specified as an offset value to the Element FEG. Settings: −64–+63
Changes the sound by setting the cutoff frequency of the filter. When the Low Pass Filter is selected, you can make the sound brighter by setting this to a larger value, and darker by setting it to a smaller value.
This is specified as an offset value to the cutoff frequency for the Element. Settings: −64–+63
Adds special characteristics to the sound by adjusting the signal level near the cutoff frequency.
This is specified as an offset value to the filter resonance or filter width for the Element. Settings: −64–+63
Sets the depth range of the cutoff frequency controlled by the FEG for the Element.
When it is set to 0, the settings in the Element will be used with no change. Settings: −64–+63
On the Amp EG screen, you can set the AEG (Amplitude Envelope Generator) for the Part. This lets you determine how the volume changes from the moment you press a key on the keyboard to when the sound decays.
- [PERFORMANCE] → Part Common selection → [EDIT/] → Filter/Amp → Amp EG
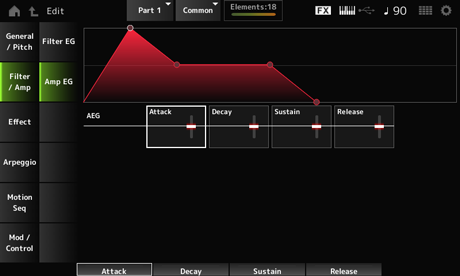
Sets the length of time it takes for the volume to change from the moment you press a key on the keyboard to when it reaches the maximum.
This is specified as an offset value to the Element AEG. Settings: −64–+63
Sets the length of time it takes for the volume to change after it has reached the maximum.
This is specified as an offset value to the Element AEG. Settings: −64–+63
Sets the volume that is maintained after the decay time. Settings: −64–+63
Sets the length of time it takes after you have released the key to when the sound decays.
This is specified as an offset value to the Element AEG. Settings: −64–+63
On the Routing screen, you can set the effect routing for the Part.
- [PERFORMANCE] → Part Common selection → [EDIT/] → Effect → Routing
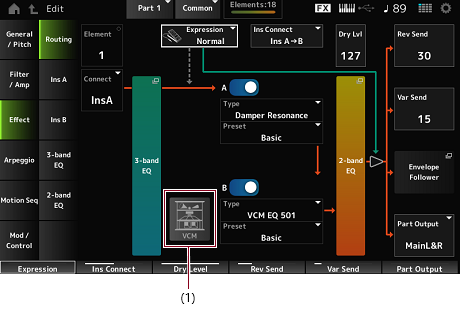
Shows the name of the selected Element.
When Ex Elem Sw (General/Pitch → Element Settings) is set to Off, or when there are less than eight elements, the numbers 1 to 8 are shown. Settings: 1–128 (up to the Element Count setting)
Sets the Element to be output to Insertion Effect A or Insertion Effect B.
Setting it to Thru bypasses the Insertion Effects. Settings: Thru, InsA, InsB
Opens the Effect → 3-band EQ screen.
Opens the Effect → 2-band EQ screen.
Sets the position in the signal flow when using the Expression pedal. Settings: Normal, Pre FX
Normal: Applied after the 2-band EQ
Pre FX: Applied before the Insertion Effects. This setting is effective when used with non-linear effects such as Distortion. Example of using it with Distortion: When set to Normal, the output of Distortion changes. While the distortion level stays the same and only the volume will change. When set to Pre FX, the input of Distortion changes, so both the distortion level and the volume will change.
Sets the way the expression effect is applied when Expression Type is set to Pre FX.
Settings: Normal: Volume curve of normal characteristics
Organ: Volume curve of the characteristics simulating a vintage organ
Sets the VCM Rotary Speaker effect, which simulates the characteristics of a rotary speaker by utilizing VCM technology.
This parameter is available only for Part 1. Settings: Off, On
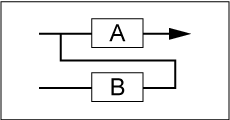
Sets the effect routing for Insertion Effect A and Insertion Effect B. The diagram changes accordingly when the settings are changed. Settings: Parallel, Ins A→B, Ins B→A
Parallel: (for Normal Part (AWM2) and Drum Part): The output from Insertion Effect A and Insertion Effect B are individually sent to the Master Effect, Master EQ, Reverb, Variation, and Envelope Follower.
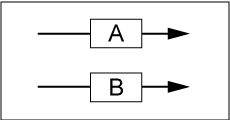
Ins A→B: The output from Insertion Effect A is sent to Insertion Effect B, and the output from Insertion Effect B is sent to the Master Effect, Master EQ, Reverb, Variation, and Envelope Follower.
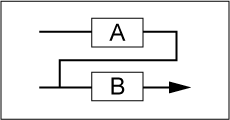
Ins B→A: The output from Insertion Effect B is sent to Insertion Effect A, and the output from Insertion Effect A is sent to the Master Effect, Master EQ, Reverb, Variation, and Envelope Follower.
B (Insertion Effect B Switch)
Turns Insertion Effect A and Insertion Effect B on or off. Settings: Off, On
Sets the Effect Type. Settings: See Effect types.
Selects one of the Preset effect parameters for each Effect Type.
By selecting a Preset, you can change the way effects are applied. Settings: Refer to the Data List.
Modulator (Insertion Modulator Part)
Sets the Side Chain Part (or the Modulator depending on the effect type) for the Insertion Effect A or Insertion Effect B.
This parameter is not available when the Part itself or Master is set to the Modulator. In that case, the parameter value will be shown in parenthesis as in “(Master).” Settings: Part 1–16, A/D, Master, Off
Sets the Dry Level of the selected Part.
This parameter is available only when Part Output is set to MainL&R. Settings: 0–127
Sets the level of the signals (or bypass signals) sent from Insertion Effect A or Insertion Effect B to the Reverb Effect. This parameter is available only when Part Output is set to MainL&R. Settings: 0–127
Sets the level of the signals (or bypass signals) sent from Insertion Effect A or Insertion Effect B to the Variation Effect. This parameter is available only when Part Output is set to MainL&R. Settings: 0–127
Sets the output destination for the audio signals. Settings: MainL&R, AsgnL&R, USB1&2–USB29&30, AsgnL, AsgnR, USB1–30, Off
MainL&R: Outputs in stereo (two channels) to the OUTPUT [L/MONO] and OUTPUT [R] jacks.
AsgnL&R: Outputs in stereo (two channels) to the ASSIGNABLE OUTPUT [L] and [R] jacks.
USB1&2–USB29&30: Outputs in stereo (channels 1 and 2, to channels 29 and 30) to the [USB TO HOST] terminal.
AsgnL: Outputs in mono (one channel) to the ASSIGNABLE OUTPUT [L] jack.
AsgnR: Outputs in mono (one channel) to the ASSIGNABLE OUTPUT [R] jack.
USB1–30: Outputs in mono (channels 1 to 30) to the [USB TO HOST] terminal.
Off: No output of the audio signal for the Part.
Opens the Envelope Follower Edit screen.
On the Ins A and Ins B screens, you can set the Insertion Effects.
- [PERFORMANCE] → Part Common selection → [EDIT/] → Effect → Ins A
- [PERFORMANCE] → Part Common selection → [EDIT/] → Effect → Ins B
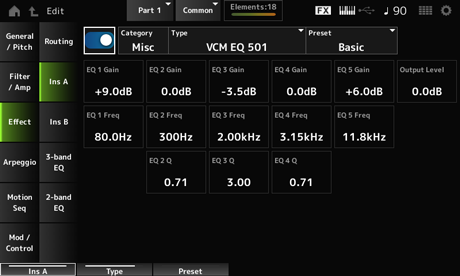
The same as Audio In → Ins A or Ins B in Common Edit.
On the 3-band EQ screen, you can set the Part EQ. The 3-band EQ can be applied before the Insertion Effect.

- [PERFORMANCE] → Part Common selection → [EDIT/] → Effect → 3-band EQ
Shown below is the setting screen for 3-band EQ.
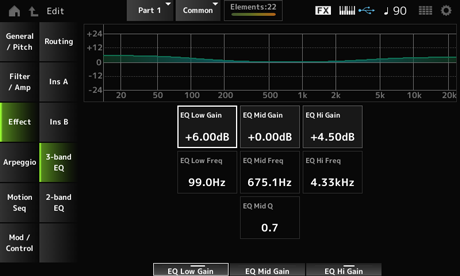
Sets the frequency of the Low band. Settings: 50.1Hz–2.00kHz
Sets the signal level of the Low band. Settings: −12.00dB–+12.00dB
Sets the frequency of the Mid band. Settings: 139.7Hz–10.1kHz
Sets the signal level of the Mid band. Settings: −12.00dB–+12.00dB
Sets the bandwidth of the Mid band. Settings: 0.7–10.3
Sets the frequency of the High band. Settings: 503.8Hz–14.0kHz
Sets the signal level of the High band. Settings: −12.00dB–+12.00dB
On the 2-band EQ screen, you can set the Part EQ.
The 2-band EQ can be applied after the Insertion Effect.
- [PERFORMANCE] → Part Common selection → [EDIT/] → Effect → 2-band EQ
Shown below is the setting screen for 2-band EQ.
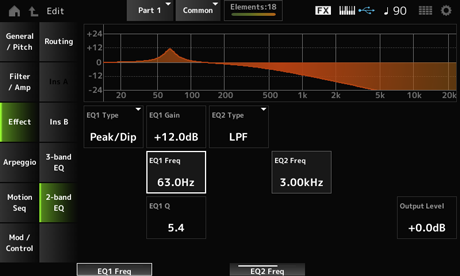
EQ2 Type (2band EQ 2 Type)
Selects the desired EQ type. Settings: Thru, LPF, HPF, Low Shelf, Hi Shelf, Peak/Dip
Thru: Passes the signals with no effects being applied.
LPF: Cuts the signals above the cutoff frequency.
HPF: Cuts the signals below the cutoff frequency.
Low Shelf: Cuts or boosts the signals below the specified frequency setting.
Hi Shelf: Cuts or boosts the signals above the specified frequency setting.
Peak/Dip: Cuts or boosts the signals at the specified frequency setting.
EQ 2 Freq (2band EQ 2 Frequency)
Sets the frequency to be cut or boosted.
This parameter is not available when the EQ Type is set to Thru. Settings: 63.0Hz–18.0Hz
EQ 2 Gain (2band EQ 2 Gain)
Sets the signal level of the frequency band set in EQ1 Freq or EQ2 Freq.
This parameter is not available when the EQ Type is set to Thru, LPF, or HPF. Settings: −12.0dB–+12.0dB
EQ 2 Q (2band EQ 2 Q)
Sets the bandwidth for cutting or boosting the volume of the frequencies set with EQ1 Freq or EQ2 Freq.
This parameter is available only when the EQ Type is set to Peak/Dip. Settings: 0.1–12.0
Sets the output gain of the 2-band EQ. Settings: −12.0dB–+12.0dB
On the Common screen, you can set the Arpeggio for the entire Part.
- [PERFORMANCE] → Part Common selection → [EDIT/] → Arpeggio → Common
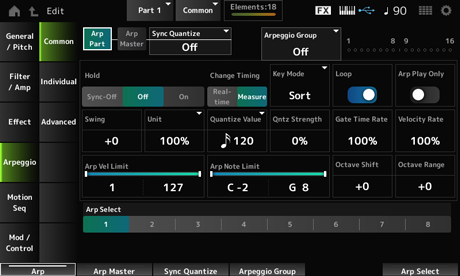
Sets the Arpeggio for the Part on or off. Settings: Off, On
Sets the Arpeggio for the Performance on or off. Settings: Off, On
Adjusts the timing for starting the next Arpeggio phrase when playing back Arpeggio phrases in multiple Parts.
When set to Off, Arpeggio playback starts when the Part is played on the keyboard.
The value shown here is in clocks. Settings: Off, 60 (thirty-second note), 80 (sixteenth note triplet), 120 (sixteenth note), 160 (eighth note triplet), 240 (eighth note), 320 (quarter note triplet), 480 (quarter note)
Sets the Arpeggio Group for using the same Arpeggio on multiple Parts.
The Parts set in the same Group will have the same Arpeggio settings.
This Indicator is set to On for the Part that is in the same Group as the selected Part.
Enables or disables the Hold function which continues to repeatedly play back the Arpeggio even after you release the key on the keyboard. Settings: Sync-Off, Off, On
Sync-Off: Repeats Arpeggio playback in the background while your fingers release the keys and resumes playback when you press any key on the keyboard.
Off: Plays back the Arpeggio only while any key is being held.
On: Repeats Arpeggio playback even after you release the key on the keyboard.
Sets the timing for changing the Arpeggio type while another Arpeggio phrase is still being played back. You can select Real-time for switching to a new Arpeggio phrase immediately or Measure for switching to a new Arpeggio phrase at the top of the next measure. Settings: Real-time, Measure
Sets the way Arpeggio is played back. Settings: Sort, Thru, Direct, Sort+Drct, Thru+Drct
Sort: Plays back the same Arpeggio regardless of the order of keys played.
Thru: Plays back the Arpeggio differently depending on the order of keys played.
Direct: Does not play back the Arpeggio. Only your keyboard performance will be played. However, this setting allows you to create sound changes through Control Change messages such as pan and brightness, depending on the Arpeggio. As such, it is useful for Arpeggio types that use Control Change or for Arpeggio types included in the Control category.
Sort+Drct: Plays back the Arpeggio according to the Sort setting, as well as the notes played on the keyboard.
Thru+Drct: Plays back the Arpeggio according to the Thru setting, as well as the notes played on the keyboard.
Selects loop (repeat) playback while holding the key on the keyboard, or one-shot playback for the Arpeggio every time you press a key. Settings: Off, On
Sets the Part to play only with the Arpeggio.
Parts set to On will be played by the Note On messages sent for the Arpeggio. Settings: Off, On
Changes the timing of even-numbered beats (backbeats) counted from the value specified in Quantize Value to add a swing feel to the Arpeggio playback.
- +1 and higher: Moved behind the beat.
- -1 and lower: Moved ahead of the beat.
- 0: Does not change the even-numbered beats or add any swing feel.
This setting is useful for creating desired rhythms for playing in swing, shuffle, and bounce feels.
Settings: −120–+120
Sets the percentage for stretching or compressing the Arpeggio playback time.
The subdivision of the beat and the tempo will change when you stretch or compress the playback time, so you can create a completely new feel for the originally selected Arpeggio. Settings: 50%, 66%, 75%, 100%, 133%, 150%, 200%, 266%, 300%, 400%, Common
200%: The playback time is doubled, and the tempo is halved as a result.
100%: The playback time is kept unchanged.
50%: The playback time is halved, and the tempo is doubled as a result.
Common: The value set in the Unit Multiply common to all Parts is applied.
Sets the reference note for using quantize and swing.
The value shown here is in clocks. Settings: Off, 60 (thirty-second note), 80 (sixteenth note triplet), 120 (sixteenth note), 160 (eighth note triplet), 240 (eighth note), 320 (quarter note triplet), 480 (quarter note)
Sets the strength of the quantize setting (or how close the notes are to the reference note set in Quantize Value). A setting of 100% shifts the timing completely to that set in Quantize Value, while a setting of 0% results in no quantization. Settings: 0%–100%
Sets the rate for the Gate Time (or time length for playing the notes) of Arpeggio playback. If the Gate Time is set to the value 0 as a result, the setting will be changed to the value 1. Settings: 0%–200%
Sets the velocity rate of Arpeggio playback. If the Velocity is set to the value 0 as a result, the setting will be changed to a value of 1. When it is set to a value larger than 128, the setting will be changed to a value of 127. Settings: 0%–200%
Sets the velocity range (lowest and highest values) for Arpeggio playback.
When this is set so that the higher value is first and the lower value is second (for example, 93 to 34), the Arpeggio is played only for velocities of 1 to 34 and 93 to 127. Settings: 1–127
Sets the note range (the lowest and the highest notes) for Arpeggio playback.
When the first note specified is higher than the second (for example, C5 to C4), the notes in the ranges C−2 to C4 and C5 to G8 will be played. Settings: C−2–G8
Shifts the pitch of the Arpeggio in octaves. Settings: −10–+0–+10
Shifts the range of the Arpeggio in octaves. Settings: −3–+0–+3
Selects the Arpeggio. Settings: 1–8
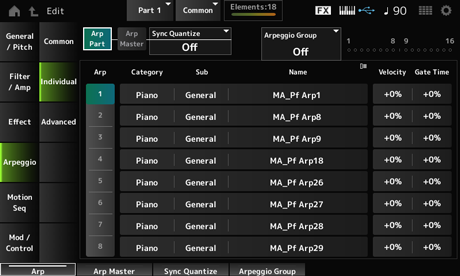
On the Individual screen, you can set the Arpeggio type parameters for Arpeggio Select 1 to 8. Tapping the Arpeggio Type setting calls up the menu. Selecting Search opens the Arpeggio Category Search screen. Selecting Number allows you to specify the Arpeggio Type by number.
- [PERFORMANCE] → Part Common selection → [EDIT/] → Arpeggio → Individual
- (When a selected Part is something other than Common) [SHIFT] + [ARP ON/OFF]
Arp Master (Arpeggio Master Switch)
Sync Quantize (Arpeggio Sync Quantize Value)
Arp Group
Indicator
The same as the Common screen.
Selects the Arpeggio. Settings: 1–8
Shows the Category of the selected Arpeggio. Settings: Refer to the Data List.
Shows the Sub category of the selected Arpeggio. Settings: Refer to the Data List.
Shows the name of the selected Arpeggio. Settings: Refer to the Data List.
Sets the velocity rate of the Arpeggio playback.
If the Velocity is set to the value of 0 as a result, the setting will be changed to a value of 1. When it is set to a value larger than 128, the setting will be changed to a value of 127. Settings: −100%–+100%
Sets the Gate Time (or time length for playing the notes) for Arpeggio playback.
If the Gate Time is set to a value of 0 as a result, the setting will be changed to a value of 1. Settings: −100%–+100%
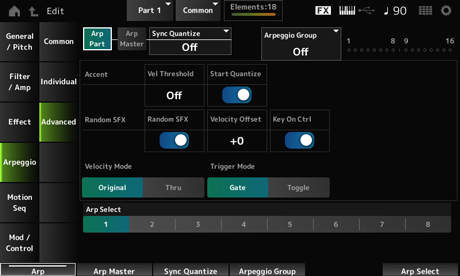
On the Advanced screen, you can set the Arpeggio parameters.
- [PERFORMANCE] → Part Common selection → [EDIT/] → Arpeggio → Advanced
Arp Master (Arpeggio Master Switch)
Sync Quantize (Arpeggio Sync Quantize Value)
Arp Group
Indicator
The same as the Common screen.
Sets the velocity level for triggering an Accent Phrase.
Accent Phrases are sequence phrases that have been programmed to certain types of Arpeggio patterns to be played back only when the keys are played at a fast velocity. Accent Phrases are triggered when the velocity is faster than Accent Vel Threshold (Arpeggio Accent Velocity Threshold).
If the Accent Phrase is not triggered properly, try lowering the Accent Vel Threshold (Arpeggio Accent Velocity Threshold) value.Settings: Off, 1–127
For more information on the Arpeggio types that support this function, refer to the Data List.
Sets the Accent Phrase to be triggered when a key is pressed at the velocity value larger than the Accent Vel Threshold (Arpeggio Accent Velocity Threshold) (set to On) or triggered at the timing set in the selected Arpeggio type (set to Off). Settings: Off, On
Enables the Random SFX function.
The Random SFX function triggers special sounds included in some Arpeggio types. There are various types of special sounds you can use. For example, you can use this function to add guitar fret noises when you release your finger from the key. Settings: Off, On
For more information on the Arpeggio types that support this function, refer to the Data List.
Sets the velocity value for triggering special sounds for the Random SFX function. Settings: −64–+0–+63
Sets special sounds to be triggered by the velocity level for pressing keys or by the velocity level automatically set. Settings: Off, On
Sets the velocity for playing back the Arpeggio. Settings: Original, Thru
Original: Follows the velocity level set in the Arpeggio Type.
Thru: Follows the velocity level of the keystroke.
Sets the Trigger Mode to the Gate setting that starts and stops the Arpeggio playback by pressing a key, or to the Toggle setting that alternates start and stop by pressing a key. Settings: Gate, Toggle
Changes the Arpeggio selection. Settings: 1–8
On the Common screen, you can set the Motion Sequencer parameters for the entire Part.
- [PERFORMANCE] → Part Common selection → [EDIT/] → Motion Seq → Common
- (When a selected Part is something other than Common) [SHIFT] + [MSEQ ON/OFF]
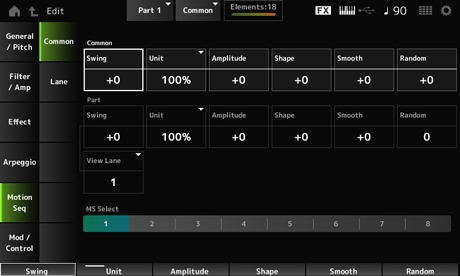
Sets the swing value of the Arpeggio and Motion Sequencer for the Performance.
This is specified as an offset value to the Part Swing. Settings: −120–+120
Sets the percentage for stretching or compressing the Arpeggio and Motion Sequencer playback time for the entire Performance.
This parameter is effective on the Lane for which Unit Multiply is set to Common.
The subdivision of the beat and the tempo will change when you stretch or compress playback time, so you can create a completely new feel for the Motion Sequence you have originally selected. Settings: 50%–400%
200%: The playback time is doubled, and the tempo is halved as a result.
100%: The playback time is kept unchanged.
50%: The playback time is halved, and the tempo is doubled as a result.
Sets the Motion Sequencer Amplitude for the entire Performance.
This is specified as an offset value to the Motion Sequencer Amplitude for the Part.
Amplitude here is the degree of changes to the Motion Sequence.
This parameter value offsets the Amplitude of the Lanes within the Performance if MS FX is set to On for the lane. Settings: −127–+127
Sets the Motion Sequencer Pulse Shape for the Performance.
This is specified as an offset value to the Motion Sequencer Pulse Shape for the Part.
This parameter changes the shape of the step curve that makes up the sequence.
This parameter value offsets the parameters for the Lanes within the Performance if the MS FX is set to On for the lane and Control is set to On. Settings: −100–+100
Sets the Motion Sequencer Smoothness for the Performance.
This is specified as an offset value to the Motion Sequencer Smoothness for the Part.
Smoothness here is the smoothness of the changes in the sequence over time.
This parameter value offsets the Smoothness of the Lanes within the Performance if the MS FX is set to On for the lane. Settings: −127–+127
Sets the Motion Sequencer Randomness for the Performance.
This is specified as an offset value to the Motion Sequencer Randomness for the Part.
This parameter indicates the randomness of changes in the step value of the sequence.
This parameter value offsets the Randomness of the Lanes within the Performance if the MS FX is set to On for the lane. Settings: −127–+127
Changes the timing of the even-numbered beats (backbeats) counted from the value specified in MS Grid to add a swing feel to the Motion Sequencer playback.
- +1 and higher: Moved behind the beat.
- -1 and lower: Moved ahead of the beat.
- 0: Does not change the even-numbered beats or add any swing feel.
This setting is useful for creating desired rhythms for playing swing, shuffle, and bounce feels.
Settings: −120–+120
Sets the percentage for stretching or compressing the Arpeggio playback time for the Part.
The parameter setting is effective when the Unit Multiply of each Lane is set to Arp. Settings: 50%–400%, Common
200%: The playback time is doubled, and the tempo is halved as a result.
100%: The playback time is kept unchanged.
50%: The playback time is halved, and the tempo is doubled as a result.
Common: The value set in the Unit Multiply common to all Parts is applied.
Sets the Motion Sequencer Amplitude for the Part.
This is specified as an offset value to the Motion Sequencer Amplitude for each Lane.
This parameter value offsets the Amplitude of the Lanes within the Part if the MS FX is set to On for the lane. Settings: −127–+127
Sets the Motion Sequencer Pulse Shape for the Part.
This is specified as an offset value to the Motion Sequencer Step Curve parameter for each Lane.
This parameter value offsets the parameters for the Lanes within the Part if the MS FX is set to On for the lane and Control is set to On. Settings: −100–+100
Sets the Motion Sequencer Smoothness for the Part.
This is specified as an offset value to the Motion Sequencer Smoothness for each Lane.
This parameter value offsets the Smoothness of the Lanes within the Part if MS FX is set to On for the Lane. Settings: −127–+127
Sets the Motion Sequencer Randomness for the Part.
Sets randomness of the changes in the Step value of the sequence. Settings: 0–127
Sets the Motion Seq Lane to show when the View Mode of the Home screen is set to Motion Seq.
Selects the Motion Sequence to playback. Settings: 1–8
On the Lane screen, you can set the parameters for each Motion Sequencer Lane.
- [PERFORMANCE] → Part Common selection → [EDIT/] → Motion Seq → Lane
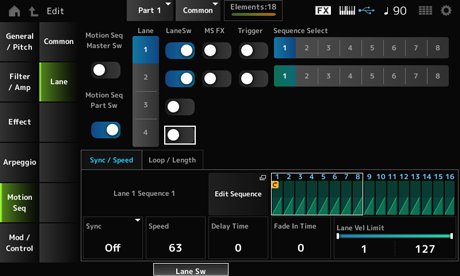
Sets the Motion Sequencer for the entire Performance on or off. Settings: Off, On
Sets the Motion Sequencer of the Part on or off. Settings: Off, On
Selects a Lane. Settings: 1–4
Indicates the Lane and the Sequence.
Opens the Motion Sequence Edit screen.
You can create a sequence of up to 16 steps.
Sets the value for each step in the Motion Sequence.
You can use Control sliders 1 to 8 to change the values for Steps 1 to 8 and Steps 9 to 16, depending on the cursor position. Settings: 0–127
Sets each Lane on or off.
You can use up to four Motion Sequencer lanes in one Part, or up to eight lanes in an entire Performance. When set to Off, the parameters for that lane will not be shown. Settings: Off, On
Sets the selected Lane to receive the signals from the knobs for changing the Motion Sequencer parameters such as Swing and Smooth. Settings: Off, On
Sets the selected Lane to receive the signals from the [MSEQ TRIGGER] button.
When set to On, the Motion Sequence will not be played back unless you press the [MSEQ TRIGGER] button. Settings: Off, On
Changes the Motion Sequence selection. Settings: 1–8
Sets the speed and the timing of the playback of the Motion Sequence set for the Destination in the Control Assign screen. Settings: Off, Tempo, Beat, Arp, Lane1 (when Lanes 2–4 are selected)
Off: Plays back the Lane Motion Sequencer alone.
Tempo: Plays back the Lane Motion Sequencer at the Performance tempo.
Beat: Plays back in sync with the beat.
Arp: Plays back the Lane Motion Sequencer in sync with the top of the Arpeggio playback.
Lane1: Plays back the Lane Motion Sequencer in sync with Lane 1.
Sets the playback speed for the Motion Sequence.
This parameter is available when Lane Motion Sequencer is set to Off. Settings: 0–127
Sets the delay time for starting the playback of the Motion Sequence when Sync is set to Off. Settings: 0–127
Sets the time to reach the maximum amplitude for the Motion Sequence when Sync is set to Off. Settings: 0–127
Sets the percentage for stretching or compressing the Motion Sequencer playback time for the current Lane.
This parameter is available when Lane Motion Sequencer is set to Off or something other than Lane 1. Settings: 50%–6400%, Common, Arp
200%: The playback time is doubled, and the tempo is halved as a result.
100%: The playback time is kept unchanged.
50%: The time length is halved, and the tempo is doubled as a result.
Common: The value set in the Unit Multiply common to all Parts is applied.
Arp: The value set in the Unit Multiply of the Part Arpeggio is applied.
Sets the delay time for starting the playback of the Motion Sequence when Sync is set to something other than Off or Lane1. Settings: 0–32
Sets the time to reach the maximum amplitude for the Motion Sequence when Sync is set to something other than Off. Settings: 0–32
Sets the velocity range (lowest and highest values) for playing back the Motion Sequence of the selected Lane.
This parameter is available when Lane Motion Sequencer is set to something other than Lane 1.
When the Velocity Limit is set to a range from the highest value to the lowest value, the Motion Sequence will be played back in two velocity ranges: from the maximum to the highest value, and from the lowest value to the minimum. Settings: 1–127
Resets the Motion Sequence playback when you press any key on the keyboard.
This parameter is available when Lane Motion Sequencer is set to Arp or something other than Lane 1.
This parameter is not available when Trigger is set to On. Settings: Off, Each-On, 1st-On
Each-On: Each time you play any note, the sequence will be reset and the playback starts from the beginning.
1st-On: Playback starts from the beginning at the first note you play. If the first note is held while a second note is played, the sequence is not reset at the second or any subsequent notes.
Sets the Motion Sequence to loop (repeat) playback or one-shot playback.
This parameter is available when Lane Motion Sequencer is set to something other than Lane 1. Settings: Off, On
Sets the step for starting playback the second time or later when repeating Motion Sequence playback. Settings: 1–Length (Loop Length)
Sets the number of steps in the Motion Sequence. Settings: Loop Start (Lane Loop Start) –16
Sets the length of a step in the Motion Sequence. Settings: 60, 80, 120, 160, 240, 320, 480
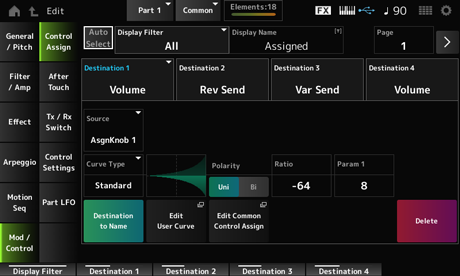
The Control Assign screen lets you set the Controllers for the Part.
By assigning a parameter (Destination) to a controller (Source), you can control the sound in a large variety of ways. You can use physical controllers such as the Pitch Bend wheel and knobs as well as the Motion Sequencer and Envelope Follower.
Up to 32 controllers can be assigned simultaneously to a Part.
- [PERFORMANCE] → Part Common selection → [EDIT/] → Mod/Control → Control Assign
When Display Filter is set to Super Knob, tapping [+] shows the message in the upper area of the display and automatically adds the Control Assign settings for the Common Edit.
When there are no assignable knobs available, [+] will not be shown.
Sets the auto select of the Display Filter on or off.
When set to On, moving the controller you wish to set to Source automatically sets the controller to the Display Filter. Settings: Off, On
Selects the controller for showing the settings on the screen.
When you select Super Knob, all settings having the Super Knob Link set to On will be shown. Settings: PitchBend, ModWheel, AfterTouch, FootCtrl 1, FootCtrl 2, FootSwitch, Ribbon, Breath, AsgnKnob 1–8, Super Knob, AsgnSw 1, AsgnSw 2, MS Lane 1–4, EnvFollow 1–16, EnvFollowAD, EnvFollowMst, All
If the controller set to Display Filter is used by other Parts, the corresponding PART buttons will flash.
This calls up the Pitch settings screen.
The screen shown here is the same as the one opened from [EDIT/![]() ] → General/Pitch → Pitch.
] → General/Pitch → Pitch.
This parameter is not available when Source is set to something other than PitchBend.
This allows you to enter a new name for Knobs 1 to 8 to show on the Sub display.
This parameter is not shown when Source is set to something other than AsgnKnob 1–8.
Opens the Motion Seq → Lane screen for the current Part.
You can create a sequence of up to 16 steps.
This parameter is not available when Source is set to something other than MS Lane 1–4.
Opens the Envelope Follower Edit screen.
This parameter is not available when Source is set to something other than EnvFollow 1–16, EnvFollowAD, or EnvFollowMst.
Selects the next page when there are more than four Destinations. The next page does not appear when the Destinations are four or fewer. Settings: 1–8
Sets the parameter to the Destination. Tapping the [+] icon allows you to add a new Destination.
Sets the controller for controlling the parameters set to the Destination. Settings: PitchBend, ModWheel, Ch. AT, FootCtrl 1, FootCtrl 2, FootSwitch, Ribbon, Breath, AsgnKnob 1–8, AsgnSw 1, AsgnSw 2, MS Lane 1–4, EnvFollow 1–16, EnvFollowAD, EnvFollowMst
You can set the controller setting for each Element on or off.
This parameter is shown only when the selected Destination is related to Elements.
When the Ex Elem Sw on the General/Pitch → Element Settings screen is set to On, you can change the switch number by changing the Display Element.
The actual range of numbers you can use in the switch depends on the value set in Element Count on the General/Pitch → Element Settings screen. Settings: Off, On
Shown only when Ex Elem Sw on the General/Pitch → Element Settings screen is set to On.
You can select a different group of eight elements corresponding to Element Sw.
The actual range of numbers you can use depends on the value set in Element Count on the General/Pitch → Element Settings screen.
For example, up to 25-32 can be used when Element Count is set to 30.
Settings: 1–8, 9–16, ..., 121–128
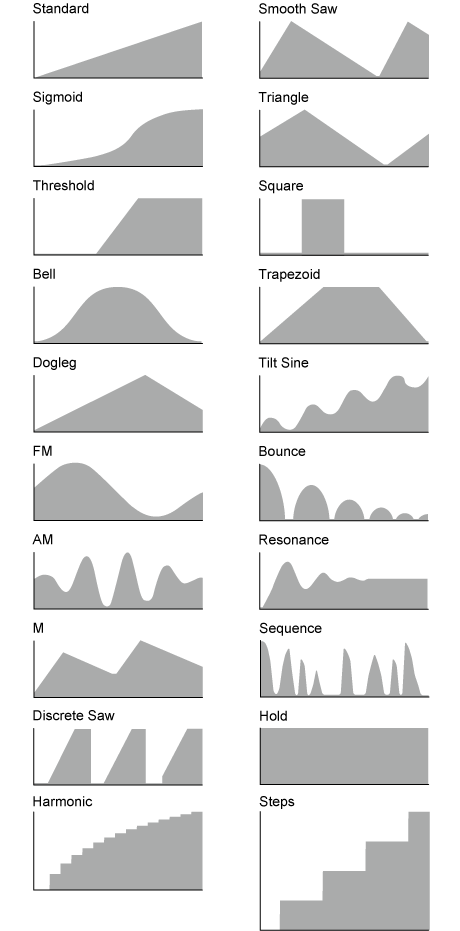
Sets the change curve of the parameter set to Destination.
The horizontal axis represents the controller value set in Source while the vertical axis represents the parameter value set in Destination. Settings: Standard, Sigmoid, Threshold, Bell, Dogleg, FM, AM, M, Discrete Saw, Smooth Saw, Triangle, Square, Trapezoid, Tilt Sine, Bounce, Resonance, Sequence, Hold, Harmonic, Steps, Init Curve 1–32 (when a User bank is selected), Library 1–24 (when a Library file is loaded)
Param 2 (Curve Parameter 2)
Adjusts the curve shape.
This setting may not be available depending on the curve type.
Copies the parameters set to Destination to Display Name.
This parameter is not shown when Source is set to something other than AsgnKnob 1–8.
Opens the User Curve Edit screen.
You can create either an 8-point linear curve or an 8-step curve.
Opens the Control Assign screen for Common Edit.
Deletes the selected Destination.
- [PERFORMANCE] → Part Common selection → [EDIT/] → Mod/Control → After Touch
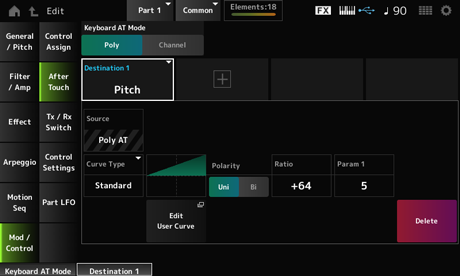
Selects the mode for sending Aftertouch messages from the keyboard to the internal tone generator.
This parameter is set to Channel on the MONTAGE M6 and MONTAGE M7, regardless of the setting here.
Settings: Poly (polyphonic aftertouch), Channel (channel aftertouch)
Sets the parameter for the Destination. Tapping the [+] icon lets you add a new Destination.
Cannot be changed from this screen.
This parameter is fixed to Poly AT.
You can set the controller setting for each Element on or off.
This parameter is shown only when the selected Destination is related to Elements.
When the Ex Elem Sw on the General/Pitch → Element Settings screen is set to On, you can change the switch number by changing the Display Element.
The actual range of numbers you can use in the switch depends on the value set in the Element Count on the General/Pitch → Element Settings screen. Settings: Off, On
Shown only when Ex Elem Sw on the General/Pitch → Element Settings screen is set to On.
You can select a different group of eight elements corresponding to Element Sw.
The actual range of numbers you can use depends on the value set in Element Count on the General/Pitch → Element Settings screen.
For example, up to 25-32 can be used when Element Count is set to 30.
Settings: 1–8, 9–16, ..., 121–128
Sets the change curve of the parameter set to Destination.
The horizontal axis represents the controller value set in Source while the vertical axis represents the parameter value set in Destination.
Settings: Standard, Sigmoid, Threshold, Bell, Dogleg, FM, AM, M, Discrete Saw, Smooth Saw, Triangle, Square, Trapezoid, Tilt Sine, Bounce, Resonance, Sequence, Hold, Harmonic, Steps, Init Curve 1–32 (when a User bank is selected), Library 1–8 (when a Library file is loaded)
Sets the polarity of the curve set in Curve Type. Settings: Uni, Bi
Uni: Parameter changes occur only within the positive range or the negative range according to the curve shape.
Bi: Parameter changes occur both in positive and negative ranges according to the curve shape.
Sets the ratio of the parameter values. Settings: −64–+63
Opens the User Curve Edit screen.
You can create an 8-point linear curve or an 8-step curve.
Deletes the current Destination.
On the Tx/Rx Switch screen, you can set the switch for transmitting or receiving MIDI messages (such as Control Change) on or off.
When CC (Control Change) is set to Off, the parameters related to Control Change messages cannot be set.
- [PERFORMANCE] → Part Common selection → [EDIT/] → Mod/Control → Tx/Rx Switch
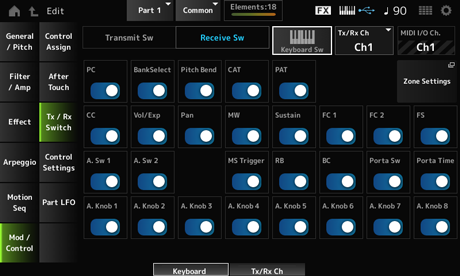
Shows the transmit switch.
This parameter is available only when Part Mode is set to External or when Keyboard Sw is set to Off.
This parameter is available only when Part Mode is set to Internal.
Keyboard Control is used for selecting Parts to be played on the keyboard.
When Keyboard Control is set to On, you can simultaneously play Parts having Keyboard Control set to On, if the Part is set to Common or Keyboard Control for the Part is set to On.
When Keyboard Control is set to Off, you can play the Part on the keyboard only when that Part is selected. Settings: Off, On
Sets the channel for transmitting and receiving MIDI messages when Part Mode is set to Internal. Settings: Ch1–Ch16, Off
Shows the channel for transmitting and receiving MIDI messages.
Sets the channel for receiving MIDI messages when Part Mode is set to External.
This calls up the Zone settings screen.
The screen shown here is the same as the one opened from [EDIT/![]() ] → General/Pitch → Zone Settings.
] → General/Pitch → Zone Settings.
Sets the transmission and reception of Program Change messages on or off. Settings: Off, On
Sets the transmission and reception of Bank Select MSB and LSB messages on or off.
This parameter is not available when CC (Control Change) is set to Off. Settings: Off, On
Sets the transmission and reception of MIDI Pitch Bend messages on or off. Settings: Off, On
Sets the transmission and reception of Channel Aftertouch on or off. Settings: Off, On
Sets the transmission and reception of Polyphonic Aftertouch on or off. Settings: Off, On
Sets the transmission and reception of Control Change messages on or off. Settings: Off, On
Sets the transmission and reception of the Volume setting on or off.
This parameter is not available when CC (Control Change) is set to Off. Settings: Off, On
Sets the transmission and reception of the Pan setting on or off.
This parameter is not available when CC (Control Change) is set to Off. Settings: Off, On
Sets the transmission and reception of MIDI Modulation wheel messages on or off.
This parameter is not available when CC (Control Change) is set to Off. Settings: Off, On
Sets the transmission and reception of MIDI Sustain and Sostenuto messages on or off.
This parameter is not available when CC (Control Change) is set to Off. Settings: Off, On
FC2 (Foot Controller 2)
Sets the transmission and reception of MIDI messages for the separately sold foot controllers on or off.
This parameter is not available when CC (Control Change) is set to Off. Settings: Off, On
Sets the transmission and reception of MIDI messages for the separately sold foot switch on or off.
This parameter is not available when CC (Control Change) is set to Off. Settings: Off, On
A. Sw 2 (Assignable Function Switch 2)
Sets the transmission and reception of MIDI messages for the [ASSIGN 1] and [ASSIGN 2] buttons on or off.
This parameter is not available when CC (Control Change) is set to Off. Settings: Off, On
Sets the transmission and reception of MIDI messages for the [MSEQ TRIGGER] button on or off.
This parameter is not available when CC (Control Change) is set to Off. Settings: Off, On
Sets the transmission and reception of MIDI Ribbon Controller messages on or off.
This parameter is not available when CC (Control Change) is set to Off. Settings: Off, On
Sets the transmission and reception of MIDI Breath Controller messages on or off.
This parameter is not available when CC (Control Change) is set to Off. Settings: Off, On
Sets the transmission and reception of MIDI messages for the [PORTAMENTO] button on or off.
This parameter is not available when CC (Control Change) is set to Off. Settings: Off, On
Sets the transmission and reception of MIDI messages for the PORTAMENTO [TIME] knob on or off.
This parameter is not available when CC (Control Change) is set to Off. Settings: Off, On
Sets the transmission and reception of MIDI messages for Knobs 1 to 8 on or off.
This parameter is not available when CC (Control Change) is set to Off. Settings: Off, On
- [PERFORMANCE] → Part Common selection → [EDIT/] → Mod/Control → Control Settings
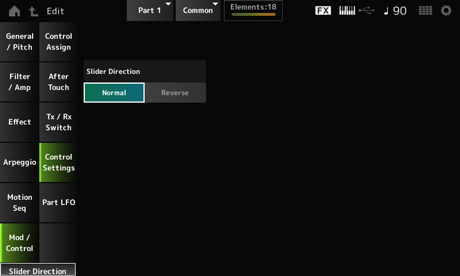
Sets the direction of the Control sliders 1 to 8 for this Part when the slider mode is set to ELEM/OP/OSC.
When set to Reverse, the volume controls on the screen will change to organ sliders. The organ sliders will be shown when you select a Part and set the View Mode to Part Info. Settings: Normal (up from the bottom), Reverse (down from the top)
The Part LFO screen lets you make settings for the Part LFO.
- [PERFORMANCE] → Part Common selection → [EDIT/] → Mod/Control → Part LFO
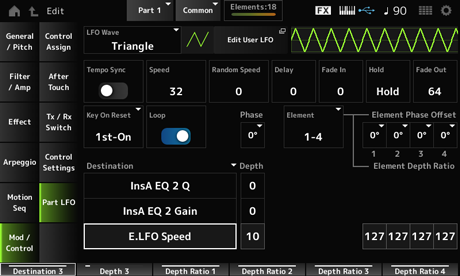
Selects the LFO Wave and sets the type of cyclical changes to the LFOs. Settings: Triangle, Triangle+, Saw Up, Saw Down, Squ1/4, Squ1/3, Square, Squ2/3, Squ3/4, Trapezoid, S/H1, S/H2, User
Opens the User LFO Edit screen.
You can create an LFO waveform of up to 16 steps.
Sets the speed of the LFO Wave changes to synchronize to Arpeggio or Song playback. Settings: Off (not synchronized), On (synchronized)
Sets the speed of LFO Wave changes.
This parameter is not available when Tempo Sync is set to On. Settings: 0–63
Changes the LFO Speed randomly.
This parameter is not available when Tempo Sync is set to On. Settings: 0–127
This parameter is available when Tempo Sync is set to On. You can sync the speed of changes in LFO Wave by using musical note values. Settings: 1/16 (sixteenth notes), 1/8 Tri. (eighth-note triplets), 1/16 Dot. (dotted sixteenth notes), 1/8 (eighth notes), 1/4 Tri. (quarter-note triplets), 1/8 Dot. (dotted eighth notes), 1/4 (quarter notes), 1/2 Tri. (half-note triplets), 1/4 Dot. (dotted quarter notes), 1/2 (half notes), Whole Tri. (whole-note triplets), 1/2 Dot. (dotted half notes), 1/4 × 4 (quarter-note quadruplets; four quarter notes to the beat), 1/4 × 5 quarter-note quintuplets; five quarter notes to the beat), 1/4 × 6 (quarter-note sextuplets; six quarter notes to the beat), 1/4 × 7 (quarter-note septuplets; seven quarter notes to the beat), 1/4 × 8 (quarter-note octuplets; eight quarter notes to the beat), 1/4 × 16 (sixteen quarter-notes to the beat), 1/4 × 32 (32 quarter notes to the beat), 1/4 × 64 (64 quarter notes to the beat)
Sets the delay time between the moment you press a key on the keyboard and the moment the LFO comes into effect.
The larger the value, the longer the delay time, or the time that elapses before the LFO comes into effect. Settings: 0–127
Sets the amount of time for the LFO effect to fade in after the delay time set in Delay (LFO Delay Time) has elapsed. Settings: 0–127
The larger the value, the longer it takes for the LFO effect to reach the maximum.
0: LFO changes to the maximum value without any fade-in.
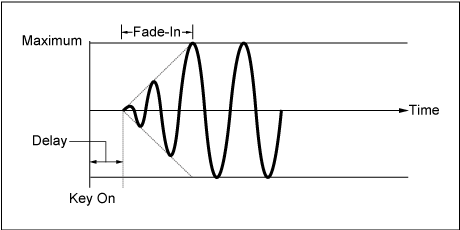
Low value: Fast fade-in
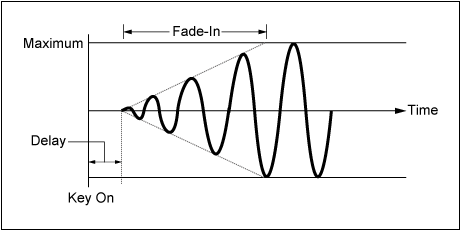
High value: Slow fade-in
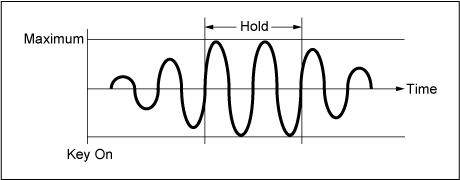
Sets the time for maintaining the LFO effect after the maximum level had been reached. Settings: 0–126, Hold
Hold: Does not fade out
Sets the amount of time for the LFO effect to fade out after the hold time set in Hold (LFO Hold Time) has elapsed.
The larger the value, the longer it takes for the LFO effect to fade out.Settings: 0–127
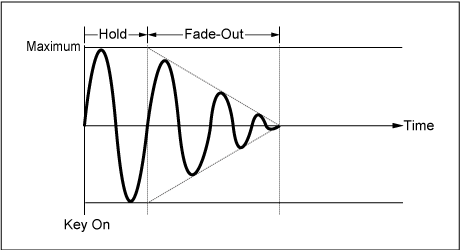
Low value: Fast fade-out
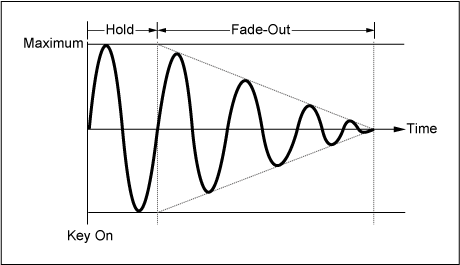
High value: Slow fade-out
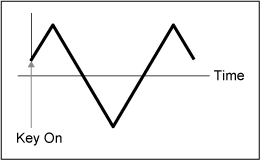
Resets the oscillation of the LFO when a key is pressed. Settings: Off, Each-on, 1st-on
Does not reset the oscillation of the LFO. Pressing a key starts the LFO wave at whatever phase the LFO happens to be at that moment.
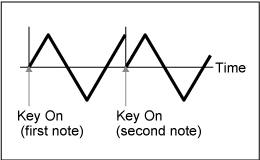
Resets the oscillation of the LFO every time a key is pressed and starts the waveform at the phase specified by the Phase parameter.
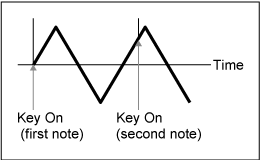
Resets the oscillation of the LFO every time a key is pressed and starts the waveform at the phase specified by the Phase parameter.
When a second note is played while the first note is held, playback will not be reset.
Sets the LFO Wave to loop (repeat) playback or one-shot playback. Settings: Off, On
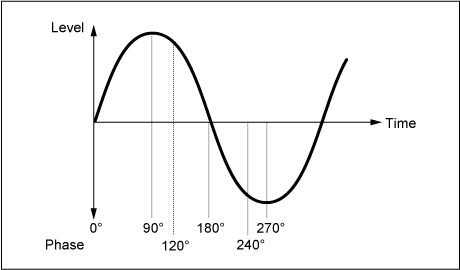
You can set the initial phase for the time LFO Wave is reset. Settings: 0°, 90°, 120°, 180°, 240°, 270°
Sets the offset value to Phase for each Element.Settings: 0°, 90°, 120°, 180°, 240°, 270°
Shown only when Ex Elem Sw on the General/Pitch → Element Settings screen is set to On.
You can select a different number for the group of four elements corresponding to the Element Phase Offset and Element Depth Ratio.
The actual range of numbers you can use depends on the value set in Element Count on the General/Pitch → Element Settings screen.
For example, up to 25-32 can be used when Element Count is set to 30.
Settings: 1–8, 9–16, ..., 121–128
This is specified as an offset value to the Phase (LFO Phase) for each Element.
You can set the initial phase for each Element when LFO Wave is reset.
When the Ex Elem Sw on the General/Pitch → Element Settings screen is set to On, you can change the element number by changing the Display Element.
The actual range of numbers you can use for Element Phase Offset depends on the value set in Element Count on the General/Pitch → Element Settings screen.
Sets the function to be controlled by the LFO Wave. Settings: Insertion Effect A Parameter 1–24, Insertion Effect B Parameter 1–24, Level, Pitch, Cutoff, Resonance, Pan, E.LFO Speed
Sets the depth of the LFO Wave control for each Destination. Settings: 0–127
Adjusts the Depth for each Element.
Set this parameter to Off to turn off the LFO.
This parameter is shown only when the selected Destination is related to Elements.
When the Ex Elem Sw on the General/Pitch → Element Settings screen is set to On, you can change the element number set to Depth by changing the Display Element.
The actual range of numbers you can use for the Depth depends on the value set in Element Count on the General/Pitch → Element Settings screen. Settings: Off, 0–127
Opens the setting screen for User LFO.
You can create an LFO waveform of up to 16 steps.
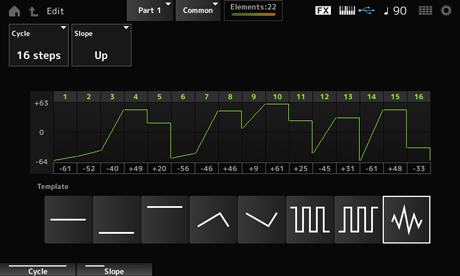
Sets the number of LFO steps. Settings: 2 steps, 3 steps, 4 steps, 6 steps, 8 steps, 12 steps, 16 steps
Sets the changes to the slope of the waveform currently shown on the screen. Settings: Off (no slope), Up, Down, Up&Down
Sets the value for each step. Settings: −64–+63
Selects the template for the LFO waveform.
 Print this page